1. Introduction
The Avaya 9611G IP Deskphone is designed to enhance productivity and communication efficiency in a professional environment. It delivers high-definition audio for clear conversations and features an easy-to-read, high-resolution color display. This manual provides comprehensive instructions for setting up, operating, and maintaining your Avaya 9611G IP Deskphone.
Key features include:
- 2.8" x 2.1" Color display with 8 buttons featuring dual LEDs.
- Easy management of contacts, numbers, call history, and messages.
- Support for Bluetooth headsets and local or centralized electrical power.
- Integrated speakerphone and headset options.
- Compatibility with expansion modules for enhanced functionality.
- Power over Ethernet (PoE) design with sleep mode for energy efficiency.
- Integrated Gigabit Ethernet and USB interface support.
2. Product Overview
Below is an image of the Avaya 9611G IP Deskphone, highlighting its main components.
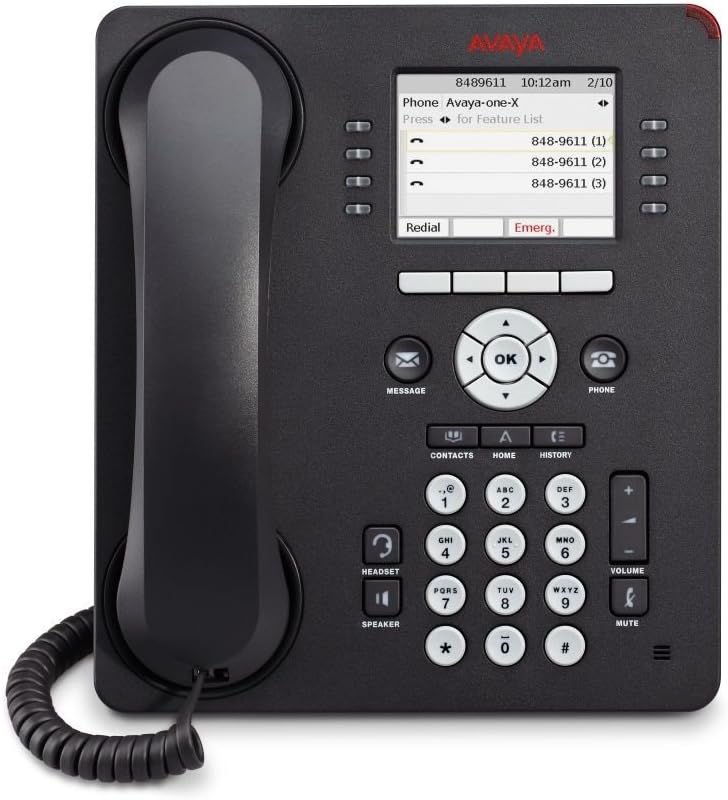
Figure 2.1: Avaya 9611G IP Deskphone. This image shows the full front view of the black Avaya 9611G IP Deskphone. Key visible components include the handset, the color display screen showing call information, a central navigation cluster with an 'OK' button, a standard numeric keypad, dedicated buttons for message, phone, contacts, home, history, headset, speaker, volume control, and mute. There are also programmable feature buttons on either side of the display.
3. Setup
3.1 Package Contents
Before you begin, ensure all components are present:
- Avaya 9611G IP Deskphone unit
- Handset and coiled cord
- Desk stand (if not pre-attached)
- Ethernet cable
- Power adapter (if not using Power over Ethernet - PoE)
3.2 Connecting the Phone
- Connect the Handset: Plug one end of the coiled cord into the handset and the other end into the handset port on the phone base (usually marked with a handset icon).
- Connect to Network (PoE): If your network supports Power over Ethernet (PoE), connect one end of the Ethernet cable to the "LAN" port on the back of the phone and the other end to a PoE-enabled network switch or router. The phone will power on automatically.
- Connect to Network (Non-PoE): If not using PoE, first connect the power adapter to the phone's power port and then to a power outlet. Then, connect one end of the Ethernet cable to the "LAN" port on the back of the phone and the other end to your network switch or router.
- Connect to PC (Optional): If you wish to connect a computer through the phone, connect an Ethernet cable from your PC to the "PC" port on the back of the phone.
- Initial Boot-up: Allow the phone to boot up. It may take a few minutes to connect to the network and register with your communication system. The display will show progress and eventually indicate readiness for use.
4. Operating Instructions
4.1 Making and Receiving Calls
- To Make a Call: Lift the handset, press the Speaker button, or press the Headset button. Dial the number using the keypad.
- To Answer a Call: Lift the handset, press the Speaker button, or press the Headset button when the phone rings.
- To End a Call: Replace the handset, press the Speaker button again, or press the Headset button again.
4.2 Using Softkeys and Navigation
The softkeys located directly below the display change function based on the current context. Use the navigation cluster (up, down, left, right arrows, and OK button) to navigate menus and select options on the screen.
4.3 Managing Contacts and Call History
- Contacts: Press the CONTACTS button to access your phone's contact list. Use the navigation arrows to scroll and the OK button to select.
- Call History: Press the HISTORY button to view recent incoming, outgoing, and missed calls.
- Messages: Press the MESSAGE button to access your voicemail or message center.
4.4 Volume Control and Mute
- Volume: Use the VOLUME up/down buttons to adjust the volume of the ringer, handset, speakerphone, or headset during a call.
- Mute: Press the MUTE button to mute your microphone during a call. Press it again to unmute.
5. Maintenance
Proper maintenance ensures the longevity and optimal performance of your Avaya 9611G IP Deskphone.
- Cleaning: Use a soft, dry, lint-free cloth to clean the phone's surface and display. For stubborn marks, slightly dampen the cloth with water. Avoid using harsh chemicals, abrasive cleaners, or aerosol sprays directly on the phone.
- Environment: Keep the phone in a clean, dry environment, away from direct sunlight, excessive heat, and moisture.
- Cords: Periodically check all connected cords for any signs of wear or damage. Replace if necessary.
6. Troubleshooting
This section addresses common issues you might encounter with your Avaya 9611G IP Deskphone.
| Problem | Possible Cause | Solution |
|---|---|---|
| Phone does not power on. | No power from PoE or power adapter. | Ensure Ethernet cable is securely connected to a PoE-enabled port, or that the power adapter is correctly plugged into the phone and a working power outlet. |
| No dial tone. | Network connectivity issue or phone not registered. | Check Ethernet cable connection. Verify network status. If issue persists, contact your system administrator. |
| Cannot hear caller / Caller cannot hear me. | Volume too low, mute activated, or faulty handset/headset. | Adjust volume using the VOLUME buttons. Check if the MUTE button is illuminated. Ensure handset/headset is properly connected. |
| Display is blank or frozen. | Software glitch or power issue. | Perform a power cycle: Disconnect the Ethernet cable (and power adapter if used), wait 10 seconds, then reconnect. |
7. Specifications
| Feature | Detail |
|---|---|
| Product Dimensions | 1 x 1 x 1 inches |
| Item Weight | 2.2 pounds |
| Model Number | 700480593 |
| Brand | Avaya |
| Color | Black |
| Telephone Type | Corded |
| Material | Plastic |
| Power Source | Corded Electric (PoE compatible) |
| First Available Date | March 19, 2011 |
8. Warranty and Support
For warranty information and technical support, please refer to the documentation provided with your purchase or contact your Avaya authorized reseller or system administrator. You can also visit the official Avaya website for further assistance and resources.
Note: This manual provides general guidance. Specific features and configurations may vary based on your organization's communication system setup.