Black+Decker BDEDMT
BLACK+DECKER BDEDMT 3/8-inch 4 Amp Corded Electric Drill User Manual
1. Introduction
Thank you for choosing the BLACK+DECKER BDEDMT 3/8-inch 4 Amp Corded Electric Drill. This manual provides essential information for the safe operation, maintenance, and troubleshooting of your new tool. Please read this manual thoroughly before first use and keep it for future reference.
2. General Safety Instructions
Always follow basic safety precautions to reduce the risk of fire, electric shock, and personal injury. Keep your work area clean and well-lit. Do not operate power tools in explosive atmospheres, such as in the presence of flammable liquids, gases, or dust. Always wear appropriate personal protective equipment, including safety glasses, hearing protection, and gloves. Ensure the power cord is in good condition and avoid accidental starting. Disconnect the plug from the power source before making any adjustments, changing accessories, or storing the tool.
3. Product Overview
The BLACK+DECKER BDEDMT is a versatile 3/8-inch 4 Amp corded electric drill designed for various drilling and driving tasks. Its compact and lightweight design enhances maneuverability, while the MATRIX Quick Connect system allows for tool-free attachment changes.
Key Features:
- MATRIX Quick Connect System: Enables tool-free changes between various attachments, expanding the drill's functionality.
- Powerful 4 Amp Motor: Provides sufficient power for a wide range of applications and accessories.
- Compact and Lightweight Design: Facilitates drilling and driving in confined spaces with ease.
- 11-Position Clutch: Offers an extra level of control to help prevent stripping screws and overdriving.

Image 3.1: Front view of the BLACK+DECKER BDEDMT 3/8-inch 4 Amp Corded Electric Drill, highlighting its compact design.
4. Setup and Assembly
Attaching/Detaching MATRIX Attachments:
The BDEDMT drill utilizes the MATRIX Quick Connect system for easy attachment changes. Ensure the tool is unplugged before changing any attachments.
- To Detach: Grip the main body of the drill with one hand and the attachment with the other. Press the release buttons located on the sides of the drill body (if present, or twist as indicated by the attachment design) and pull the attachment straight off.
- To Attach: Align the attachment with the drill's front housing. Push the attachment firmly onto the drill until it clicks securely into place. Ensure it is fully seated and cannot be easily pulled off.

Image 4.1: Hands demonstrating the detachment of a MATRIX drill/driver attachment from the main power unit.

Image 4.2: Hands demonstrating the attachment of a MATRIX drill/driver attachment to the main power unit.
Inserting Drill Bits/Driver Bits:
For the drill/driver attachment, ensure the chuck is open, insert the bit, and tighten the chuck securely by hand. For other attachments, follow their specific instructions.
5. Operating Instructions
Powering On/Off:
To turn the drill on, press the trigger switch. To turn it off, release the trigger switch. The drill is corded and requires a constant power supply.
Clutch Settings:
The 11-position clutch allows you to adjust the torque output. Rotate the clutch collar to select the desired setting. Lower numbers are for driving small screws or into soft materials, while higher numbers are for driving larger screws or into harder materials. The drill icon setting is for drilling applications, providing maximum torque.
Drilling and Driving Techniques:
- Always hold the drill firmly with both hands, if possible, to maintain control.
- Apply steady, even pressure. Do not force the drill.
- For drilling, start with a slow speed to create a pilot hole, then increase speed as needed.
- For driving screws, select an appropriate clutch setting to prevent overdriving or stripping the screw head.
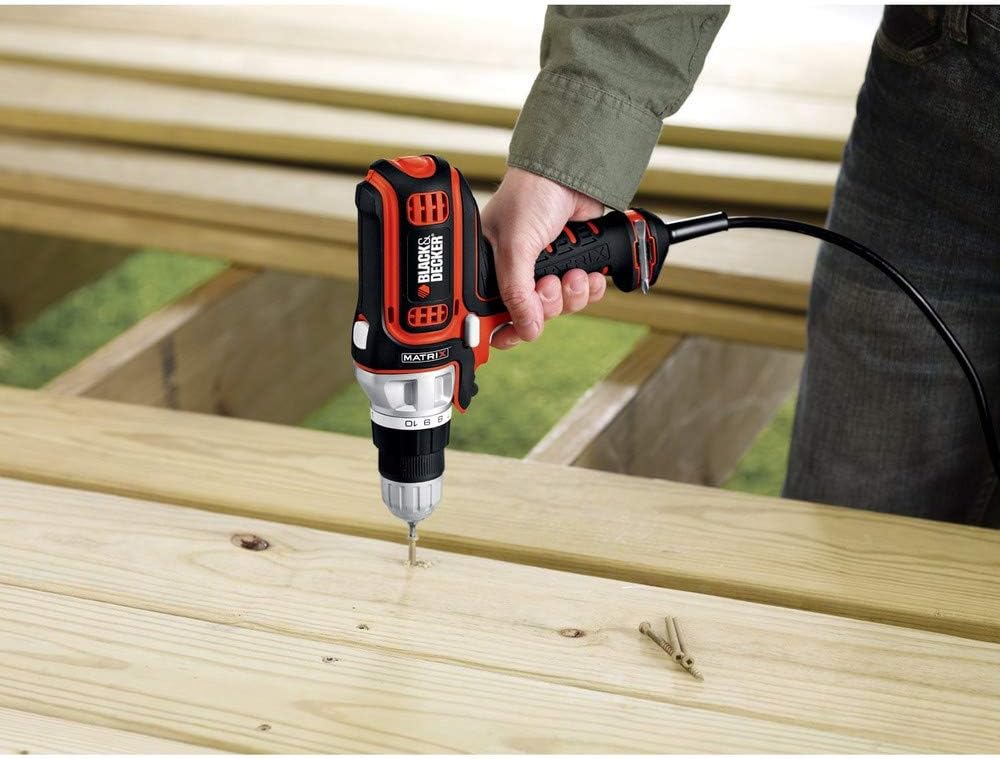
Image 5.1: A user demonstrating drilling into a wooden board, showcasing the drill's application in woodworking.

Image 5.2: A user demonstrating drilling into a wall, highlighting the drill's use for home improvement tasks.

Image 5.3: A user drilling a larger diameter hole into a wooden beam, illustrating the drill's capability for more demanding tasks.
6. Maintenance
Cleaning:
Regularly clean the ventilation slots on the drill to prevent overheating. Use a soft brush or dry cloth to remove dust and debris. Do not use water or chemical cleaners. Keep the chuck clean and free of debris for optimal bit gripping.
Storage:
Store the drill in a dry, secure location out of reach of children. Ensure the power cord is neatly coiled and not kinked. Protect the tool from direct sunlight and extreme temperatures.
7. Troubleshooting
| Problem | Possible Cause | Solution |
|---|---|---|
| Drill does not start | No power supply; Faulty power cord; Trigger switch issue | Check power outlet and cord; Ensure trigger is fully depressed; Contact service center if problem persists. |
| Loss of power during operation | Overload; Loose connection | Reduce load; Check power cord connection; Allow tool to cool down. |
| Bit slips in chuck | Chuck not tightened properly; Dirty chuck jaws | Retighten chuck securely; Clean chuck jaws. |
| Screws are stripped or overdriven | Incorrect clutch setting | Adjust clutch to a lower setting for softer materials or smaller screws. |
8. Specifications
| Feature | Specification |
|---|---|
| Model | BDEDMT |
| Power Source | Corded Electric |
| Voltage | 120 Volts |
| Amperage | 4 Amperes |
| Chuck Size | 3/8 inch |
| Clutch Positions | 11 |
| Max Torque | 128 Inch-Pounds |
| Weight | 3.31 Pounds (approx. 1.5 kg) |
| Dimensions (L x W x H) | 10.5 x 3 x 10.88 inches (approx. 26.67 x 7.62 x 27.62 cm) |
| Special Features | Compact, MATRIX Quick Connect System |
9. Warranty and Support
BLACK+DECKER products are manufactured to high-quality standards. For detailed warranty information, please refer to the warranty card included with your product or visit the official BLACK+DECKER website. For technical support, replacement parts, or service, please contact BLACK+DECKER customer service through their official channels. Keep your proof of purchase for warranty claims.
For further assistance, please visit the official Black+Decker Store.