1. Introduction
Thank you for choosing the Crescent 11-Inch Nail Puller Pliers, Model NP11. This tool is engineered for efficient and effective removal of various fasteners, including finishing nails, floor staples, wire or coaxial staples, headed nails, brads, damaged fasteners, and pin nails. Its robust design and ergonomic features ensure reliable performance for a wide range of tasks.
2. Safety Information
- Always wear appropriate personal protective equipment, such as safety glasses, to protect against flying debris.
- Ensure a stable grip on the tool and the workpiece to prevent slippage and injury.
- Do not use the pliers for tasks beyond their intended design, such as cutting hardened steel or live electrical wires.
- Keep hands and fingers clear of the jaws during operation.
- Store the tool in a dry, secure place, out of reach of children.
3. Product Overview
The Crescent NP11 Nail Puller Pliers feature a forged steel head and handles, providing exceptional durability. The dual-handle design and integrated roll bar facilitate smooth, low-effort nail extraction. The black-oxide finish on the handles helps resist corrosion, ensuring longevity.

Figure 1: Crescent 11-Inch Nail Puller Pliers NP11. This image shows the overall design of the pliers with red handles and a black head, highlighting its robust construction.
4. Setup
The Crescent NP11 Nail Puller Pliers require no assembly. Before first use, inspect the tool for any signs of damage or manufacturing defects. Ensure the jaws open and close smoothly. Clean any protective coatings or debris from the tool before use.
5. Operating Instructions
These pliers are designed for efficient nail and staple removal with minimal effort and damage to the workpiece.
5.1. General Nail Removal
- Position the Jaws: Open the pliers and position the serrated jaws around the head or shaft of the nail/fastener. Ensure a firm grip.
- Leverage with Roll Bar: Place the curved roll bar of the pliers against the surface of the material from which the nail is being extracted.
- Apply Pressure: Squeeze the handles firmly to secure the nail. Then, roll the pliers using the curved head as a fulcrum. This action provides significant leverage, allowing the nail to be pulled out smoothly.
- Complete Extraction: Continue rolling until the nail is fully extracted. For longer nails, you may need to reposition the jaws closer to the material surface and repeat the rolling motion.

Figure 2: Demonstrating the use of Crescent Nail Puller Pliers to extract a nail from a wooden board. The image shows a hand gripping the pliers, with the roll bar leveraged against the wood for efficient pulling.
5.2. Removing Nails from Studs or Tight Spaces
The design allows for effective removal even in confined areas.
- Access: For nails in studs or between materials, position the pliers to grip the exposed portion of the nail.
- Leverage: Use the roll bar against the adjacent surface or the stud itself to gain leverage.
- Extract: Apply pressure and roll the pliers to pull the nail. The narrow profile of the jaws allows access where other tools might not fit.

Figure 3: The pliers are shown extracting a nail from a wooden stud, demonstrating their utility in construction and demolition tasks. The user wears gloves for protection.
5.3. Removing Nails from Flooring
When removing nails from flooring, care should be taken to minimize damage to the surface.
- Protect Surface: If the flooring is delicate, place a thin piece of scrap wood or a protective pad under the roll bar to prevent marring the surface.
- Grip and Roll: Grip the nail as close to the surface as possible and use the rolling action to pull it out.
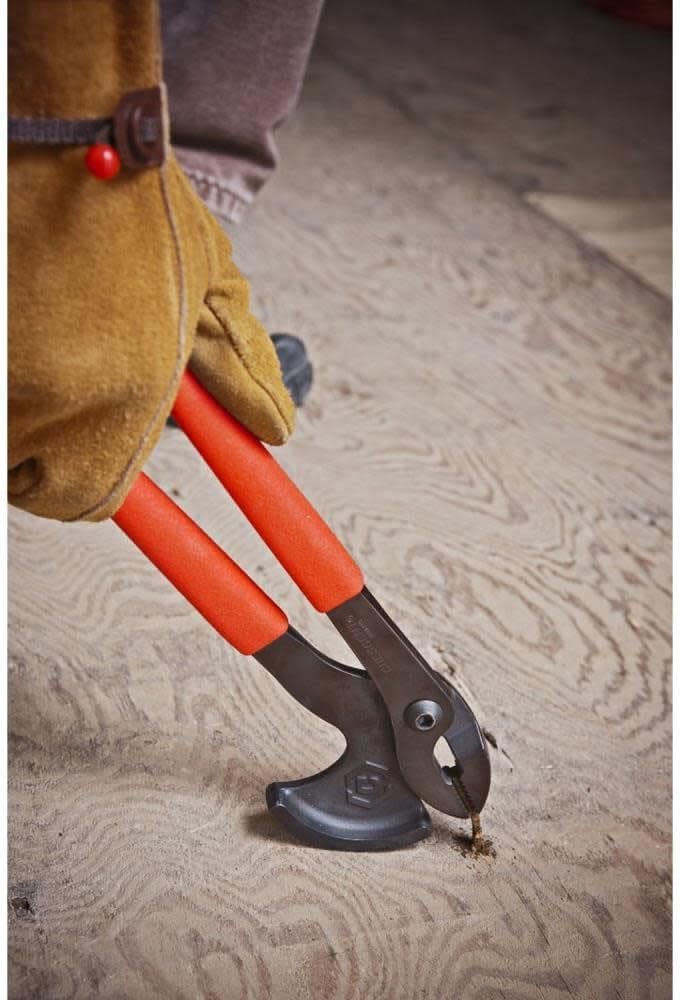
Figure 4: A close-up of the pliers removing a nail from a wooden floor, illustrating the precision and leverage provided by the tool. The user wears gloves for protection.
5.4. Official Product Videos
Crescent 11" Nail Puller Pliers - NP11
Video 1: This official product video demonstrates the key features and effective use of the Crescent 11-Inch Nail Puller Pliers NP11 for various nail removal tasks.
Crescent NP11 Nail Pulling Pliers
Video 2: An official demonstration showcasing the functionality and ease of use of the Crescent NP11 Nail Pulling Pliers for different applications.
6. Maintenance
- Cleaning: After each use, wipe the pliers clean of any dust, debris, or moisture. A damp cloth can be used, followed by thorough drying.
- Lubrication: Periodically apply a light coat of machine oil to the pivot point to ensure smooth operation and prevent rust.
- Storage: Store the pliers in a dry environment to prevent corrosion. Avoid storing in areas with high humidity or extreme temperature fluctuations.
- Inspection: Regularly inspect the jaws for wear or damage. If the jaws become excessively worn or misaligned, the tool's effectiveness may be reduced.
7. Troubleshooting
7.1. Nail Slipping from Jaws
- Cause: Insufficient grip on the nail or worn jaws.
- Solution: Ensure the jaws are positioned as close to the material surface as possible for maximum grip. Apply firm pressure to the handles. If jaws are worn, consider replacing the tool.
7.2. Difficulty Rolling the Pliers
- Cause: Excessive friction or improper leverage.
- Solution: Ensure the roll bar is making good contact with the surface. For very stubborn nails, apply steady, increasing pressure rather than sudden force. Check the pivot point for rust and lubricate if necessary.
7.3. Damage to Workpiece Surface
- Cause: Roll bar directly contacting a soft or finished surface.
- Solution: Always place a protective material (e.g., thin scrap wood, cardboard, or a cloth) under the roll bar when working on delicate surfaces to prevent dents or scratches.
8. Specifications
| Feature | Detail |
|---|---|
| Brand | Crescent |
| Model Number | NP11 |
| Product Dimensions | 11"L x 3.25"W |
| Material | Forged Steel (Head), Polyvinyl Chloride (PVC) (Handle) |
| Color | Red/Black |
| Item Weight | 1 Pound |
| Grip Type | Ergonomic |
9. Warranty and Support
This Crescent tool comes with a manufacturer's warranty. For specific warranty details, please refer to the documentation included with your purchase or visit the official Crescent Tools website. For technical support, replacement parts, or any inquiries, please contact Crescent customer service through their official channels.
Online Support: Visit www.crescenttool.com for product information and support resources.


