Introduction
Thank you for choosing the Fissler Vitaquick Pressure Cooker. This 2.7-quart stainless steel pressure cooker is designed for efficient and safe cooking on various stovetops, including induction, gas, and electric. Its removable dishwasher-safe parts ensure easy cleaning. Please read this manual thoroughly before first use to ensure proper operation and maintenance.

Image: The Fissler Vitaquick Pressure Cooker, a 2.7-quart stainless steel pot with a black handle and lid.
Important Safety Instructions
When using your pressure cooker, basic safety precautions should always be followed.
- Read all instructions carefully before operating the appliance.
- Do not touch hot surfaces. Use handles or knobs.
- Close supervision is necessary when the pressure cooker is used near children.
- Do not place the pressure cooker in a heated oven.
- Exercise extreme caution when moving a pressure cooker containing hot liquids.
- Do not use the pressure cooker for purposes other than its intended use.
- This appliance cooks under pressure. Improper use may result in scalding injury. Make certain unit is properly closed before operating.
- Never force open the pressure cooker. Ensure the internal pressure is completely released before opening.
- Do not fill the unit over 2/3 full. When cooking foods that expand during cooking, such as rice or dried vegetables, do not fill the unit over 1/3 full.
- Ensure the pressure release devices are not obstructed before use.
- Always check the gasket and valves for proper placement and condition before each use.
Product Components
Your Fissler Vitaquick Pressure Cooker consists of the following main components:
- Pressure Cooker Pot: Stainless steel body with Superthermic Floor.
- Lid: Features the main handle, locking mechanism, and pressure indicator.
- Main Handle: Ergonomically designed for safe handling, removable for cleaning.
- Locking Indicator: Visual and audible cue for secure lid closure.
- Pressure Valve/Control Valve: Regulates internal pressure.
- Gasket: Ensures an airtight seal between the lid and the pot.
- Separate Glass Lid: For conventional cooking when not using pressure.
Setup and First Use
- Unpacking: Carefully remove all packaging materials and inspect the pressure cooker for any damage.
- Initial Cleaning: Before first use, wash the pot, lid, and gasket thoroughly with warm soapy water. Rinse well and dry completely. The removable handle can be detached for easier cleaning.
- Gasket Placement: Ensure the gasket is correctly seated inside the lid rim, forming a tight seal.
- Handle Attachment: If the handle was removed for cleaning, reattach it securely according to the instructions provided in the separate assembly guide (if applicable).
Operating Instructions
1. Filling the Pressure Cooker
- Add food and liquid to the pressure cooker.
- Do not fill the pot more than two-thirds (2/3) full.
- For foods that expand (e.g., rice, beans, grains), do not fill more than one-third (1/3) full.
- Always ensure there is at least 1 cup (250ml) of liquid in the pot to generate steam.
2. Closing the Lid
- Align the lid with the pot. The lid has a "CLOSE" marking that should align with a corresponding mark on the pot handle.
- Rotate the lid handle clockwise until it locks into place.
- The locking indicator on the handle will turn green, and you will hear an audible "Click" when the lid is securely closed.

Image: A close-up of the pressure cooker lid showing the "CLOSE" indicator and a red arrow guiding the alignment for proper closure.
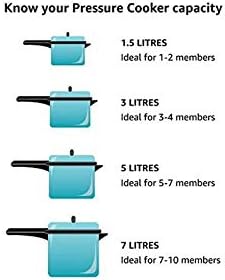
Image: A red curved arrow illustrates the rotational movement required to securely lock the pressure cooker lid.

Image: The pressure cooker handle displaying a green locking indicator and a "Click" graphic, confirming the lid is securely fastened.
3. Building Pressure
- Place the pressure cooker on a suitable stovetop burner (induction, gas, electric).
- Set the heat to high. The pressure indicator on the lid will begin to rise.
- Once the desired pressure level is reached (indicated by rings on the pressure valve, typically 1 or 2 rings visible), reduce the heat to maintain that pressure.
- Begin timing your recipe once the desired pressure is reached and heat is adjusted.

Image: A close-up of the pressure cooker lid, highlighting the blue button used for pressure release.
4. Releasing Pressure
There are generally two methods for releasing pressure:
- Natural Release: Remove the pressure cooker from heat and allow the pressure to dissipate naturally. This is suitable for foods that benefit from continued cooking, like stews or grains. The pressure indicator will drop on its own.
- Quick Release: For foods that require precise cooking times, you can manually release pressure. Press the blue button on the lid to release steam. Direct the steam away from your face and hands. Do not use quick release for foamy foods or large quantities of liquid.
5. Opening the Lid
- Only open the lid once the pressure indicator has fully dropped and the green locking indicator is no longer visible.
- Rotate the lid handle counter-clockwise to unlock and remove the lid.
- Always open the lid away from your face to avoid residual steam.
Maintenance and Cleaning
- Daily Cleaning: After each use, wash the pot and lid with warm soapy water. The pot is dishwasher safe.
- Lid Cleaning: The lid, including the handle and valve components, should be cleaned carefully. The handle is removable for thorough cleaning. Refer to the product's specific instructions for detaching and reattaching the handle.
- Gasket: Remove the gasket from the lid and wash it separately. Ensure it is clean and free of food particles. Allow it to dry completely before reinserting. Inspect the gasket regularly for cracks or damage and replace if necessary.
- Valves: Ensure all pressure release valves and safety valves are clear of food debris. Use a small brush or toothpick if needed.
- Storage: Store the pressure cooker with the lid inverted or slightly ajar to prevent odors and allow air circulation.
Troubleshooting
| Problem | Possible Cause | Solution |
|---|---|---|
| Pressure not building or steam leaking from lid. | Lid not closed properly, gasket improperly seated or damaged, food debris blocking seal, insufficient liquid. | Ensure lid is securely locked (green indicator visible). Check gasket for proper placement and damage; replace if necessary. Clean lid rim and gasket. Add more liquid. |
| Lid cannot be opened after cooking. | Residual pressure inside the cooker. | Do not force open. Ensure pressure indicator has fully dropped. If it hasn't, release remaining pressure using the quick release method or allow more time for natural release. |
| Food burning at the bottom. | Too little liquid, heat too high, cooking time too long. | Always use sufficient liquid. Reduce heat once pressure is reached. Adjust cooking time according to recipe. |
| Pressure indicator not rising. | Lid not sealed, insufficient heat, faulty valve. | Check lid seal. Increase heat. Inspect pressure valve for blockages or damage. |
Specifications
- Model Number: FISS-60030002009
- Capacity: 2.7 Quarts
- Material: Stainless Steel
- Finish Type: Stainless Steel
- Item Weight: Approximately 4 Pounds
- Control Method: Touch
- Operation Mode: Manual
- Dishwasher Safe: Yes (Pot and removable parts)
- Compatible Stovetops: Induction, Gas, Electric, Glass Ceramic
- Closure Type: Inner Lid, Outer Lid
- Voltage: 110 Volts (Note: This specification is typically for electric appliances; this is a stovetop model.)

Image: A diagram illustrating different pressure cooker capacities (1.5, 3, 5, 7 liters) and their ideal serving sizes, for general reference.
Warranty and Support
Warranty: Your Fissler Vitaquick Pressure Cooker comes with a Limited Lifetime Warranty from Fissler. Please retain your proof of purchase for warranty claims. The warranty covers defects in materials and workmanship under normal household use.
Customer Support: For further assistance, questions, or to inquire about replacement parts, please contact Fissler customer service. Refer to the official Fissler website or product packaging for the most current contact information.