Introduction
Thank you for purchasing the Generic Universal 4-Leg Bench Grinder Stand. This manual provides essential information for the safe assembly, operation, and maintenance of your new stand. Please read these instructions carefully before use and retain them for future reference.
Important Note: The bench grinder, buffer, or vise shown in some illustrations is for demonstration purposes only and is NOT included with this stand.
Safety Information
Always follow basic safety precautions when using this product to reduce the risk of personal injury or damage to the stand. This stand is designed to support bench grinders, buffers, or vises within its specified load capacity.
- Ensure the stand is placed on a stable, level surface before mounting any equipment.
- Do not exceed the maximum load capacity of 30 pounds.
- Verify all fasteners are securely tightened before and after each use.
- Keep children and bystanders away from the work area.
- Wear appropriate personal protective equipment (PPE) when operating tools mounted on the stand.
- Inspect the stand for any damage or loose components before each use. Do not use if damaged.
Components Included
The package includes the following components:
- Stand frame components (legs, top plate, tool tray)
- Assembly hardware (bolts, nuts, washers)

Image: The assembled Generic Universal 4-Leg Bench Grinder Stand, showcasing its sturdy metal construction and integrated tool tray.
Assembly Instructions
While the product specifications state "Assembly Required: No", customer feedback indicates that some assembly is typically involved. Please follow these general steps for assembly. If your unit arrives pre-assembled, you may skip this section.
- Unpack Components: Carefully remove all parts from the packaging and lay them out on a clean, flat surface. Verify all hardware is present.
- Attach Legs to Top Plate: Secure the four legs to the top mounting plate using the provided bolts, washers, and nuts. Ensure the legs are oriented correctly to form a stable base. Do not fully tighten bolts yet.
- Install Tool Tray: Position the tool tray between the legs at the desired height. Secure it to the legs using the remaining bolts, washers, and nuts. This tray provides additional stability.
- Final Tightening: Once all components are loosely assembled, place the stand on a level surface. Systematically tighten all bolts securely. Avoid over-tightening.
- Inspect: After assembly, gently shake the stand to ensure it is stable and all connections are firm.

Image: An illustration showing the overall dimensions of the stand: 20 inches (L) x 19 inches (W) x 33 inches (H).
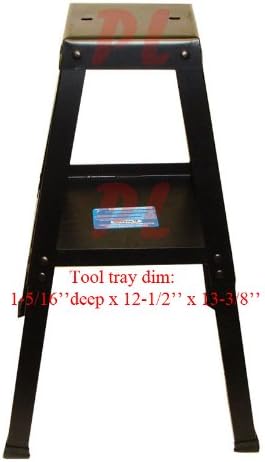
Image: A close-up view detailing the dimensions of the integrated tool tray: 1-5/16 inches deep by 12-1/2 inches x 13-3/8 inches.

Image: A top-down view of the stand's mounting plate, showing its dimensions of 7-7/8 inches x 8-3/4 inches, with bolt hole spacing indicated.
Operating Instructions
- Mounting Equipment: Place your bench grinder, buffer, or vise onto the top plate of the stand. Align the mounting holes of your equipment with the pre-drilled holes on the stand's top plate.
- Secure Equipment: Use appropriate bolts, washers, and nuts (not included with the stand) to securely fasten your equipment to the stand. Ensure all connections are tight to prevent movement during operation.
- Stability Check: Before starting any work, gently test the stability of the mounted equipment and the stand. Ensure there is no wobbling or excessive movement.
- Tool Tray Use: The integrated tool tray can be used to store small tools, accessories, or workpieces, keeping your work area organized.

Image: The Universal 4-Leg Bench Grinder Stand shown with a bench grinder mounted on its top plate. Note: The grinder is not included with the stand.
Maintenance
- Regular Inspection: Periodically inspect the stand for any signs of wear, damage, or loose fasteners.
- Tighten Fasteners: Re-tighten all bolts and nuts as necessary to maintain structural integrity.
- Cleaning: Wipe down the stand with a damp cloth to remove dust and debris. Avoid using harsh chemicals that may damage the finish.
- Storage: Store the stand in a dry environment to prevent rust and corrosion.
Troubleshooting
| Problem | Possible Cause | Solution |
|---|---|---|
| Stand is wobbly or unstable. | Loose assembly bolts; uneven floor surface; equipment not securely mounted. | Ensure all assembly bolts are fully tightened. Move stand to a level surface. Securely fasten equipment to the top plate. |
| Difficulty during assembly. | Misaligned holes; incorrect hardware usage. | Review assembly steps. Ensure components are aligned before tightening. If carriage bolts spin, use pliers to hold the head while tightening the nut. |
| Stand appears damaged. | Shipping damage; improper handling. | Do not use a damaged stand. Contact customer support for assistance. |
Specifications
- Model: Universal 4-Leg Stand
- Material: Metal
- Color: Black
- Overall Dimensions: 20 inches (L) x 19 inches (W) x 33 inches (H)
- Top Plate Dimensions: 7-7/8 inches x 8-3/4 inches
- Tool Tray Dimensions: 1-5/16 inches Deep x 12-1/2 inches x 13-3/8 inches
- Base Size: 18-7/8 inches x 19-3/4 inches
- Item Weight: 18 pounds
- Load Capacity: 30 pounds
Warranty Information
Specific warranty details for Generic products may vary. Please refer to your purchase documentation or contact the retailer for information regarding warranty coverage and claims.
Customer Support
For any questions, missing parts, or assistance with your Generic Universal 4-Leg Bench Grinder Stand, please contact the retailer or manufacturer directly. Have your purchase details and model information ready for faster service.