1. Introduction
This manual provides detailed instructions for the installation, operation, and maintenance of your Soundstream VL-11A Single DIN Digital Media Receiver. Please read this manual thoroughly before using the product to ensure proper operation and to prevent damage.
The Soundstream VL-11A is designed to provide high-quality audio playback from various digital sources, including USB drives, SD cards, and auxiliary input devices. It features a compact single DIN chassis for easy integration into most vehicle dashboards.
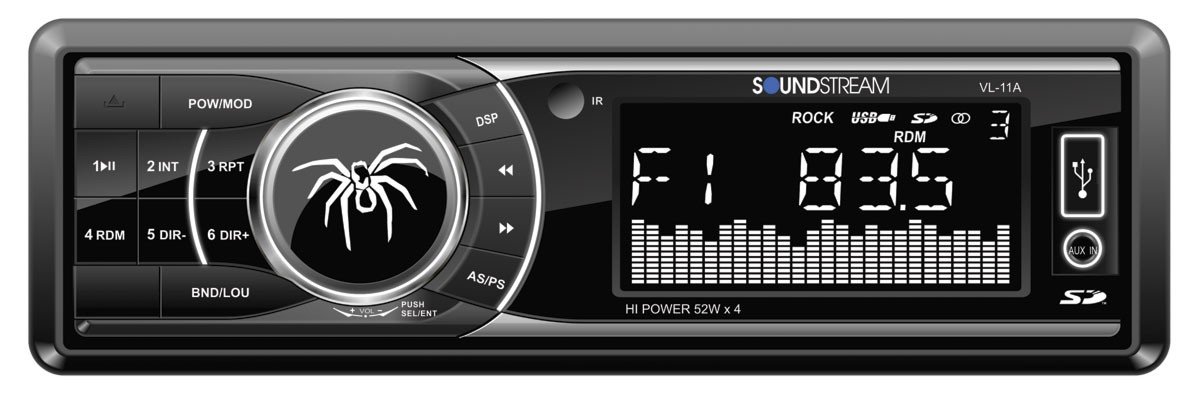
Figure 1.1: Front view of the Soundstream VL-11A Digital Media Receiver. This image displays the main unit with its control buttons and display panel.
2. Safety Information
Observe the following safety precautions to prevent injury or damage to the unit:
- Do not operate the unit in a manner that distracts you from driving. Always prioritize road safety.
- Ensure proper wiring connections. Incorrect wiring can cause fire or damage to the vehicle's electrical system.
- Avoid exposing the unit to moisture or extreme temperatures.
- Do not attempt to disassemble or modify the unit. Refer all servicing to qualified personnel.
- Keep the volume at a level that allows you to hear outside traffic sounds.
3. Package Contents
Verify that all items are present in the package:
- Soundstream VL-11A Digital Media Receiver
- Wiring Harness
- Mounting Hardware (Screws, Mounting Sleeve)
- Remote Control
- User Manual (this document)
4. Product Overview
4.1 Front Panel Controls
The front panel provides access to primary functions and media inputs.
Figure 4.1: Illustrative diagram of the VL-11A front panel. This image highlights the display, volume knob, mode button, track controls, USB port, SD card slot, and auxiliary input.
- Power/Mode Button: Press to turn on/off. Short press to cycle through audio sources (Radio, USB, SD, AUX).
- Volume Knob: Rotate to adjust volume. Press to access audio settings (Bass, Treble, Balance, Fader, EQ).
- Display: Shows current status, track information, and settings.
- USB Port: Connect USB storage devices for media playback.
- SD Card Slot: Insert SD cards for media playback.
- AUX Input: Connect external audio devices via a 3.5mm jack.
- Track/Tune Buttons: Navigate tracks or tune radio frequencies.
4.2 Rear Connections
The rear of the unit contains the main wiring harness and preamp outputs.
Figure 4.2: Illustrative diagram of the VL-11A rear connections. This image shows the main wiring harness connector and the RCA preamp outputs.
- Main Wiring Harness: Connects to vehicle power, ground, accessory, and speaker wires.
- RCA Preamp Outputs: Two sets of 2V outputs for connecting external amplifiers.
5. Setup
5.1 Installation
Professional installation is recommended. If installing yourself, ensure the vehicle's battery is disconnected before beginning.
- Mounting: Insert the metal mounting sleeve into the vehicle's dashboard opening. Bend the tabs to secure it.
- Wiring: Connect the supplied wiring harness to the vehicle's wiring. Match wire colors and functions carefully.
- Speaker Connections: Connect the speaker wires from the harness to your vehicle's speakers. Ensure correct polarity.
- Power Connections: Connect the yellow wire (constant 12V), red wire (switched 12V), and black wire (ground) to the appropriate vehicle circuits.
- Antenna: Connect the vehicle's antenna cable to the unit's antenna input.
- Secure Unit: Slide the VL-11A into the mounting sleeve until it clicks into place.
Warning: Incorrect wiring can cause severe damage to the unit or vehicle. Consult a professional if unsure.
5.2 Initial Power-Up
After installation, reconnect the vehicle's battery. Press the power button on the unit or remote control to turn it on. The display should illuminate.
6. Operating Instructions
6.1 Basic Controls
- Power On/Off: Press the PWR/MODE button.
- Volume Adjustment: Rotate the VOLUME knob.
- Source Selection: Short press the PWR/MODE button to cycle through Radio, USB, SD, and AUX.
6.2 Audio Settings
Press the VOLUME knob to enter the audio menu. Rotate the knob to navigate options and press to select.
- BASS/TREBLE: Adjust bass and treble levels.
- BALANCE: Adjust audio balance between left and right speakers.
- FADER: Adjust audio balance between front and rear speakers.
- EQ (Equalizer): Select from preset EQ curves (e.g., Pop, Rock, Classic) or a custom setting.
6.3 USB/SD Playback
Insert a USB drive into the USB port or an SD card into the SD card slot. The unit will automatically switch to the respective source and begin playback.
- Play/Pause: Press the PLAY/PAUSE button.
- Next/Previous Track: Press the NEXT/PREV buttons.
- Folder Navigation: Use the FOLDER UP/DOWN buttons (if available on remote or unit).
6.4 Auxiliary Input (AUX)
Connect an external audio device (e.g., smartphone, MP3 player) to the 3.5mm AUX input on the front panel using an audio cable. Select AUX as the source using the MODE button.
6.5 Radio Tuner
Select Radio as the source. The unit supports AM/FM bands.
- Band Selection: Press the BAND button to switch between FM1, FM2, FM3, and AM.
- Manual Tuning: Short press the TUNE UP/DOWN buttons to adjust frequency step-by-step.
- Seek Tuning: Long press the TUNE UP/DOWN buttons to automatically seek the next strong station.
- Preset Stations: Press and hold a numbered preset button (1-6) to save the current station. Short press to recall a saved station.
6.6 Remote Control
The included remote control provides convenient access to most functions. Point the remote control towards the unit's front panel sensor.
Figure 6.1: Illustrative diagram of the VL-11A remote control. This image shows the various buttons for power, mode, volume, track control, and numeric presets.
7. Maintenance
7.1 Cleaning the Unit
- Use a soft, dry cloth to wipe the front panel and display.
- Do not use abrasive cleaners, waxes, or solvents.
- Avoid spraying cleaning solutions directly onto the unit.
7.2 General Care
- Ensure proper ventilation around the unit to prevent overheating.
- Avoid placing heavy objects on the unit.
- If the unit is exposed to extreme cold, allow it to warm up before operation to prevent condensation.
8. Troubleshooting
If you encounter issues, refer to the following table before contacting support:
| Problem | Possible Cause | Solution |
|---|---|---|
| No power | Blown fuse; Incorrect wiring; Disconnected battery. | Check vehicle fuses and unit fuse. Verify wiring connections. Ensure battery is connected. |
| No sound | Volume too low; Mute activated; Incorrect speaker wiring; Source not selected. | Increase volume. Deactivate mute. Check speaker connections and polarity. Select correct audio source. |
| USB/SD not playing | Unsupported file format; Corrupt media; Incorrectly inserted device. | Ensure media contains supported audio files (e.g., WMA). Try a different USB/SD. Reinsert device. |
| Radio reception poor | Antenna not connected; Weak signal area. | Check antenna connection. Try tuning to a stronger station. |
| Remote control not working | Dead battery; Obstruction; Not pointing at sensor. | Replace remote battery. Remove obstructions. Ensure direct line of sight to unit's IR sensor. |
9. Specifications
Technical specifications for the Soundstream VL-11A Digital Media Receiver:
- Model: VL-11A
- Brand: Soundstream
- Manufacturer: Soundstream
- Product Dimensions: 22.35 x 20.32 x 9.65 cm
- Item Weight: 771.11 g (1.7 Pounds)
- Audio Wattage: 52 Watts (Max)
- Number of Channels: 4
- Preamp Outputs: 2 Sets of 2V
- Media Format: WMA (and other common digital audio formats)
- Special Features: SD Card Input, USB Input, Auxiliary Input
- Connector Type: Auxiliary, USB, 3.5mm Jack
- Compatible Devices: Speaker
- Control Method: Remote
10. Warranty & Support
Soundstream products are designed and manufactured to the highest quality standards. For specific warranty information, please refer to the warranty card included with your product or visit the official Soundstream website.
For technical support or service inquiries, please contact Soundstream customer service through their official channels. Keep your purchase receipt and product model number (VL-11A) handy when contacting support.


