Introduction
The Thermaltake Frio Extreme Universal CPU Cooler is engineered to provide exceptional cooling performance for high-end processors, supporting thermal design power (TDP) up to 250W. Its unique dual ultra-wide tower design, coupled with dual 140mm VR/PWM fans in a push-pull configuration, maximizes heat dissipation efficiency. This manual provides comprehensive instructions for installation, operation, and maintenance to ensure optimal performance and longevity of your CPU cooler.

Figure 1: The Thermaltake Frio Extreme CPU Cooler, showcasing its dual tower heatsink and two 140mm blue-bladed fans.
Package Contents
Please verify that all components are present in the package before beginning installation.
- Thermaltake Frio Extreme CPU Cooler Assembly (Heatsink with pre-attached heat pipes)
- Two 140mm VR/PWM Fans
- Universal Mounting Kit (for Intel LGA 2011, 1366, 1156, 1155, 775 and AMD AM3+, AM3, AM2+, AM2, FM1 sockets)
- Fan Speed Control Box (VR/PWM)
- Premium Thermal Compound
- Installation Guide (this manual)
Specifications
| Attribute | Value |
|---|---|
| Model Number | CLP0587 |
| Cooling Capacity (TDP) | 250W |
| Fan Dimensions | 140mm x 140mm |
| Fan Speed | 1200 RPM (Normal), up to 1800 RPM (OC Mode) |
| Noise Level | 39 dB (Maximum) |
| Heat Pipes | Six 6mm copper heat pipes |
| Power Connector | 4-Pin |
| Voltage | 12 Volts |
| Compatible Sockets | Intel: LGA 2011, 1366, 1156, 1155, 775; AMD: AM3+, AM3, AM2+, AM2, FM1 |
| Product Dimensions (LxWxH) | 8.75 x 7.5 x 7 inches |
| Item Weight | 3 pounds |
Setup and Installation
Pre-Installation Checklist
- Ensure your computer case has sufficient clearance for the cooler's dimensions (8.75 x 7.5 x 7 inches).
- Verify your motherboard's CPU socket type is compatible with the cooler's universal mounting kit.
- Gather necessary tools: Phillips head screwdriver, cleaning alcohol (for old thermal paste removal).
- Unplug your computer from the power source and open the case.
Installation Steps
- Prepare CPU and Motherboard:
If replacing an existing cooler, carefully remove the old cooler and clean any residual thermal paste from the CPU surface using cleaning alcohol and a lint-free cloth. Ensure the CPU surface is clean and dry.
- Install Backplate (if required):
Depending on your CPU socket, install the appropriate backplate from the universal mounting kit behind the motherboard. Secure it with the provided standoffs.
- Attach Mounting Brackets:
Attach the correct mounting brackets to the CPU cooler's base. These brackets will align with the standoffs or mounting holes on your motherboard.
- Apply Thermal Compound:
Apply a small, pea-sized amount of the included premium thermal compound to the center of the CPU's integrated heat spreader (IHS). Do not spread it manually; the pressure from the cooler will distribute it evenly.
- Mount the Cooler:
Carefully align the cooler's base with the CPU and the mounting holes/standoffs. Gently lower the cooler onto the CPU. Secure the cooler by tightening the screws on the mounting brackets in an alternating X-pattern to ensure even pressure. Do not overtighten.
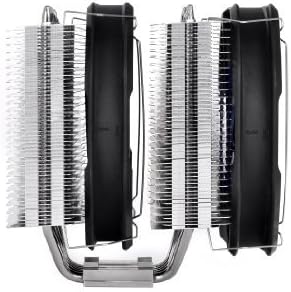
Figure 2: Side profile of the Frio Extreme cooler, illustrating the dual tower heatsink design and fan mounting points. This view is crucial for assessing case and RAM clearance.
- Attach Fans:
Attach the two 140mm fans to the heatsink towers using the provided fan clips. Ensure one fan is positioned to pull air through the first tower and the second fan is positioned to push air through the second tower, creating a push-pull airflow configuration.

Figure 3: Close-up front view of one of the 140mm fans, highlighting its blue blades and the Thermaltake logo. These fans are designed for high airflow and static pressure.
- Connect Fan Cables:
Connect the fan cables to the included fan speed control box. Then, connect the control box to an available 4-pin PWM fan header on your motherboard. The control box allows you to switch between PWM (motherboard controlled) and VR (manual knob controlled) modes.
- Cable Management:
Route fan cables neatly to avoid interference with other components or airflow.
- Close Case and Power On:
Once all connections are secure, close your computer case and reconnect the power. Boot your system and monitor CPU temperatures to confirm proper installation and operation.
Operating Instructions
The Thermaltake Frio Extreme features a versatile fan speed control box, allowing you to optimize cooling performance and noise levels.
- PWM Mode: In this mode, the fan speed is automatically controlled by your motherboard based on CPU temperature. This is the recommended mode for most users as it balances cooling and noise efficiently. Ensure your motherboard's BIOS/UEFI settings are configured for optimal fan control.
- VR Mode: This mode allows for manual adjustment of fan speed using the knob on the control box. Turn the knob to increase or decrease fan RPM. This mode is useful for users who prefer direct control over fan performance, especially during overclocking or when maximum cooling is desired.
For optimal performance, ensure adequate airflow within your computer case. Proper case ventilation complements the CPU cooler's efficiency.
Maintenance
Regular maintenance helps ensure the longevity and optimal performance of your CPU cooler.
- Dust Removal: Periodically (every 3-6 months, or more frequently in dusty environments) clean dust accumulation from the heatsink fins and fan blades. Use compressed air or a soft brush. Ensure fans are not spinning during cleaning to prevent damage to bearings.
- Thermal Paste Check: While not frequently required, if you notice a significant increase in CPU temperatures over time, consider reapplying thermal paste. This involves carefully removing the cooler, cleaning old paste, and applying new paste as per installation steps.
- Fan Inspection: Check fan blades for any obstructions or damage. Ensure fan cables are securely connected.
Troubleshooting
| Issue | Possible Cause | Solution |
|---|---|---|
| High CPU Temperatures | Improper thermal paste application; Loose cooler mounting; Insufficient case airflow; Dust accumulation. | Reapply thermal paste; Re-seat and secure cooler; Improve case ventilation; Clean heatsink and fans. |
| Fans Not Spinning / Noisy Fans | Fan cable disconnected; Fan failure; Obstruction; Incorrect fan speed setting. | Check fan cable connection to control box and motherboard; Remove obstructions; Adjust fan speed via VR knob or BIOS/UEFI settings; Replace fan if faulty. |
| Cooler Does Not Fit Case / Motherboard | Insufficient physical clearance. | Verify case dimensions and motherboard component clearance before purchase. This cooler is large; ensure compatibility. |
Warranty and Support
Thermaltake products are manufactured to the highest quality standards. For information regarding warranty coverage, technical support, or replacement parts, please visit the official Thermaltake website or contact their customer service department. Keep your proof of purchase for warranty claims.
Official Thermaltake Website: www.thermaltake.com