
Peluso 22 47 LE
Peluso 2247 LE Tube Microphone User Manual
Model: 22 47 LE
Introduction
The Peluso 2247 LE is a high-quality, large-diaphragm condenser tube microphone designed for professional audio recording. Inspired by classic microphone designs, it features a German (Telefunken) steel tube and offers 9 selectable polar patterns, making it versatile for various recording applications, particularly vocals.
This manual provides essential information for the proper setup, operation, and maintenance of your Peluso 2247 LE microphone to ensure optimal performance and longevity.
Safety Information
- Power Supply: Always use the dedicated Peluso power supply unit provided with the microphone. Ensure the power supply is connected to a grounded electrical outlet.
- Tube Handling: The microphone contains a vacuum tube which can become hot during operation. Avoid touching the microphone body near the tube area during or immediately after use.
- Moisture: Keep the microphone and power supply away from water or excessive moisture. Do not operate in damp environments.
- Handling: Handle the microphone with care. Avoid dropping or subjecting it to strong impacts, as this can damage the delicate internal components, especially the tube and capsule.
- Ventilation: Ensure adequate ventilation around the power supply unit to prevent overheating.
- Cleaning: Disconnect the power supply before cleaning. Use a soft, dry cloth for cleaning. Do not use liquid cleaners or solvents.
Package Contents
Verify that all items listed below are present in your Peluso 2247 LE package:
- Peluso 2247 LE Tube Microphone
- Dedicated Power Supply Unit
- Shock Mount
- 7-Pin XLR Cable (for connecting mic to power supply)
- AC Power Cable
- Wooden Storage Box for Microphone
- Durable Flight Case for entire kit
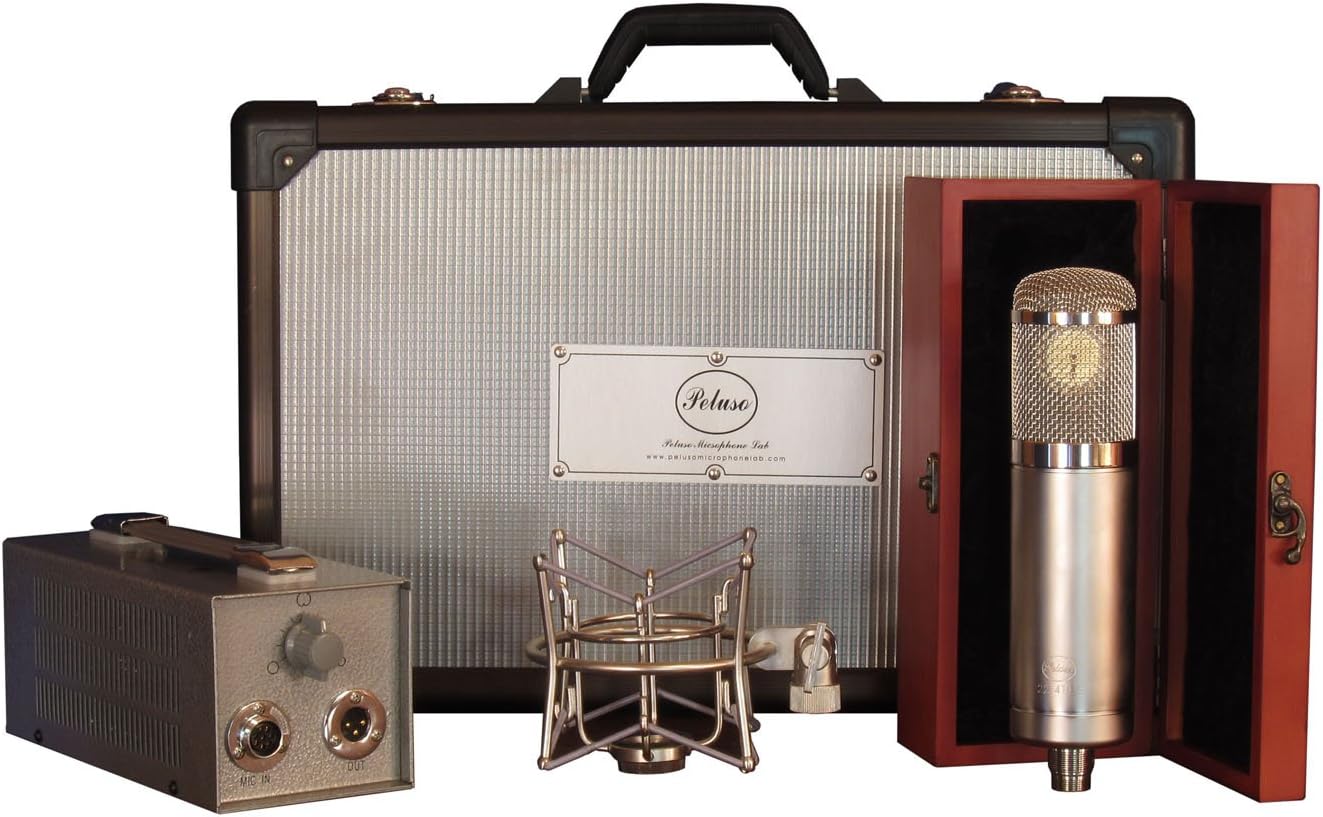
Image: Complete Peluso 2247 LE microphone kit with all components.
Setup
- Mount the Microphone: Carefully remove the Peluso 2247 LE microphone from its wooden storage box. Attach the microphone to the provided shock mount. Ensure it is securely fastened to prevent accidental drops.
- Attach to Stand: Secure the shock mount to a sturdy microphone stand. Adjust the stand to the desired height and position for your recording application.
- Connect Microphone to Power Supply: Connect the 7-pin XLR cable to the corresponding input on the Peluso 2247 LE microphone and the 7-pin output on the dedicated power supply unit. Ensure the connectors are fully seated and locked.
- Connect Power Supply to Audio Interface/Preamp: Connect a standard 3-pin XLR cable from the "Audio Out" on the power supply unit to an XLR input on your audio interface, mixer, or microphone preamplifier.
- Connect Power Supply to Mains: Connect the AC power cable to the power supply unit and then plug it into a grounded electrical outlet.
- Power On: Turn on the power supply unit using the power switch. Allow the microphone approximately 15-30 minutes to warm up for optimal performance and tube stabilization.

Image: Peluso 2247 LE microphone securely attached to its shock mount.
Operating Instructions
The Peluso 2247 LE offers 9 selectable polar patterns, allowing for flexibility in various recording scenarios. The polar pattern selector knob is located on the power supply unit.
Polar Patterns:
- Omnidirectional: Picks up sound equally from all directions. Ideal for capturing room ambiance or multiple sources.
- Cardioid: Most sensitive to sound from the front, rejecting sound from the rear. Best for isolating a single sound source, such as a vocalist.
- Figure-8: Picks up sound equally from the front and rear, rejecting sound from the sides. Useful for recording two vocalists facing each other or for M/S stereo techniques.
- Intermediate Patterns: The 2247 LE also features intermediate patterns between these main three, offering fine-tuned control over the microphone's pickup characteristics. Experiment with these settings to find the best sound for your specific application.
Recording Tips:
- Placement: Microphone placement significantly impacts the recorded sound. Experiment with distance and angle relative to the sound source.
- Proximity Effect: When using cardioid or figure-8 patterns, bass frequencies will increase as the microphone gets closer to the sound source. Use this to your advantage or compensate with EQ.
- Pop Filter: For vocal recordings, always use a pop filter to reduce plosive sounds (P's and B's) and protect the microphone capsule from moisture.
- Gain Staging: Set appropriate gain levels on your audio interface or preamp to avoid clipping (distortion) while ensuring a strong signal.
Maintenance
- Cleaning: Use a soft, dry, lint-free cloth to wipe down the microphone body and power supply. Do not use abrasive cleaners, solvents, or excessive moisture.
- Storage: When not in use, always store the microphone in its wooden box and the entire kit in the provided flight case. This protects it from dust, moisture, and physical damage.
- Tube Life: The vacuum tube has a finite lifespan. While designed for longevity, excessive heat or physical shock can shorten its life. If you notice a degradation in sound quality or unusual noise, the tube may need replacement. This should be performed by a qualified technician.
- Cable Care: Avoid kinking or sharply bending cables. Store them neatly to prevent damage to the internal wiring.
Troubleshooting
| Problem | Possible Cause | Solution |
|---|---|---|
| No Sound Output |
|
|
| Hum or Buzz Noise |
|
|
| Weak or Distorted Sound |
|
|
Specifications
| Feature | Detail |
|---|---|
| Microphone Type | Large Diaphragm Condenser Tube Microphone |
| Model Number | 22 47 LE |
| Polar Patterns | 9 (Omnidirectional, Cardioid, Figure-8, and intermediate patterns) |
| Tube Type | German (Telefunken) Steel Tube |
| Connectivity | XLR (7-pin to power supply, 3-pin from power supply) |
| Signal-to-Noise Ratio | 75 dB |
| Item Weight | 16.72 pounds (total package weight) |
| Material | Alloy Steel |
| Power Source | Corded Electric (via dedicated power supply) |
Warranty and Support
Peluso microphones are built to high standards and come with a manufacturer's warranty covering defects in materials and workmanship. For specific warranty terms and duration, please refer to the warranty card included with your product or visit the official Peluso website.
For technical support, service, or warranty claims, please contact Peluso customer service. Have your model number (22 47 LE) and purchase date ready when contacting support.
Official Website: www.pelusomicrophonelab.com (Note: This is a placeholder URL for demonstration purposes. Please refer to actual product documentation for correct contact information.)
Related Documents - 22 47 LE
 |
The Real Advent Calendar - New 2025 Design Sign-Up Form Sign up for the new 2025 design of The Real Advent Calendar. This form facilitates the collection of names, quantities, and contact details for interested parties. The calendar features a 24-page story-activity book illustrated by Martina Peluso, daily challenges, and supports mums and new babies in African villages. It includes a quote from Alan Titchmarsh and is available from £4.95. |
 |
ACES 2017 Conference: Forging the Future of Professional Counseling Official program for the ACES 2017 conference, held in Chicago, Illinois, October 4-8, 2017. The theme, 'Forging the Future of Professional Counseling,' guided discussions on professional development, advocacy, and advancements in the counseling field, featuring insights from ACES and NBCC leaders. |
 |
BUDDY! The Buddy Holly Story - History Theatre Production Program Official program for History Theatre's production of 'BUDDY! The Buddy Holly Story', running October 1-30, 2022. Explore the life and music of Buddy Holly, read messages from Artistic Director Ron Peluso and the creative team, view the cast and song list, and learn about History Theatre's mission and supporters. |
 |
ProAudio Review 2008 New Gear Guide: Professional Audio Equipment Reviews Explore the latest professional audio gear with ProAudio Review's 2008 New Gear Guide. Featuring in-depth reviews of microphones, amplifiers, interfaces, and studio equipment from leading brands. |
 |
Rights Guide Spring/Summer 2024 - Baum Haus & Community Editions Book Catalog A comprehensive catalog showcasing the Spring/Summer 2024 book releases from Baum Haus and Community Editions, featuring a diverse range of children's books, young adult novels, and non-fiction titles across various age groups and genres. |
 |
Catalogo Libri Illustrati Pane e Sale Scopri il catalogo completo di libri illustrati editi da Pane e Sale, con storie per bambini su amicizia, coraggio, emozioni, diversità e molto altro. |
Ask a question about this manual
Ask about setup, troubleshooting, compatibility, parts, safety, or missing instructions. Manuals+ will review the question and use this page’s manual context to help answer it.