
1. Important Safety Instructions
Always follow basic safety precautions when using this power tool to reduce the risk of fire, electric shock, and personal injury.
- Read all instructions: Before operating the saw, read and understand all safety warnings and instructions.
- Wear eye protection: Always wear safety goggles or safety glasses with side shields.
- Wear hearing protection: Use earplugs or earmuffs during operation.
- Keep work area clean: Cluttered areas invite accidents.
- Do not operate in explosive atmospheres: Do not use power tools in the presence of flammable liquids, gases, or dust.
- Secure workpiece: Always clamp the workpiece firmly to the fence or table.
- Avoid accidental starting: Ensure the switch is in the off-position before plugging in.
- Maintain proper footing and balance: Do not overreach.
- Disconnect power: Unplug the saw before making adjustments, changing accessories, or storing.
2. Product Overview
The Valex trl255ns Radial Miter Saw is a versatile tool designed for precise cuts in various materials. Familiarize yourself with its main components.
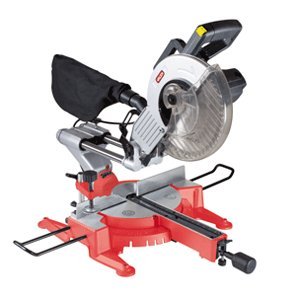
Figure 1: Valex trl255ns Radial Miter Saw. This image shows the overall structure of the miter saw, including the base, motor housing, blade guard, and handle.
Key Components:
- Motor Housing: Contains the motor and drive mechanism.
- Blade Guard: Retracts during cutting to expose the blade and covers it when not in use.
- Handle/Trigger: For operating the saw and controlling the blade.
- Miter Table/Base: The rotating platform for angle adjustments.
- Fence: Supports the workpiece during cutting.
- Workpiece Clamp: Secures the material being cut.
- Radial Slide Rails: Allows the saw head to move forward and backward for wider cuts.
- Bevel Lock: Secures the saw head at a desired bevel angle.
- Miter Lock: Secures the miter table at a desired miter angle.
3. Setup and Assembly
Before first use, ensure the saw is properly assembled and secured.
- Unpacking: Carefully remove all components from the packaging. Check for any damage.
- Mounting the Saw: Securely fasten the miter saw to a stable workbench using bolts through the mounting holes in the base.
- Blade Installation (if not pre-installed):
- Ensure the saw is unplugged.
- Lift the blade guard.
- Press the spindle lock button.
- Use the provided wrench to loosen the blade bolt.
- Install the blade with the teeth pointing downwards towards the front of the saw.
- Tighten the blade bolt securely.
- Dust Bag/Extraction: Attach the dust bag or connect to a dust extraction system for cleaner operation.
- Initial Checks: Verify all bolts and fasteners are tight. Ensure the blade guard moves freely.
4. Operating Instructions
This section details how to perform various cuts with your Valex trl255ns Radial Miter Saw.
4.1. Straight Cuts (Crosscuts)
- Set the miter table to 0 degrees and the bevel angle to 0 degrees.
- Place the workpiece firmly against the fence.
- Secure the workpiece with the clamp.
- Lower the saw head slightly to align the blade with your cut line (without starting the motor).
- Raise the saw head, start the motor, and allow the blade to reach full speed.
- Slowly lower the saw head through the workpiece.
- Once the cut is complete, release the trigger and allow the blade to stop before raising the saw head.
4.2. Miter Cuts (Angled Cuts on Horizontal Plane)
- Loosen the miter lock handle.
- Rotate the miter table to the desired angle (e.g., 15°, 22.5°, 30°, 45°, 60° right, 53° left). Use the preset stops or fine-tune as needed.
- Tighten the miter lock handle securely.
- Proceed with the cut as described for straight cuts, ensuring the workpiece is clamped.
4.3. Bevel Cuts (Angled Cuts on Vertical Plane)
- Loosen the bevel lock.
- Tilt the saw head to the desired bevel angle (0-45°).
- Tighten the bevel lock securely.
- Proceed with the cut as described for straight cuts, ensuring the workpiece is clamped.
4.4. Compound Miter Cuts (Both Miter and Bevel)
For compound cuts, combine the steps for miter and bevel cuts. Set both the miter angle and the bevel angle before making the cut.
- Set the desired miter angle.
- Set the desired bevel angle.
- Secure the workpiece.
- Perform the cut carefully, ensuring smooth and controlled movement.
4.5. Radial Sliding Function
The radial sliding function allows for cutting wider workpieces than a standard miter saw. To use:
- Ensure the saw head is fully pulled towards you (away from the fence).
- Start the motor and allow the blade to reach full speed.
- Slowly push the saw head forward through the workpiece.
- Maintain a steady, controlled pace.
- Once the cut is complete, release the trigger and allow the blade to stop before returning the saw head to its resting position.
5. Maintenance
Regular maintenance ensures optimal performance and extends the life of your miter saw. Always unplug the tool before performing any maintenance.
- Cleaning: After each use, clean dust and debris from the saw, especially around the blade guard, motor vents, and sliding rails. Use compressed air if available.
- Blade Inspection: Regularly check the saw blade for sharpness, cracks, or missing teeth. Replace dull or damaged blades immediately.
- Lubrication: Apply a light coat of machine oil to the radial slide rails periodically to ensure smooth operation.
- Carbon Brushes: Check carbon brushes every few months or if the motor performance decreases. Replace them when they are worn down to approximately 1/4 inch.
- Fasteners: Periodically check all screws and bolts for tightness. Tighten as necessary.
- Power Cord: Inspect the power cord for damage. Do not use the saw if the cord is frayed or cut.
6. Troubleshooting
Refer to this section for common issues and their solutions.
| Problem | Possible Cause | Solution |
|---|---|---|
| Saw does not start | No power supply; Faulty switch; Worn carbon brushes | Check power connection; Test switch; Replace carbon brushes |
| Blade not cutting smoothly or burning wood | Dull blade; Incorrect blade for material; Feeding too fast | Replace or sharpen blade; Use appropriate blade; Reduce feed rate |
| Excessive vibration | Loose blade; Damaged blade; Loose mounting bolts | Tighten blade bolt; Replace blade; Tighten mounting bolts |
| Saw head sticks on radial rails | Dust/debris on rails; Lack of lubrication | Clean rails thoroughly; Apply lubricant to rails |
If the problem persists after attempting these solutions, contact Valex customer support or a qualified service technician.
7. Technical Specifications
- Model: trl255ns
- Brand: Valex
- Product Weight: 4.54 g (Note: This weight seems unusually low for a miter saw, please verify with product packaging.)
- ASIN: B007QMWUJO
- Manufacturer Reference: 281381327207
- Miter Angle: 60° Right / 53° Left (with preset stops at 0°, 15°, 22.5°, 30°, 45°)
- Bevel Angle: 0° - 45°
- Intended Use: Cutting wood, plastic, and foam materials.
8. Warranty and Support
Valex products are manufactured to high-quality standards. For warranty information, service, or technical support, please refer to the warranty card included with your product or visit the official Valex website.
Keep your purchase receipt as proof of purchase for warranty claims.
Contact Information: Please refer to the Valex official website or your local dealer for up-to-date contact details for customer service and support.