1. Important Safeguards
When using electrical appliances, basic safety precautions should always be followed, including the following:
- Read all instructions before operating the appliance.
- Do not touch hot surfaces. Use handles or knobs.
- To protect against electrical shock, do not immerse cord, plugs, or appliance in water or other liquid.
- Close supervision is necessary when any appliance is used by or near children.
- Unplug from outlet when not in use and before cleaning. Allow to cool before putting on or taking off parts.
- Do not operate any appliance with a damaged cord or plug, or after the appliance malfunctions or has been damaged in any manner.
- The use of accessory attachments not recommended by the appliance manufacturer may cause injuries.
- Do not use outdoors.
- Do not let cord hang over edge of table or counter, or touch hot surfaces.
- Do not place on or near a hot gas or electric burner, or in a heated oven.
- Extreme caution must be used when moving an appliance containing hot oil or other hot liquids.
- Always attach plug to appliance first, then plug cord into the wall outlet. To disconnect, turn any control to 'off', then remove plug from wall outlet.
- Do not use appliance for other than intended use.
- Oversize foods or metal utensils must not be inserted in a toaster oven as they may create a fire or risk of electric shock.
- A fire may occur if the toaster oven is covered or touching flammable material, including curtains, draperies, walls, and the like, when in operation.
- Do not place any of the following materials in the oven: paper, cardboard, plastic, or anything similar.
- Do not store any materials, other than manufacturer's recommended accessories, in this oven when not in use.
- Do not cover crumb tray or any part of the oven with metal foil. This will cause overheating of the oven.
2. Product Overview
Familiarize yourself with the components of your Panasonic NT-GT1 Oven Toaster.

Figure 1: Front view of the Panasonic NT-GT1 Oven Toaster. This image shows the compact white exterior, glass door, handle, and control knobs on the right side.
Main Components:
- Temperature Control Knob: Used to select desired cooking temperature or function (Low, Mid, High, Toast).
- Timer Knob: Used to set the cooking duration (up to 15 minutes) and turn the oven ON/OFF.
- Glass Door: Provides visibility into the cooking chamber.
- Handle: For opening and closing the glass door.
- Grill Rack: For toasting bread or grilling items.
- Baking Tray: For baking or collecting drips.
- Crumb Tray: Located at the bottom, removable for easy cleaning.

Figure 2: Close-up view of the control panel. This image highlights the 'Temp' knob with settings for Low, Mid, High, and Toast, and the 'Timer' knob with settings up to 15 minutes and an 'Off' position.
3. Setup
- Unpacking: Carefully remove the oven toaster and all accessories from the packaging. Retain packaging for future storage or transport.
- Placement: Place the oven toaster on a stable, heat-resistant, and level surface. Ensure there is at least 4 inches (10 cm) of clearance on all sides and above the appliance for proper ventilation. Do not place near flammable materials.
- Initial Cleaning: Before first use, wipe the exterior with a damp cloth. Wash the grill rack and baking tray in warm, soapy water, rinse thoroughly, and dry completely.
- First Use (Burn-in): To eliminate any manufacturing odors, operate the empty oven for approximately 10-15 minutes at the 'High' temperature setting. A slight odor or smoke may be present; this is normal and will dissipate. Ensure the area is well-ventilated during this process.
- Power Connection: Plug the power cord into a grounded electrical outlet. Ensure the voltage matches the specifications of your appliance.
4. Operating Instructions
General Operation:
- Place food on the grill rack or baking tray.
- Insert the rack/tray into the oven.
- Close the glass door securely.
- Turn the Temperature Control Knob to the desired setting (Low, Mid, High, Toast).
- Turn the Timer Knob clockwise to the desired cooking time. The oven will begin heating. For times less than 5 minutes, turn the knob past 6 minutes, then back to the desired time for accurate setting.
- A bell will sound when the timer reaches 'Off' and the oven will automatically turn off.
- Carefully remove cooked food using oven mitts.

Figure 3: Interior view of the oven toaster showing the baking tray placed on the grill rack. This setup is suitable for items that may drip or require a flat surface for cooking.
Cooking Guide:
- Toasting Bread: Place bread slices directly on the grill rack. Set the Temperature Control Knob to 'Toast'. Set the Timer Knob to your desired browning level (e.g., 2-4 minutes).
- Baking/Reheating: Place food on the baking tray. Set the Temperature Control Knob to 'Low', 'Mid', or 'High' depending on the recipe. Set the Timer Knob for the required duration.
- Grilling: Place items like sandwiches or small cuts of meat on the grill rack, possibly with the baking tray underneath to catch drips. Set the Temperature Control Knob to 'High' or 'Toast'. Set the Timer Knob for the desired cooking time, monitoring closely to prevent burning.
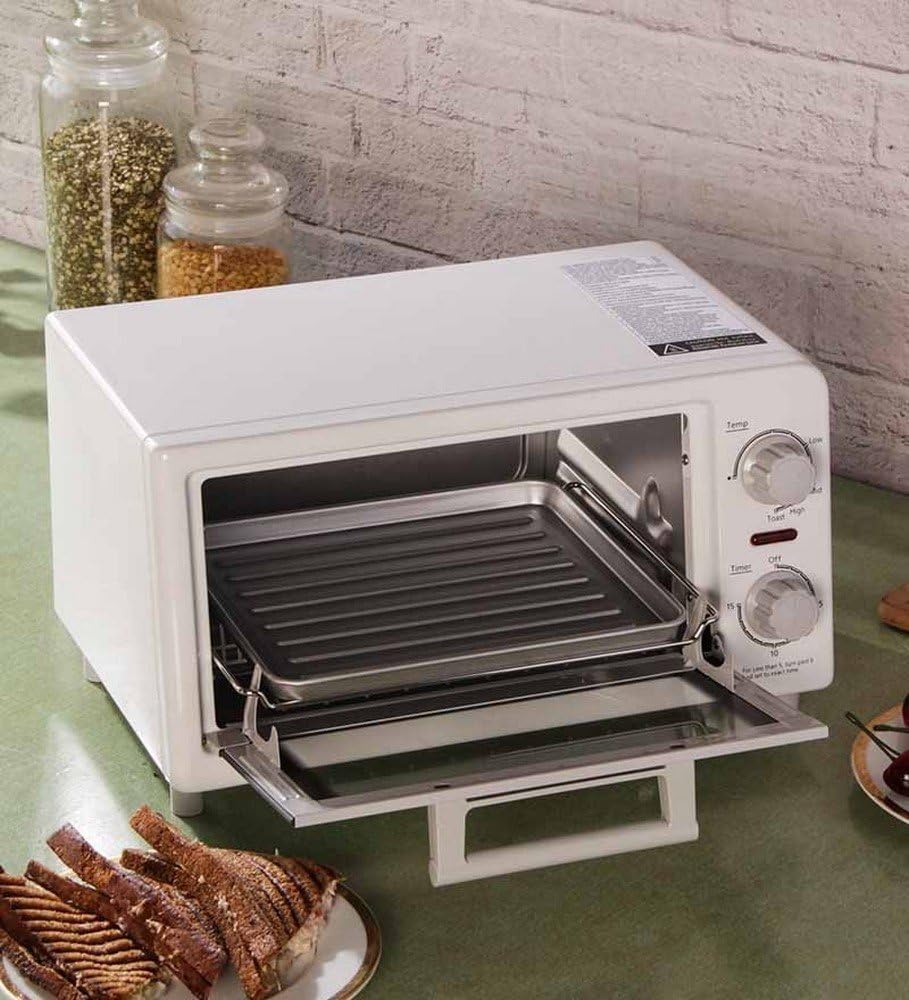
Figure 4: The oven toaster with its door open, revealing the removable grill rack and baking tray. This illustrates how accessories are positioned for various cooking tasks.
Note: Cooking times and temperatures are approximate and may vary based on food type, quantity, and personal preference. Always monitor food during cooking.
5. Cleaning and Maintenance
Regular cleaning ensures optimal performance and extends the life of your oven toaster.
- Always unplug the appliance from the power outlet and allow it to cool completely before cleaning.
- Exterior: Wipe the exterior surfaces with a soft, damp cloth. Do not use abrasive cleaners or scouring pads, as they may damage the finish.
- Interior: Wipe the interior walls with a damp cloth. For stubborn stains, a mild detergent can be used, but ensure all soap residue is wiped away.
- Grill Rack and Baking Tray: These accessories can be washed in warm, soapy water. Rinse thoroughly and dry completely before returning to the oven. They are not dishwasher safe.
- Crumb Tray: Pull out the crumb tray from the bottom of the oven. Discard crumbs and wash the tray in warm, soapy water. Rinse and dry thoroughly before reinserting. Clean regularly to prevent grease buildup and potential fire hazards.
- Heating Elements: Do not attempt to clean the heating elements. If food particles are stuck, gently brush them off when the oven is cold.
- Storage: When not in use, store the oven toaster in a clean, dry place.
6. Troubleshooting
Before contacting customer service, please refer to the following common issues and solutions:
| Problem | Possible Cause | Solution |
|---|---|---|
| Oven does not turn on. | Not plugged in. Power outlet not working. Timer not set. | Ensure power cord is securely plugged in. Check if the outlet is functional. Turn the Timer Knob clockwise to set a cooking time. |
| Food is not cooking evenly. | Incorrect temperature setting. Food placed incorrectly. | Adjust temperature setting as needed. Ensure food is centered on the rack/tray. Preheat oven if necessary for certain recipes. |
| Smoke or unusual odor during operation. | Food residue on heating elements. First use burn-in. | Unplug and allow to cool. Clean interior and crumb tray. If it's the first use, this is normal and will subside. Ensure good ventilation. |
| Timer bell does not sound. | Timer mechanism issue. | If the oven still turns off, the bell mechanism might be faulty. Contact customer support if this is a concern. |
7. Specifications
| Feature | Detail |
|---|---|
| Brand | Panasonic |
| Model Number | NT-GT1 |
| Capacity | 9 Liters |
| Wattage | 1200 watts |
| Finish Type | Non-stick |
| Item Weight | 9.4 Pounds |
8. Warranty and Support
For warranty information and customer support, please refer to the warranty card included with your product or visit the official Panasonic website for your region. Keep your purchase receipt as proof of purchase for any warranty claims.