Wildgame Innovations WGI-WGIPU0022
WILDGAME INNOVATIONS Trophy Hunter 6V Analog Feeder Kit Instruction Manual
Model: WGI-WGIPU0022
1. Introduction
The Wildgame Innovations Trophy Hunter 6V Analog Feeder Kit is designed to provide a reliable and programmable feeding solution for game. This kit includes a power control unit, an analog timer, and necessary hardware for installation, allowing for customized feeding schedules to attract and manage wildlife.
2. Safety Information
Always refer to the product packaging for specific safety warnings and precautions. Ensure all electrical connections are secure and protected from the elements to prevent malfunction or injury.
3. Package Contents
Verify that all components are present before beginning installation:
- Power Control Unit (PCU)
- Analog Timer Unit
- Motor
- Spinner Plate
- Drop Funnel (2-inch)
- Mounting Hardware (bolts, flange nuts, washers, sheet metal screws)
- Wiring Harness

Figure 3.1: All components included in the Wildgame Innovations Trophy Hunter 6V Analog Feeder Kit.
4. Setup and Installation
The feeder kit is designed for easy plug-and-play operation. Follow these steps for proper installation:
- Prepare the Feeder Housing: Ensure the feeder housing (not included) is clean and ready for attachment of the power control unit.
- Install the Drop Funnel: Secure the 2-inch drop funnel to the bottom of your feeder container using appropriate fasteners. This directs feed to the spinner plate.
- Mount the Power Control Unit: Attach the power control unit to the feeder housing using the provided mounting hardware. The unit features a weather-resistant housing with a protective gasket and a wiring harness molded into the gasket for a weather-tight seal.
- Connect the Analog Timer: Open the power control unit housing. Connect the analog timer unit to the designated ports within the power control unit. Ensure connections are firm.
- Install Battery: Insert a 6V battery (not included) into the designated battery compartment within the power control unit. The analog timer operates on this 6V power source.
- Secure Wiring: Ensure all wiring is neatly routed and secured to prevent interference with moving parts or exposure to elements. The in-line fuse protection helps guard against power supply overloads.
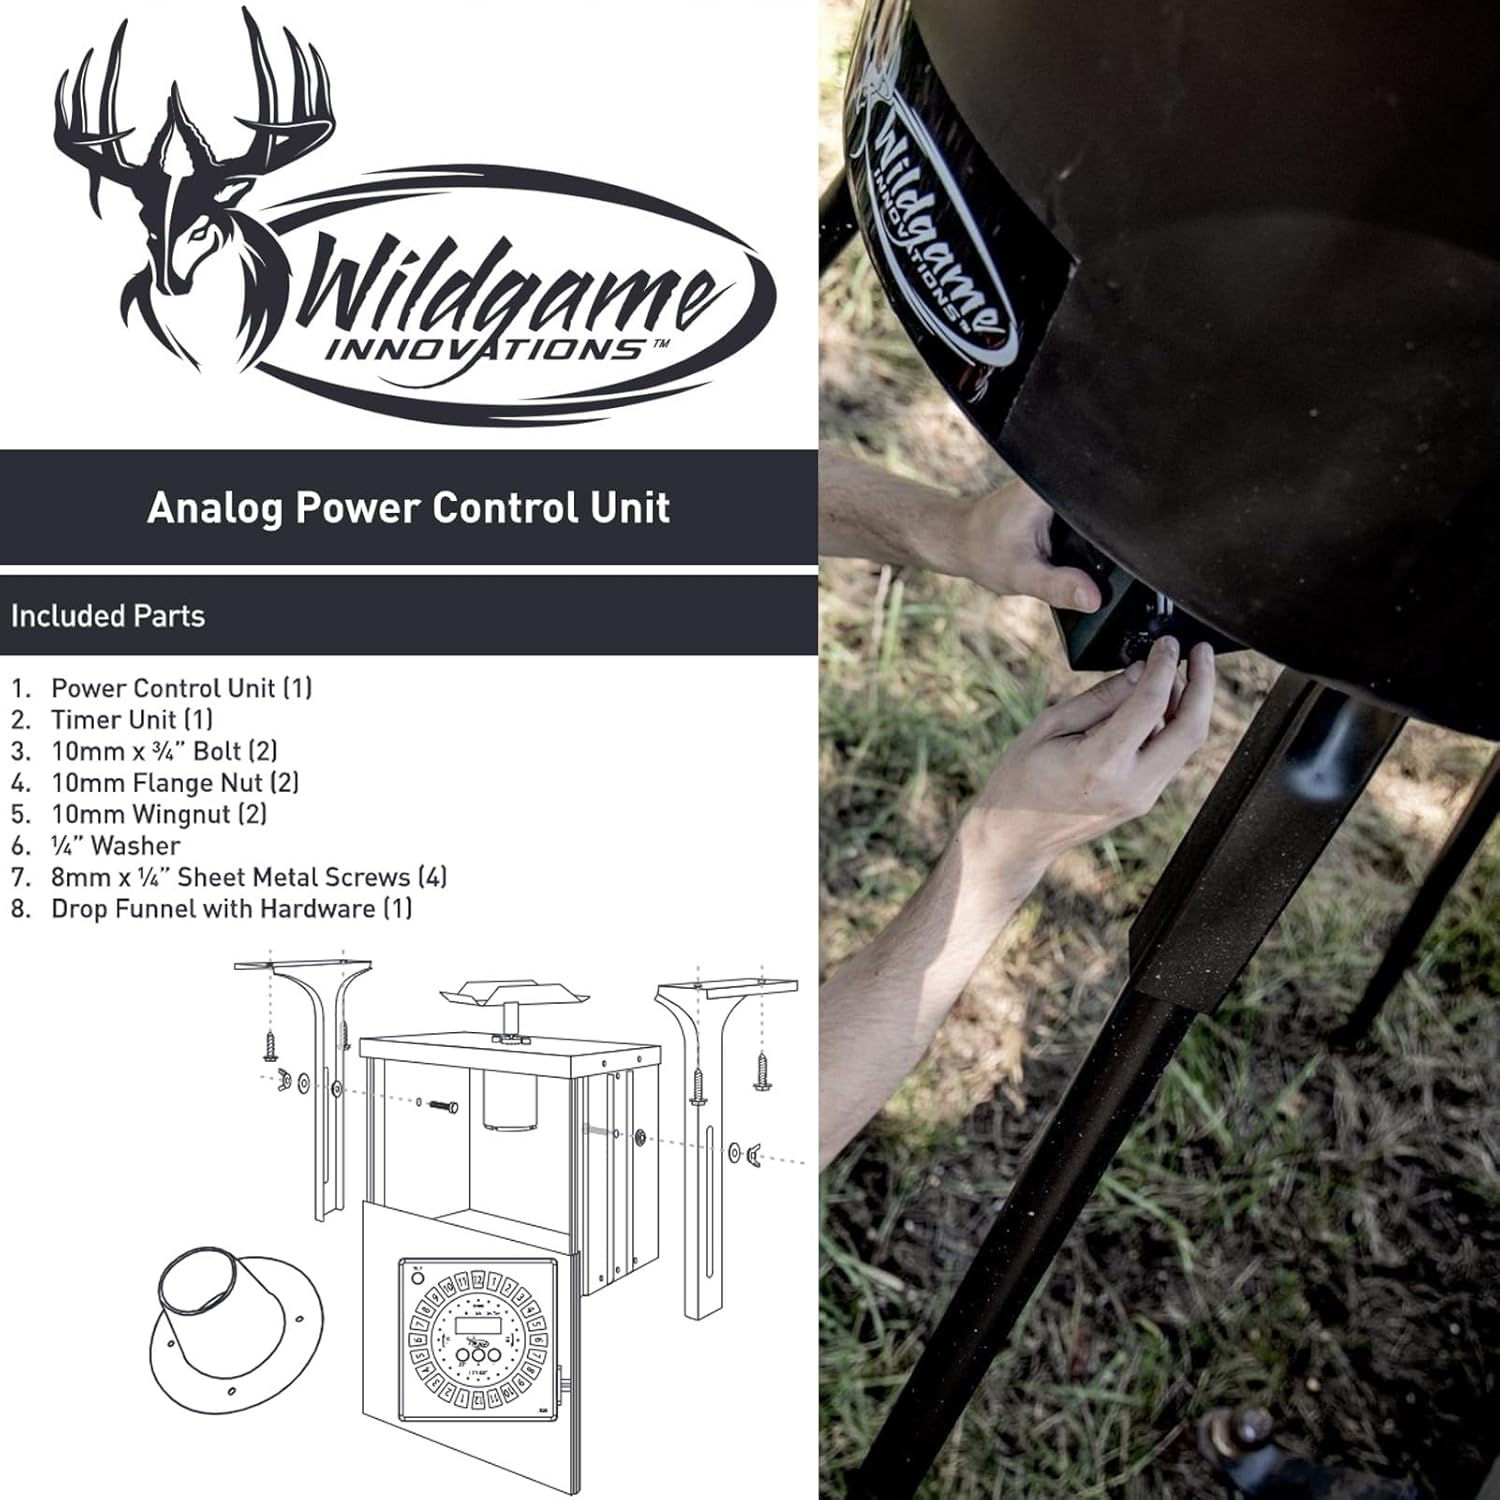
Figure 4.1: Exploded view diagram illustrating the assembly of the power control unit, timer, and associated hardware.

Figure 4.2: Connecting the analog timer's wiring harness to the power control unit.
5. Operating Instructions
The analog timer allows for precise control over feeding schedules. The timer features durable micro-switches and silicone rubber buttons for ease of use.

Figure 5.1: The analog timer unit, showing the control buttons and display.
- Setting Feed Times: The timer supports up to 24 daily feed times. Use the hour and minute buttons to select the desired start time for each feeding cycle.
- Adjusting Feed Duration: Each feed time can be adjusted from approximately 1 to 20 seconds. Use the 'Run Time' setting to specify how long the feeder motor will operate during each cycle.
- Testing the Feeder: A 'TEST' button is typically available on the timer. Pressing this button will activate the feeder motor for a short duration, allowing you to verify proper function and feed dispersal.
- Feed Dispersal: The high-torque 6V motor and galvanized steel spinner plate are designed to disperse feed 360 degrees over a distance of up to 30 feet.

Figure 5.2: Adjusting the settings on the analog timer for customized feeding schedules.
6. Maintenance
Regular maintenance ensures the longevity and optimal performance of your feeder kit.
- Cleaning: Periodically clean the spinner plate and the interior of the power control unit to prevent build-up of feed or debris. Ensure the unit is dry before reassembly.
- Battery Replacement: Monitor the 6V battery charge. Replace the battery as needed to ensure consistent operation.
- Housing Inspection: Inspect the powder-coated, galvanized steel construction and the protective gasket for any signs of wear or damage. Ensure the housing remains sealed against weather.
- Fuse Check: If the unit stops functioning, check the in-line fuse for damage and replace if necessary.
7. Troubleshooting
If you encounter issues with your feeder kit, consider the following troubleshooting steps:
- Feeder Not Dispensing:
- Check the 6V battery. Ensure it is fully charged and correctly installed.
- Verify that the analog timer is programmed with active feed times and durations.
- Inspect the spinner plate for obstructions or debris.
- Check all wiring connections for looseness or corrosion.
- Inconsistent Feeding:
- Ensure the battery has sufficient power. Low battery can affect motor performance.
- Review timer settings for accuracy.
- Examine the feed for moisture or clumping that might impede flow.
- Unit Not Powering On:
- Confirm the 6V battery is installed correctly and charged.
- Check the in-line fuse. A blown fuse will prevent power to the unit.
- Inspect the main power connections within the power control unit.
8. Specifications
| Model Name | WGI-WGIPU0022 |
| Brand | Wildgame Innovations |
| Power Source | 6V Battery (not included) |
| Feed Times | Up to 24 daily |
| Feed Duration | 1 to 20 seconds (adjustable) |
| Feed Range | 360-degree, up to 30 feet |
| Construction Material | Powder-coated, galvanized steel |
| Included Components | 2-inch drop funnel, mounting hardware |
| Item Weight | 1.54 Kilograms |
| Item Dimensions (LxWxH) | 1 x 1 x 1 inches (Unit dimensions, not package) |
| Target Species | Deer |
9. Warranty and Support
For warranty information and customer support, please refer to the documentation included with your product or visit the official Wildgame Innovations website. Keep your purchase receipt for warranty claims.