1. Introduction
This manual provides detailed instructions for the assembly, painting, and decal application of the Italeri 1328S 1:72 scale UH-60/MH-60 Black Hawk 'Night Raid' plastic model kit. Please read all instructions carefully before beginning assembly.

Figure 1.1: Packaging for the Italeri 1328S UH-60/MH-60 Black Hawk 'Night Raid' model kit.

Figure 1.2: Illustrative artwork of the UH-60 Black Hawk in a 'Night Raid' scenario.
2. Safety Information
WARNING: SMALL PARTS. Not suitable for children under 14 years due to small components which may present a choking hazard. Adult supervision is recommended.
Always use appropriate tools and adhesives in a well-ventilated area. Keep all modeling supplies out of reach of small children and pets.
3. Kit Contents
The Italeri 1328S model kit includes the following components:
- Highly detailed plastic pieces molded in light gray.
- Clear plastic pieces for windows and cockpit canopy.
- Waterslide decals for various markings.
- Illustrated assembly instructions.
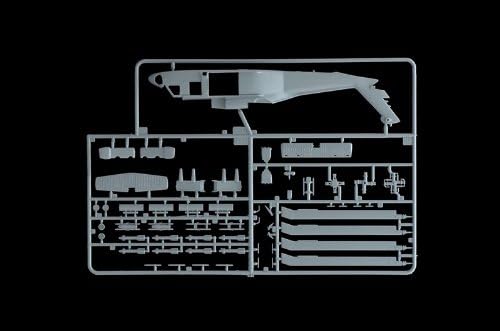
Figure 3.1: Example of a plastic sprue with molded components.
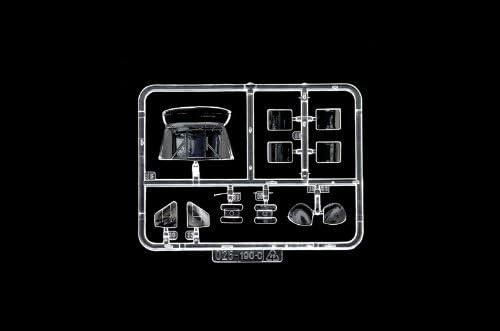
Figure 3.2: Second example of a plastic sprue with molded components.
4. Assembly Guide
4.1. Tools and Materials Required
- Plastic cement (model glue)
- Hobby knife or sprue cutters
- Sandpaper or sanding sticks (various grits)
- Tweezers
- Paints (acrylic or enamel, as per desired scheme)
- Paintbrushes or airbrush
- Decal setting solution (optional)
4.2. General Assembly Steps
- Carefully remove parts from the sprues using a hobby knife or sprue cutters.
- Clean any excess plastic (flash) from the parts using a hobby knife or sandpaper.
- Dry-fit parts before applying glue to ensure proper alignment.
- Apply plastic cement sparingly to bonding surfaces and hold parts together until the glue sets.
- Follow the numbered steps in the included instruction booklet for specific part placement.
4.3. Key Assembly Areas
- Cockpit: Assemble the instrument panel, seats, and control sticks. Paint these components before gluing them into the fuselage halves.
- Fuselage: Join the fuselage halves, ensuring the cockpit and any internal components are correctly positioned. Use clamps or tape to hold the halves together while the glue dries.
- Rotors: Assemble the main rotor blades and tail rotor. Pay attention to the correct angle and direction of the blades.
- Landing Gear: Attach the landing gear components securely. Ensure they are aligned to support the model evenly.
- External Details: Add antennas, sensors, and other small external parts as indicated in the instructions.
5. Painting and Decal Application
5.1. Surface Preparation
Before painting, ensure the model surface is clean, dry, and free of dust, grease, or mold release agents. A light wash with mild soap and water, followed by thorough rinsing and drying, is recommended.
5.2. Painting Instructions
Refer to the instruction booklet for specific paint color recommendations for different versions of the UH-60/MH-60 Black Hawk. Common schemes include:
- U.S. Army, Afghanistan, 2011: Typically a dark olive drab or similar military green/brown.
- Colombian Army, 2nd Air Assault Aviation Battalion: Often features a camouflage pattern.
- Australian Army, 171 Avn Sqn in 6 Avn Regt: May use a distinct camouflage pattern.
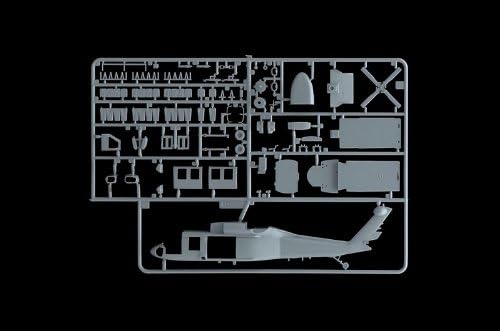
Figure 5.1: U.S. Army UH-60 Black Hawk paint scheme example.
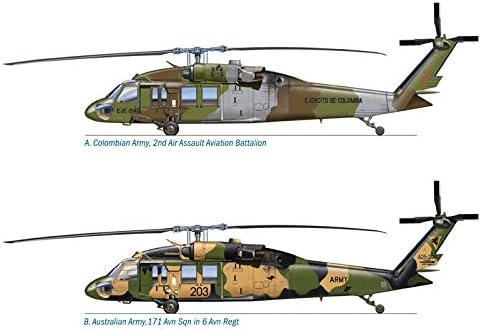
Figure 5.2: Colombian Army UH-60 Black Hawk paint scheme example.
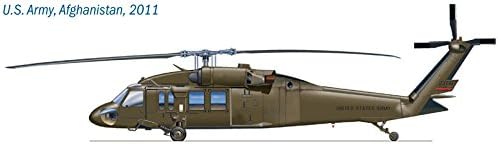
Figure 5.3: Australian Army UH-60 Black Hawk paint scheme example.
5.3. Decal Application
Once painting is complete and thoroughly dry, apply the waterslide decals. Cut each decal carefully from the sheet. Dip the decal in lukewarm water for a few seconds until it can slide freely from the backing paper. Position the decal on the model using tweezers. Gently blot away excess water with a soft cloth or cotton swab. For best results, use a decal setting solution to help the decal conform to surface details and eliminate silvering.

Figure 5.4: Included waterslide decal sheet.
6. Specifications
| Brand | Italeri |
| Model Name | BLACK HAWK HELI |
| Item Model Number | 510001328 |
| Scale | 1:72 |
| Material | Plastic |
| Item Dimensions (L x W x H) | 0.1 x 0.1 x 21.1 inches |
| Item Weight | 5.6 ounces (160 Grams) |
| Number of Pieces | 1 (referring to the kit as a single item, not individual parts) |
| Recommended Age | 14 years and up |
7. Care and Maintenance
Once assembled and painted, your model requires minimal maintenance. To keep your model in optimal condition:
- Cleaning: Dust regularly with a soft, dry brush or a gentle air blower. Avoid using harsh chemicals or abrasive materials.
- Display: Display your model in a stable location away from direct sunlight, extreme temperatures, and high humidity to prevent fading, warping, or damage to adhesives.
- Handling: Handle the model by its sturdy parts, such as the fuselage, to avoid damaging delicate components like antennas or rotor blades.
8. Troubleshooting
Common issues encountered during model assembly and their potential solutions:
- Part Fit Issues: If parts do not fit perfectly, gently sand or trim the mating surfaces. Dry-fitting before gluing can help identify these issues early.
- Gaps Between Parts: Small gaps can be filled with plastic putty or stretched sprue. Sand smooth once dry.
- Paint Adhesion Problems: Ensure the model surface is clean and free of oils before painting. Use a primer for better paint adhesion.
- Decal Silvering: This occurs when air is trapped under the decal. Use a decal setting solution to help the decal conform to the surface and eliminate air bubbles. Puncture tiny bubbles with a sharp needle and reapply setting solution.
9. Manufacturer Support
For further assistance, missing parts, or specific product inquiries, please contact Italeri directly. Warranty information, if applicable, should be obtained from the manufacturer or your point of purchase.
Italeri is a United States-based company; parts are sourced from Italian producers.
You may visit the official Italeri website for contact details and additional resources.