
Introduction
Welcome to your ONKYO TX-NR616 7.1-channel AV Receiver. This manual provides essential information for setting up, operating, and maintaining your receiver to ensure optimal performance and longevity. The TX-NR616 features a discrete amplifier configuration for all 7 channels, utilizing high-capacity power transistors and a 3-stage inverted Darlington circuit for enhanced speaker drive capability. It supports 4K upscaling via HDMI (when connected to a compatible display) using Marvell Qdeo technology for high-quality video output. Additionally, the receiver offers extensive network audio playback capabilities, including streaming services like radiko.jp, vTuner, AUPEO!, and MP3tunes, allowing access to various internet content and PC/network HDD music.
Important Safety Instructions
Please read and follow all safety instructions carefully before operating the unit. Keep this manual for future reference.
- Power Source: Connect the unit only to an AC outlet of the voltage specified on the rear panel.
- Ventilation: Ensure adequate ventilation. Do not block ventilation openings. Maintain a minimum clearance of 20 cm (8 inches) around the unit.
- Water and Moisture: Do not expose the unit to rain or moisture. Do not place objects filled with liquids, such as vases, on the unit.
- Heat: Do not place the unit near heat sources such as radiators, heat registers, stoves, or other apparatus (including amplifiers) that produce heat.
- Cleaning: Unplug the unit from the wall outlet before cleaning. Use a dry cloth for cleaning.
- Servicing: Do not attempt to service this product yourself. Refer all servicing to qualified service personnel.
Setup
Unpacking and Placement
Carefully remove the receiver from its packaging. Place the unit on a stable, level surface with sufficient space for ventilation. Avoid placing it in direct sunlight or near heat-generating equipment.
Connections
Refer to the diagram below for proper connection of your audio and video components, as well as speakers.
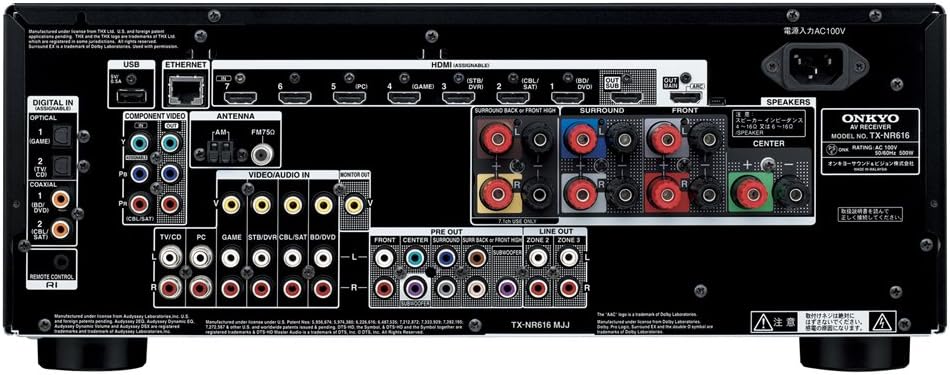
This image displays the rear panel of the ONKYO TX-NR616 AV Receiver. Key connection points include multiple HDMI inputs and outputs, digital audio inputs (optical and coaxial), analog audio inputs, component video inputs, Ethernet port for network connectivity, USB port, and speaker terminals for 7.1 channel setup. Ensure all cables are securely connected to their respective ports.
- HDMI Connections: Connect your HDMI-compatible devices (Blu-ray player, game console, cable box) to the HDMI IN ports. Connect your TV or projector to the HDMI OUT (MAIN) port.
- Speaker Connections: Connect your speakers to the corresponding speaker terminals (FRONT L/R, CENTER, SURROUND L/R, SURROUND BACK/HIGH L/R). Ensure correct polarity (+ to + and - to -).
- Digital Audio: Use optical or coaxial cables for digital audio sources if not using HDMI.
- Network: Connect an Ethernet cable to the LAN port for network features and firmware updates.
- USB: Use the USB port for compatible external storage devices.
Speaker Setup
After connecting your speakers, use the receiver's on-screen display (OSD) menu to configure speaker settings. This includes setting speaker size, distance, and levels for optimal sound calibration. The built-in Audyssey MultEQ® room correction system can automatically optimize these settings for your listening environment.
Initial System Configuration
Upon first power-on, follow the on-screen setup wizard to configure basic settings such as language, network connection, and input assignments. This ensures your receiver is ready for use with your specific home theater components.
Operation
Basic Controls and Remote
The receiver can be operated using the front panel controls or the included remote control. Familiarize yourself with the remote control layout for easy access to functions.

This image shows the RC-837M remote control for the ONKYO TX-NR616 AV Receiver. It features dedicated buttons for input selection (BD/DVD, CBL/SAT, STB/DVR, GAME, PC, MODE, RECEIVER, TV, AUX, NET, FM, USB), volume control, navigation, setup, audio modes, and numerical input. The remote allows comprehensive control over the receiver's functions.
- Power: Use the power button on the remote or front panel to turn the unit on/off.
- Input Selector: Press the corresponding input button (e.g., BD/DVD, GAME, CBL/SAT) to switch between connected devices.
- Volume: Adjust the master volume using the VOL +/- buttons.
- Setup: Press the SETUP button to access the on-screen menu for detailed configurations.
Input Source Selection
To select an input source, press the dedicated input button on the remote control (e.g., BD/DVD, GAME, PC) or rotate the INPUT SELECTOR knob on the front panel. The selected input will be displayed on the receiver's front panel and your TV screen.
Audio and Video Adjustments
Access the receiver's menu system via the SETUP button on the remote to fine-tune audio and video settings. This includes selecting surround sound modes (e.g., Dolby TrueHD, DTS-HD Master Audio, THX Select2 Plus), adjusting tone controls, and configuring video processing options like 4K upscaling.
Network Features
Once connected to your home network, the TX-NR616 allows access to various network audio features:
- Internet Radio: Access services like vTuner and radiko.jp for a wide selection of online radio stations.
- Music Streaming: Enjoy music from streaming services such as AUPEO! and MP3tunes.
- Network Audio Playback: Stream audio files from your PC or network-attached storage (NAS) devices.
- Remote Control App: Control the receiver using a dedicated app on your Android or iOS device.
Maintenance
Cleaning
To maintain the appearance and performance of your receiver, regularly clean the unit. Disconnect the power cord before cleaning. Use a soft, dry cloth to wipe the exterior. For stubborn dirt, lightly dampen the cloth with water and then wipe dry. Do not use abrasive cleaners, solvents, or alcohol, as these can damage the finish.
Firmware Updates
Onkyo may release firmware updates to improve performance or add new features. Connect your receiver to the internet via the Ethernet port. Access the firmware update option through the receiver's setup menu. Follow the on-screen instructions carefully. Do not power off the unit during an update.
Troubleshooting
If you encounter issues with your TX-NR616, refer to the table below for common problems and solutions. If the problem persists, contact customer support.
| Problem | Possible Cause / Solution |
|---|---|
| No power | Ensure the power cord is securely plugged into the wall outlet and the receiver. Check the power outlet with another device. |
| No sound | Check speaker connections and polarity. Verify the correct input source is selected. Ensure the volume is not muted or set too low. Check audio settings in the receiver's menu. |
| No video | Ensure HDMI cables are securely connected. Verify the correct input source is selected on both the receiver and your TV. Check video output settings on the receiver. |
| Remote control not working | Replace batteries. Ensure there are no obstructions between the remote and the receiver's IR sensor. |
| Network connection issues | Check Ethernet cable connection. Restart your router and modem. Verify network settings in the receiver's menu. |
Specifications
- Brand: Onkyo
- Model: TX-NR616
- Channels: 7.1ch
- Rated Output Power: 130W per channel (7 channels driven)
- Maximum Output Power: 190W per channel
- Surround Sound Formats: DOLBY TrueHD, DTS-HD Master Audio, THX Select2 Plus
- HDMI Inputs: 8
- HDMI Outputs: 2
- Digital Audio Inputs: 2 Optical, 2 Coaxial
- USB Port: 1 (for compatible devices)
- Network Connectivity: Ethernet (LAN)
- App Control: Android/iOS compatible
- Video Upscaling: Up to 4K (4096x2160 pixels) via HDMI with Marvell Qdeo technology
- Audio Compatibility: AAC compatible
- Item Weight: 11 kg (24.25 lbs)
- Color: Black
Warranty and Support
For warranty information and customer support, please refer to the warranty card included with your product or visit the official Onkyo website. You can find detailed support resources, FAQs, and contact information there. Keep your purchase receipt as proof of purchase for warranty claims.


