1. Introduction
Thank you for choosing the Pro'sKit SS-206E Temperature Controlled Soldering Station. This device is designed for precise and efficient soldering tasks, featuring an analog temperature display and an ergonomically designed soldering iron. Please read this manual thoroughly before operation to ensure safe and correct use.
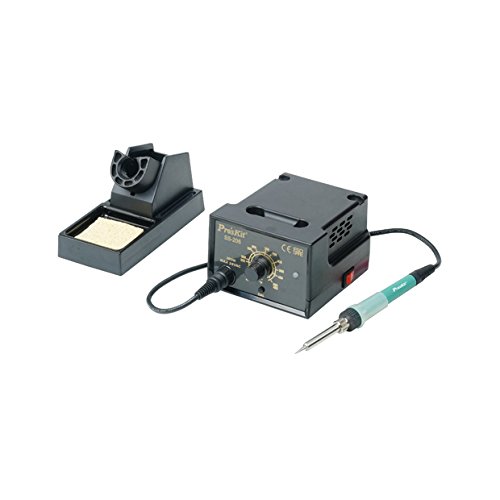
Image 1.1: The Pro'sKit SS-206E Soldering Station, showing the main unit with analog display and the connected soldering iron.
2. Safety Instructions
Always observe the following safety precautions to prevent injury or damage to the equipment:
- Electrical Safety: Ensure the power supply matches the voltage requirements of the unit (110V or 220V). Do not operate with wet hands or in damp environments.
- Heat Hazard: The soldering iron tip reaches very high temperatures. Avoid direct contact with skin or flammable materials. Use the provided soldering iron stand.
- Fume Inhalation: Soldering produces fumes. Always work in a well-ventilated area or use a fume extractor.
- Eye Protection: Wear safety glasses to protect against solder splashes.
- ESD Protection: This unit is ESD safe. However, take appropriate ESD precautions when working with sensitive electronic components.
- Children and Pets: Keep the soldering station out of reach of children and pets.
3. Package Contents
Verify that all items are present in the package:
- Pro'sKit SS-206E Soldering Station Main Unit
- Soldering Iron with connecting cable
- Soldering Iron Stand
- Cleaning Sponge
- Power Cord
4. Setup
- Unpack: Carefully remove all components from the packaging.
- Connect Soldering Iron: Plug the soldering iron's connector into the designated port on the front panel of the soldering station. Ensure a secure connection.
- Position Stand: Place the soldering iron stand on a stable, heat-resistant surface near your workspace. Insert the soldering iron into the stand when not in use.
- Prepare Sponge: Dampen the cleaning sponge with water (do not soak) and place it in the sponge tray of the soldering iron stand.
- Power Connection: Connect the power cord to the back of the soldering station and then plug it into a suitable electrical outlet. Note: This model is available in 110V and 220V versions. Verify your unit's voltage requirement before plugging it in.
5. Operating Instructions
- Power On: Flip the power switch located on the front panel to the 'ON' position. The analog display will illuminate.
- Set Temperature: Rotate the temperature control knob to your desired temperature. The analog meter will indicate the set temperature. The unit supports a temperature range of 200°C to 480°C (392°F to 896°F).
- Celsius/Fahrenheit Adjustment: A switch or internal jumper (refer to specific model documentation if available) allows selection between Celsius and Fahrenheit display.
- Preheating: Allow the soldering iron to preheat for approximately 2-3 minutes until the tip reaches the set temperature.
- Tinning the Tip: Before first use and periodically during operation, apply a small amount of solder to the hot tip. This 'tins' the tip, preventing oxidation and improving heat transfer.
- Soldering: Bring the hot, tinned tip into contact with both the component lead and the PCB pad simultaneously. Apply solder to the joint, not directly to the iron tip. Remove the solder, then the iron, allowing the joint to cool naturally.
- Cleaning the Tip: Regularly wipe the soldering iron tip on the damp sponge to remove excess solder and flux residue.
- Power Off: After use, turn the temperature control knob to its lowest setting, then flip the power switch to 'OFF'. Allow the iron to cool completely in its stand before storing.
6. Maintenance
- Soldering Tip Care: Always keep the tip tinned. Replace tips when they become pitted or heavily oxidized and cannot be cleaned. Use only compatible replacement tips.
- Sponge Maintenance: Keep the sponge damp during operation. Replace the sponge when it becomes worn or heavily soiled.
- Unit Cleaning: Periodically wipe the exterior of the soldering station with a soft, dry cloth. Do not use abrasive cleaners or solvents.
- Cable Inspection: Regularly inspect the power cord and soldering iron cable for any signs of damage. Replace immediately if damaged.
7. Troubleshooting
| Problem | Possible Cause | Solution |
|---|---|---|
| Soldering iron not heating | Power switch off; Loose connection; Incorrect voltage; Faulty heating element. | Ensure power is on. Check all cable connections. Verify unit voltage matches outlet. Contact support if heating element is suspected. |
| Poor solder joints | Tip not tinned; Incorrect temperature; Dirty tip; Old solder. | Tin the tip. Adjust temperature. Clean or replace tip. Use fresh solder. |
| Analog display not working | Unit not powered; Internal fault. | Check power connection. If power is on and display is off, contact support. |
| Unit does not power on | Power cord not connected; Outlet fault; Incorrect voltage. | Ensure power cord is securely plugged in. Test outlet with another device. Confirm unit voltage (110V or 220V) matches your power supply. |
8. Specifications
- Model: SS-206E
- Input Voltage: AC 110V or 220V (Specific voltage depends on the purchased model. Please verify your unit.)
- Temperature Range: 200°C - 480°C (392°F - 896°F)
- Display Type: Analog
- Certifications: CE, ESD Safe
- Included Components: Soldering Iron
9. Warranty and Support
For warranty information and technical support, please refer to the warranty card included with your product or visit the official Pro'sKit website. Keep your purchase receipt as proof of purchase.