Neewer Neewer
Neewer 50x70cm Photography Softbox Instruction Manual
Model: Neewer | Brand: Neewer
1. Product Overview
The Neewer 50x70cm Photography Softbox is designed to diffuse strobe flash, providing soft, even lighting for professional photography. It is an essential accessory for studio setups, enhancing skin tones, minimizing imperfections, and making colors vibrant.
This softbox is compatible with various light sources including flash, fluorescent, quartz, tungsten, and bare lights. It is particularly suitable for fashion photography, portraits, and capturing medium to large-sized products.

Image: The Neewer 50x70cm Photography Softbox in its assembled state, ready for use.
Key Features:
- Filters light to avoid harsh shadows and reflections.
- Provides a clean, professional background for photographed subjects.
- Compatible with various light sources (flash, fluorescent, quartz, tungsten, bare lights).
- Features a removable cover for camera lens access when shooting through the softbox.
- Designed for optimal light diffusion, ensuring even illumination.
2. Components
Before assembly, ensure all components are present and undamaged.

Image: All components included with the Neewer 50x70cm Photography Softbox, laid out for inspection. This includes the softbox fabric, diffuser panels, and support rods.
The package typically includes:
- Softbox fabric (50 x 70 cm)
- Internal diffuser panel
- External diffuser panel
- Support rods
- Speedring adapter (for mounting to light)
- Carrying bag (not explicitly listed in components but implied by reviews)
Note: Light stand and strobe light are not included with this softbox.
3. Setup and Assembly
Follow these steps to correctly assemble your Neewer 50x70cm Photography Softbox.
- Prepare the Speedring: Lay out the speedring adapter. This is the circular metal or plastic ring with holes for the support rods and a central opening for your light.
- Insert Support Rods: Take the softbox fabric and identify the rod pockets. Insert the ends of the support rods into the corresponding holes on the speedring. Gently bend the rods to fit them into the pockets on the opposite corners of the softbox fabric. This will give the softbox its rectangular shape.

Image: An interior view of the softbox, showing the reflective silver lining and the points where the support rods connect to form the structure.
- Attach to Light: Once the softbox is assembled, attach the speedring to your compatible studio strobe or continuous light source. Ensure the light is securely fastened to the speedring.
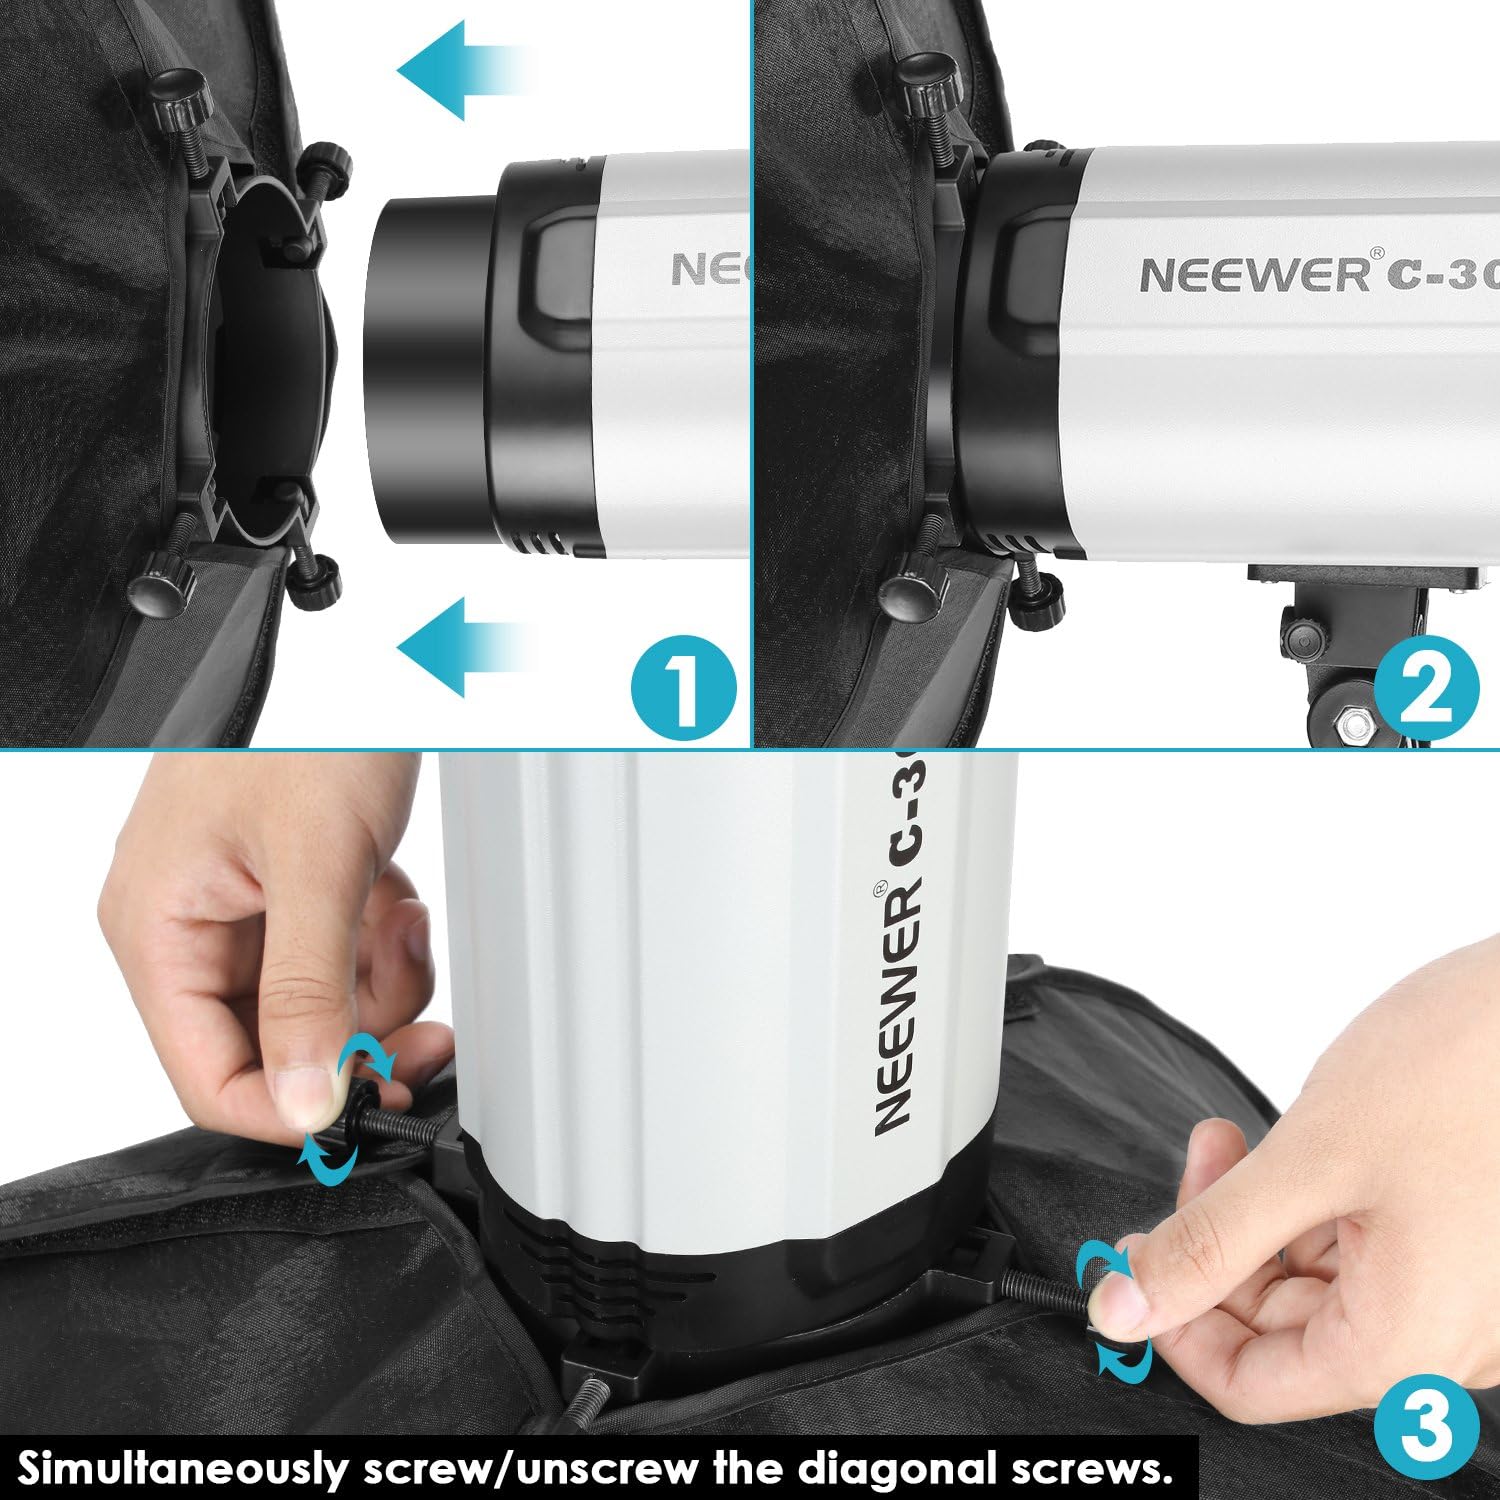
Image: A visual guide demonstrating how to attach the softbox to a compatible light source by aligning and securing the speedring.
- Install Diffuser Panels:
- Internal Diffuser: Attach the smaller, internal diffuser panel inside the softbox using the integrated Velcro tabs. This panel helps to further spread the light evenly.
- External Diffuser: Attach the larger, external diffuser panel to the front opening of the softbox using the Velcro strips along the edges. This is the primary diffusion layer that softens the light output.

Image: A comparison showing the softbox interior with its reflective silver lining (left) and with the internal diffuser panel installed (right), illustrating the light-modifying components.
Your softbox is now assembled and ready for use. For disassembly, reverse these steps.
4. Operating Instructions
The Neewer 50x70cm softbox is designed for straightforward operation once assembled. Its primary function is to modify and diffuse light for photography.
Using the Softbox:
- Positioning: Place the softbox on a light stand (not included) at the desired angle and height relative to your subject. Experiment with different positions to achieve the desired lighting effect.
- Light Source: Ensure your chosen light source (strobe, continuous light, etc.) is securely mounted within the speedring of the softbox.
- Diffusion: The internal and external diffuser panels work together to create a soft, even light output. For maximum diffusion, ensure both panels are properly installed.
- Removable Front Cover: The softbox features a removable front cover. This allows for direct access to the camera lens if you wish to shoot through the softbox for specific effects or to minimize reflections on highly reflective surfaces.

Image: A side view of the assembled Neewer softbox, showcasing its depth and the diffusion panel, illustrating its light-shaping capabilities.
Achieving Optimal Results:
The large surface area of the 50x70cm softbox is ideal for creating soft, flattering light. The closer the softbox is to your subject, the softer the light will appear. Adjust the distance and angle to control the light's intensity and spread.
5. Maintenance and Storage
Proper care and storage will extend the lifespan of your Neewer softbox.
Cleaning:
- Fabric Surfaces: Use a soft, dry cloth to gently wipe down the exterior and interior fabric surfaces.
- Diffuser Panels: If the diffuser panels become dirty, they can be carefully wiped with a slightly damp cloth. Ensure they are completely dry before reattaching or storing.
- Avoid Harsh Chemicals: Do not use abrasive cleaners, solvents, or harsh chemicals, as these can damage the fabric or reflective coating.
Storage:
- Disassembly: For long-term storage or transport, disassemble the softbox by reversing the assembly steps. This helps prevent stress on the fabric and rods.
- Folding: Carefully fold the softbox fabric and diffuser panels.

Image: The Neewer 50x70cm softbox in its folded or collapsed state, demonstrating its portability and ease of storage.
- Carrying Bag: Store all components in the provided carrying bag to protect them from dust and damage.
- Environment: Store the softbox in a cool, dry place, away from direct sunlight and extreme temperatures.
6. Troubleshooting
This section addresses common issues you might encounter with your softbox.
| Problem | Possible Cause | Solution |
|---|---|---|
| Softbox difficult to assemble. | Rods not aligned correctly; new product stiffness. | Ensure rods are fully inserted into speedring holes and fabric pockets. The fabric may be stiff initially but will loosen with use. Apply gentle, even pressure. |
| Uneven light output. | Diffuser panels not properly installed; light source not centered. | Check that both internal and external diffuser panels are smoothly attached. Ensure your light source is centered within the softbox opening. |
| Softbox detaches from light. | Improper attachment to speedring/light. | Verify that the speedring is securely fastened to your light source according to the light's instructions. Ensure all screws or clamps are tightened. |
7. Specifications
| Feature | Detail |
|---|---|
| Brand | Neewer |
| Model Number | Neewer |
| Color | 50 x 70 cm (Black exterior, Silver interior) |
| Material | Fabric |
| Compatible Devices | DSLR (and compatible studio strobes/lights) |
| Included Components | Light box (50 x 70 cm) |
| Light Source Type Compatibility | Flash, Fluorescent, Quartz, Tungsten, Projector |
| Package Dimensions (L x W x H) | 42.5 x 41.1 x 8 cm |
| Item Weight | 700 grams |
| ASIN | B007BJT8LU |
8. Warranty and Support
For warranty information and customer support, please refer to the documentation provided with your purchase or visit the official Neewer website. Neewer products typically come with a manufacturer's warranty covering defects in materials and workmanship.
If you encounter any issues not covered in this manual or require further assistance, please contact Neewer customer service through their official channels.
For more information, you may visit the Neewer Official Website.
Related Documents - Neewer
 |
Neewer NK200/NK300 Softbox Lighting Set User Manual Comprehensive guide for setting up and using the Neewer NK200 and NK300 continuous softbox lighting sets. Includes assembly instructions, usage tips, and safety information. |
 |
NEEWER FL100C LED Light - User Manual, Features, and Setup Guide Comprehensive guide for the NEEWER FL100C LED light, covering package contents, features, setup instructions, DMX control, fault diagnosis, and specifications. Learn how to use and set up your photography lighting. |
 |
NEEWER Q300 Outdoor Strobe Flash User Manual This user manual provides comprehensive instructions for the NEEWER Q300 Outdoor Strobe Flash. It covers package contents, product introduction, assembly, battery usage, detailed function explanations, wireless shooting, troubleshooting, precautions, and product specifications. |
 |
Neewer NL660 LED Photography Light User Manual User manual for the Neewer NL660 LED Photography Light, covering features, safety precautions, operation, and product specifications. Learn how to set up and use your photography lighting equipment. |
 |
Neewer Z2-C Strobo Flash Instruction Manual Comprehensive guide to operating the Neewer Z2-C Strobo Flash, covering features, specifications, safety precautions, and usage for photography. |
 |
Neewer Q6 Outdoor Strobe Flash with Lithium Battery Instruction Manual Comprehensive instruction manual for the Neewer Q6 Outdoor Strobe Flash, detailing product overview, package contents, installation, battery usage, flash modes (TTL, Manual, Multi Strobe), wireless transmission, custom settings, modeling light, app control, protection features, maintenance, and specifications. |
Ask a question about this manual
Ask about setup, troubleshooting, compatibility, parts, safety, or missing instructions. Manuals+ will review the question and use this page’s manual context to help answer it.