1. Introduction
This manual provides essential information for the proper installation, operation, and maintenance of your A&D ENGINEERING INC. GR-200 Analytical Balance. Please read this manual thoroughly before using the balance to ensure correct usage and to prevent damage or injury. The GR-200 is designed for precise weighing in laboratory and industrial environments, offering high accuracy and reliability.
2. Safety Precautions
Observe the following safety precautions to ensure safe operation and to prevent damage to the balance or injury to personnel.
- Do not operate the balance in hazardous environments or where flammable gases or vapors are present.
- Ensure the balance is placed on a stable, level surface free from vibrations and drafts.
- Use only the specified AC adapter. Using an incorrect adapter may cause fire or electric shock.
- Do not disassemble or modify the balance. Refer all servicing to qualified personnel.
- Avoid spilling liquids or powders into the balance housing. If a spill occurs, disconnect power immediately and clean carefully.
- Handle the weighing pan and draft shield components with care to avoid damage.
3. Components and Features
Familiarize yourself with the main components of your GR-200 Analytical Balance.
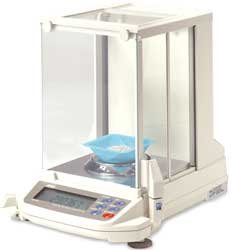
Figure 1: A&D ENGINEERING INC. GR-200 Analytical Balance. This image displays the analytical balance with its glass draft shield enclosure, a circular weighing pan, and a digital display with control buttons at the front base. A small blue container is visible on the weighing pan.
- Draft Shield: Glass enclosure to protect the weighing pan from air currents.
- Weighing Pan: The platform where samples are placed for weighing.
- Display: Digital screen showing weight readings and operational messages.
- Control Panel: Buttons for various functions such as ON/OFF, CAL, PRINT, MODE, and TARE.
- Leveling Feet: Adjustable feet to ensure the balance is perfectly level.
- Level Indicator: Bubble level to assist in proper leveling.
- AC Adapter Input: Port for connecting the power supply.
4. Setup
Follow these steps for the initial setup of your GR-200 Analytical Balance.
- Unpacking: Carefully remove the balance and all accessories from the packaging. Retain the packaging for future transport or storage.
- Placement: Place the balance on a sturdy, vibration-free workbench, away from direct sunlight, heat sources, air conditioning vents, and strong electromagnetic fields.
- Assembly:
- Install the weighing pan and draft shield components according to the diagrams in the quick start guide (if provided).
- Ensure all parts are securely in place.
- Leveling:
- Adjust the leveling feet until the bubble in the level indicator is centered.
- This is crucial for accurate measurements.
- Power Connection: Connect the supplied AC adapter to the balance and then plug it into a suitable power outlet.
- Initial Warm-up: Turn on the balance using the ON/OFF button. Allow the balance to warm up for at least 30 minutes (or as specified in the quick start guide) before performing any measurements or calibration. This stabilizes the internal components for optimal performance.
5. Operating Instructions
This section outlines basic weighing procedures.
5.1 Basic Weighing
- Ensure the balance has completed its warm-up period and is level.
- Press the ON/OFF button to turn on the balance.
- Wait for the display to show "0.0000g" (or similar, depending on the unit setting) and the stability indicator to appear.
- Carefully open the draft shield doors.
- Place your sample directly on the weighing pan or in a suitable container.
- Close the draft shield doors.
- Wait for the reading to stabilize. The stability indicator will confirm when the measurement is stable.
- Record the displayed weight.
- Remove the sample and close the draft shield.
5.2 Taring (Zeroing a Container)
- Follow steps 1-3 from "5.1 Basic Weighing".
- Place the empty container (beaker, flask, etc.) on the weighing pan and close the draft shield.
- Wait for the reading to stabilize.
- Press the TARE button. The display will return to "0.0000g".
- Carefully add your sample to the container.
- Close the draft shield and wait for the reading to stabilize. The displayed weight is the net weight of your sample.
- Remove the container and sample.
5.3 Changing Weighing Units
The GR-200 balance typically supports multiple weighing units (e.g., grams, milligrams, carats). Consult your quick start guide or the full manual for specific instructions on how to cycle through or select different units using the MODE button.
6. Calibration
Regular calibration is essential to maintain the accuracy of your analytical balance. The GR-200 may feature internal calibration or require external calibration with certified weights.
6.1 Internal Calibration (if applicable)
Some GR-series models include an internal calibration mass. To perform internal calibration:
- Ensure the balance is stable, level, and has warmed up.
- Clear the weighing pan and close the draft shield.
- Press and hold the CAL button until "CAL" appears on the display.
- Follow the on-screen prompts. The balance will perform the calibration automatically.
- Once complete, the balance will return to weighing mode.
6.2 External Calibration (if applicable)
If your model requires external calibration, you will need a certified calibration weight (e.g., 200g or 210g, Class E2 or F1, depending on the balance capacity and desired accuracy). Consult the full manual for the exact weight required and detailed steps.
- Ensure the balance is stable, level, and has warmed up.
- Clear the weighing pan and close the draft shield.
- Access the external calibration mode (refer to the full manual for button sequence, often involving the CAL or FUNCTION button).
- When prompted, place the specified calibration weight precisely in the center of the weighing pan.
- Close the draft shield and wait for the balance to register the weight.
- Follow any further on-screen instructions.
- Once calibration is complete, remove the weight and the balance will return to weighing mode.
It is recommended to calibrate the balance daily or whenever it is moved, or if there are significant temperature changes.
7. Maintenance
Proper maintenance ensures the longevity and accuracy of your GR-200 Analytical Balance.
- Cleaning:
- Always disconnect the power before cleaning.
- Use a soft, lint-free cloth dampened with a mild detergent or isopropyl alcohol to clean the exterior.
- Do not use abrasive cleaners, solvents, or harsh chemicals.
- Carefully remove the weighing pan and draft shield components for cleaning. Ensure they are dry before reassembly.
- Avoid getting liquids inside the balance.
- Storage:
- When not in use for extended periods, store the balance in a clean, dry, and stable environment.
- Keep the draft shield closed to prevent dust accumulation.
- Inspection: Periodically inspect the power cord for damage and ensure all components are securely in place.
8. Troubleshooting
This section addresses common issues you might encounter with your GR-200 Analytical Balance.
| Problem | Possible Cause | Solution |
|---|---|---|
| Balance does not turn on. | No power supply; faulty AC adapter; power outlet issue. | Check power cord connection. Ensure AC adapter is correctly plugged in. Try a different power outlet. |
| Unstable readings. | Vibrations; air currents; balance not level; warm-up incomplete. | Place on a stable surface. Close draft shield. Level the balance. Allow sufficient warm-up time. Avoid drafts. |
| Inaccurate readings. | Not calibrated; temperature change; dirty weighing pan; external interference. | Perform calibration. Allow balance to acclimatize to ambient temperature. Clean the weighing pan. Relocate away from interference. |
| Display shows "Error" message. | Overload; internal malfunction; specific error code. | Remove excess weight if overloaded. Turn off and restart the balance. Consult the full manual for specific error code meanings. If persistent, contact service. |
If you encounter issues not listed here or if solutions do not resolve the problem, please refer to the comprehensive user manual or contact A&D ENGINEERING INC. customer support.
9. Specifications
Key technical specifications for the A&D ENGINEERING INC. GR-200 Analytical Balance.
- Model: GR-200
- Capacity: 210 g
- Readability: 0.1 mg (0.0001 g)
- Pan Size: Typically Ø90 mm (refer to full manual for exact dimensions)
- Calibration: Internal or External (model dependent)
- Power Supply: AC adapter (specific voltage/current details in full manual)
- Operating Temperature: 5°C to 40°C (41°F to 104°F)
- Dimensions: (Refer to full manual for exact physical dimensions)
- Weight: (Refer to full manual for exact unit weight)
10. Warranty and Support
A&D ENGINEERING INC. products are manufactured under strict quality control. For warranty information, please refer to the warranty card included with your product or visit the official A&D ENGINEERING INC. website. Keep your purchase receipt as proof of purchase.
For technical support, service, or to inquire about replacement parts, please contact your local A&D ENGINEERING INC. distributor or customer service center. Contact details can typically be found on the manufacturer's website or in the comprehensive user manual.
Manufacturer: A&D ENGINEERING INC.
Date First Available: March 13, 2013