Introduction
This manual provides essential instructions for the safe and effective use of your Canon PowerShot A4000 IS 16.0 MP Digital Camera. It covers basic setup, operation, maintenance, and troubleshooting to help you capture high-quality photos and 720p HD videos. The camera features an 8x optical zoom, a 28mm wide-angle lens, and optical image stabilization for clear images.
What's in the Box
Verify that all items are present in your camera package:
- Canon PowerShot A4000 IS Digital Camera
- Battery Pack
- Battery Charger
- USB Cable
- Wrist Strap
- Digital Camera Solution Disk (CD-ROM)

Figure 1: Included accessories with the Canon PowerShot A4000 IS camera.
Camera Parts and Functions
Front View

Figure 2: Front view of the camera.
- Lens: Captures images.
- Flash: Provides illumination in low-light conditions.
- Shutter Button: Press halfway to focus, fully to take a picture.
- Zoom Lever: Controls optical zoom (W for wide, T for telephoto).
- Power Button: Turns the camera on or off.
Rear View
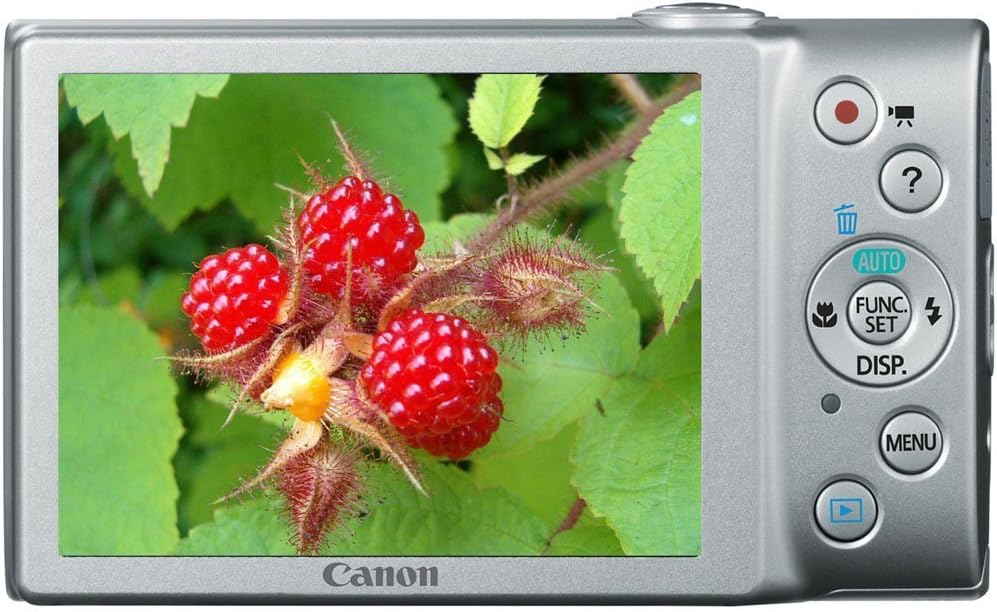
Figure 3: Rear view of the camera with LCD screen.
- LCD Monitor: Displays images, menus, and camera settings.
- Movie Button: Starts and stops video recording.
- Playback Button: Switches to playback mode to view photos and videos.
- MENU Button: Accesses camera settings and options.
- FUNC./SET Button: Confirms selections and accesses shooting function menus.
- Directional Buttons (Up, Down, Left, Right): Navigate menus and adjust settings.
Setup
1. Inserting the Battery Pack
- Open the battery cover on the bottom of the camera.
- Insert the battery pack with the contacts facing the correct direction, as indicated by the diagram inside the compartment.
- Close the battery cover securely until it clicks.
2. Inserting a Memory Card
- Open the battery/card cover.
- Insert an SD, SDHC, or SDXC memory card into the card slot until it clicks into place. Ensure the card is oriented correctly.
- Close the cover securely.
3. Setting the Date and Time
- Turn on the camera.
- If prompted, follow the on-screen instructions to set the date, time, and time zone. Use the directional buttons to navigate and the FUNC./SET button to confirm.
Operating the Camera
1. Turning the Camera On/Off
- Press the POWER button to turn the camera on.
- Press the POWER button again to turn the camera off.
2. Taking Still Photos (Smart AUTO Mode)
- Turn on the camera. The camera will typically start in Smart AUTO mode.
- Frame your subject on the LCD monitor.
- Press the Shutter Button halfway down to focus. The focus frame will appear green when focus is achieved.
- Press the Shutter Button fully down to take the picture.
3. Recording Movies
- With the camera on, press the dedicated Movie Button (red dot icon). Recording will begin immediately.
- Press the Movie Button again to stop recording.
4. Viewing Images (Playback Mode)
- Press the Playback Button (blue arrow icon).
- Use the directional buttons to scroll through your photos and videos.
- To return to shooting mode, press the Playback Button again or press the Shutter Button halfway.
Advanced Features
1. Using Optical Zoom
While in shooting mode, push the Zoom Lever towards T (Telephoto) to zoom in on your subject, or towards W (Wide-angle) to zoom out.
2. Flash Modes
In shooting mode, press the Up Directional Button to cycle through flash modes:
- Auto: Flash fires automatically when needed.
- On: Flash fires for every shot.
- Off: Flash does not fire.
3. Shooting Modes
Press the FUNC./SET Button to access various shooting modes, including:
- Smart AUTO: Camera automatically selects optimal settings.
- Program (P): Allows manual control over some settings while the camera sets exposure.
- Scene Modes: Pre-set modes for specific situations (e.g., Portrait, Landscape, Night Snapshot).
Maintenance
1. Cleaning the Camera
- Use a soft, dry cloth to clean the camera body.
- For the lens, use a lens brush or a soft, lint-free cloth specifically designed for optical surfaces. Avoid touching the lens directly with your fingers.
- Clean the LCD screen with a soft, dry cloth.
2. Battery Care
- Charge the battery fully before first use and after extended periods of non-use.
- Store the battery in a cool, dry place when not in use.
- Do not expose the battery to extreme temperatures.
3. Storage
When storing the camera for an extended period, remove the battery and memory card. Store the camera in a dry, well-ventilated area, away from direct sunlight and extreme temperatures.
Troubleshooting
| Problem | Solution |
|---|---|
| Camera does not turn on. | Ensure the battery is charged and inserted correctly. Try recharging the battery. |
| Images are blurry. | Check if the lens is clean. Ensure the camera is held steady. Use the flash in low light. Allow the camera to focus before fully pressing the shutter button. |
| Flash does not fire. | Check the flash mode setting. Ensure it is not set to 'Off'. The flash may not fire if the ambient light is sufficient. |
| Memory card error. | Ensure the memory card is inserted correctly. Try formatting the card (this will erase all data). Use a different memory card. |
| Cannot record video. | Check if the memory card has sufficient free space. Ensure the battery has enough charge. |
Specifications
| Feature | Detail |
|---|---|
| Effective Still Resolution | 16.0 Megapixels |
| Optical Zoom | 8x |
| Lens | 28mm Wide-Angle |
| Image Stabilization | Optical |
| Video Resolution | 720p HD |
| LCD Screen Size | 3.0 Inches |
| Photo Sensor Technology | CMOS |
| Supported File Format | JPEG (Exif 2.3) |
| Memory Card Type | SD/SDHC/SDXC |
| Connectivity | USB |
| Model Number | 6148B001 |
Warranty and Support
Warranty Information
This Canon PowerShot A4000 IS Digital Camera comes with a 1-year limited warranty from the date of purchase. Please retain your proof of purchase for warranty claims. The warranty covers manufacturing defects but typically excludes damage caused by misuse, accidents, or unauthorized repairs.
Customer Support
For technical assistance, service, or further information, please refer to the official Canon support website or contact their customer service. Contact details can usually be found on the manufacturer's website or in the documentation provided with your product.