1. Product Overview
The CRL HSL-3 expansion anchor, model EBA334, is a heavy-duty, torque-controlled expansion bolt designed for high performance in both static and dynamic load applications. This anchor is compliant with 2003 and 2006 IBC standards and delivers optimal performance in cracked concrete. This specific model has a length of 3-7/8 inches (98 mm).

Figure 1: The CRL HSL-3 expansion anchor, showing its threaded bolt, expansion cone, and sleeve.
2. Safety Information
Always observe general safety precautions when working with power tools and fasteners. Failure to follow these instructions may result in injury or property damage.
- Wear appropriate personal protective equipment (PPE), including safety glasses, gloves, and hearing protection.
- Ensure the base material is suitable for expansion anchors and can support the intended load.
- Verify that there are no hidden electrical wires, pipes, or other utilities in the drilling area.
- Do not exceed the specified torque values during installation. Over-tightening can damage the anchor or base material.
- Keep children and bystanders away from the work area.
- Store anchors in a dry environment to prevent corrosion.
3. Components
The CRL HSL-3 expansion anchor consists of the following primary components:
- Threaded Bolt: The main shaft of the anchor, which is threaded at one end for a nut and washer.
- Expansion Cone: A tapered component at the end of the bolt that expands the sleeve when tightened.
- Sleeve: A cylindrical metal casing that expands against the drilled hole walls to create the anchorage.
- Nut and Washer: Used to apply torque and secure the fixture.
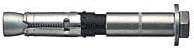
Figure 2: A detailed view of the CRL HSL-3 expansion anchor, highlighting its construction.
4. Installation Instructions
Follow these steps for proper installation of the CRL HSL-3 expansion anchor:
- Drill the Hole: Using a hammer drill, drill a hole of the specified diameter and depth into the concrete base material. Ensure the hole is perpendicular to the surface. For the M8 anchor, consult the manufacturer's specifications for the exact drill bit diameter. The effective anchorage depth is 60 mm.
- Clean the Hole: Thoroughly clean the drilled hole using a wire brush and a blow-out pump or compressed air to remove all dust and debris. A clean hole is critical for proper anchor performance.
- Insert the Anchor: Insert the CRL HSL-3 expansion anchor into the cleaned hole. Ensure the anchor is fully seated, with the washer and nut flush against the surface of the base material or fixture.
- Tighten the Anchor: Using a torque wrench, tighten the nut to the manufacturer's recommended torque value. As the nut is tightened, the expansion cone is pulled into the sleeve, causing the sleeve to expand and grip the walls of the drilled hole. Do not over-tighten.
- Verify Installation: After tightening, ensure the anchor feels secure and the fixture (if applicable) is firmly attached.
Note: The minimum thickness of the base material required is 120 mm. The maximum thickness of the material to be fastened is 20 mm.
5. Operation
Once properly installed, the CRL HSL-3 expansion anchor provides a secure and reliable fastening point. The anchor functions by creating an outward pressure against the walls of the drilled hole in the concrete, resisting pull-out forces. It is designed for applications requiring high performance under static and dynamic loads.
6. Maintenance
Expansion anchors generally require minimal maintenance once installed correctly. However, periodic inspection is recommended, especially in critical applications or environments subject to vibration or significant temperature fluctuations.
- Visual Inspection: Check for any signs of corrosion, loosening, or damage to the anchor or the surrounding concrete.
- Retightening: If an anchor appears loose, carefully retighten the nut to the specified torque value. Do not over-tighten.
- Environmental Factors: In corrosive environments, consider protective coatings or replacement if significant degradation is observed.
7. Troubleshooting
| Problem | Possible Cause | Solution |
|---|---|---|
| Anchor does not hold securely. |
|
|
| Anchor spins during tightening. |
|
|
8. Specifications
| Model Number | EBA334 |
| Anchor Type | HSL-3 Expansion Anchor |
| Nominal Diameter | M8 |
| Anchor Length | 3-7/8" (98 mm) |
| Effective Anchorage Depth | 60 mm |
| Maximum Thickness Fastened | 20 mm |
| Minimum Thickness of Base Material | 120 mm |
| Material | Carbon Steel |
| Approvals/Listings | ETAG, Shock BZS, Fire IBMB, Fire exiting. VdS (2003 and 2006 IBC compliant) |
| Product Dimensions | 3 x 2.2 x 0.6 inches |
| Item Weight | 0.256 ounces |
Note: The indicated load value applies to non-cracked concrete C20/25, with no edge distance and spacing influence. Always refer to local building codes and engineering specifications for specific application requirements.
9. Warranty and Support
For specific warranty information and technical support regarding the CRL EBA334 HSL-3 Expansion Anchor, please contact the manufacturer, CRL, or your authorized distributor. Warranty terms and conditions may vary based on region and purchase location.
Manufacturer: Hilti (as per product specifications, though brand is CRL)