1. Introduction
This manual provides essential information for the safe and efficient operation of your SANYO PLC-XK2200 XGA Ultra-Portable Multimedia Projector. Please read this manual thoroughly before using the projector and retain it for future reference.
The SANYO PLC-XK2200 is designed to deliver clear and bright images with 2200 lumens and a 2000:1 contrast ratio, suitable for various presentation environments.
2. Safety Information
- Power Source: Use only the specified power supply. Ensure the power cord is securely connected.
- Ventilation: Do not block ventilation openings. Ensure adequate space around the projector for proper airflow to prevent overheating.
- Lamp Warning: The projector lamp operates at high temperatures and pressures. Allow the projector to cool down before moving or performing maintenance. Do not look directly into the lens when the lamp is on.
- Liquid Exposure: Do not expose the projector to rain, moisture, or liquids.
- Servicing: Refer all servicing to qualified service personnel. Do not attempt to open or repair the projector yourself.
3. Product Overview
3.1 Top Panel Controls
The top panel provides access to essential controls for power, menu navigation, focus, and zoom adjustments.

Image: Top view of the SANYO PLC-XK2200 projector. Visible controls include the focus and zoom rings, the power button, and buttons for menu navigation (Menu, Select, Volume, Auto Setup, Lamp Reset).
3.2 Rear Panel Connections
The rear panel houses various input and output ports for connecting external devices.

Image: Rear view of the SANYO PLC-XK2200 projector. Ports visible include Control Port, Computer In 1 (S-Video In/Component In), Computer In 2 (Monitor Out), Video In, Audio In/Out, and a network port.
3.3 Side and Bottom Views
The side view shows the power input and ventilation, while the bottom view reveals mounting points and product labels.
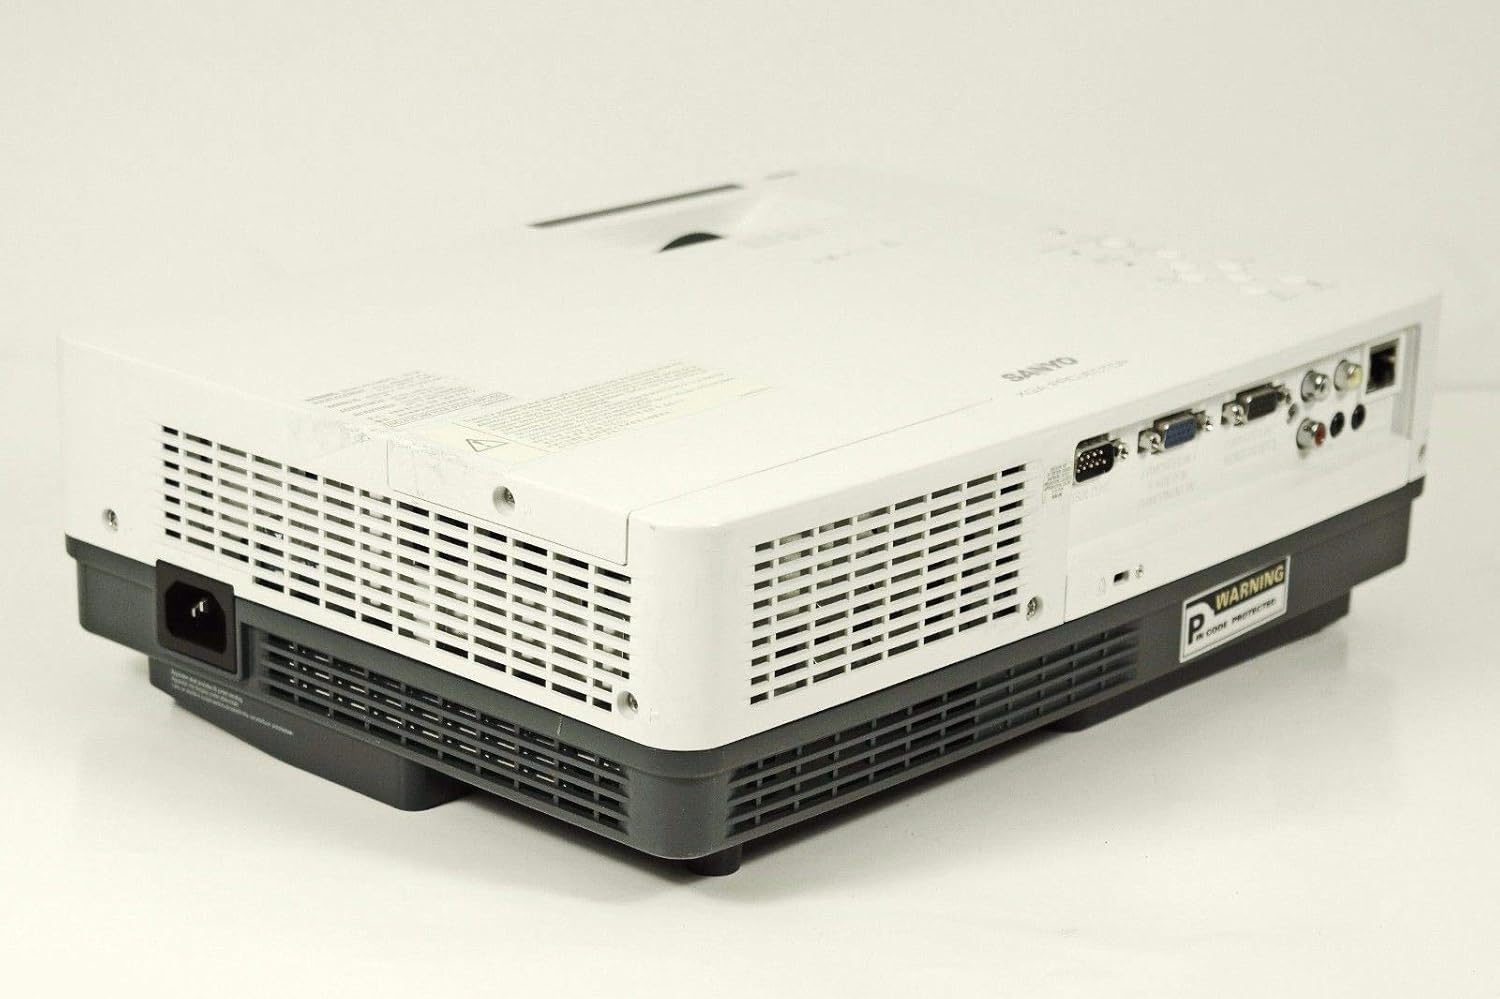
Image: Side view of the SANYO PLC-XK2200 projector, highlighting the power input socket and exhaust vents.

Image: Bottom view of the SANYO PLC-XK2200 projector, displaying screw holes for mounting, ventilation grilles, and the product information label.
4. Setup
4.1 Projector Placement
Place the projector on a stable, flat surface or mount it securely. Ensure there is sufficient space around the projector for ventilation. Avoid placing it in direct sunlight or near heat sources.
4.2 Connecting Power
- Connect the power cord to the AC inlet on the projector.
- Plug the other end of the power cord into a grounded electrical outlet.
- The power indicator light will illuminate, typically in amber, indicating standby mode.
4.3 Connecting Input Sources
Connect your video source (e.g., computer, DVD player) to the appropriate input port on the projector's rear panel. The PLC-XK2200 supports various inputs including VGA (Computer In 1/2), S-Video, and Composite Video.
- Computer: Use a VGA cable to connect your computer's video output to the COMPUTER IN 1 or COMPUTER IN 2 port.
- Video Devices: For S-Video, connect to the S-VIDEO IN port. For composite video, connect to the VIDEO IN port using an RCA cable.
- Audio: Connect audio cables from your source device to the AUDIO IN ports if you wish to use the projector's internal speaker or audio output.
5. Operating Instructions
5.1 Powering On/Off
- To Power On: Press the POWER button on the projector's top panel or remote control. The power indicator will turn green, and the lamp will illuminate.
- To Power Off: Press the POWER button twice. The projector will enter cooling mode, and the power indicator will flash amber. Once cooled, it will return to standby mode (solid amber).
5.2 Adjusting the Image
- Focus: Rotate the FOCUS ring on the lens until the image is sharp and clear.
- Zoom: Rotate the ZOOM ring on the lens to adjust the image size.
- Keystone Correction: Use the AUTO SETUP button or navigate through the menu to adjust vertical keystone distortion, which corrects trapezoidal images.
5.3 Input Selection
Press the INPUT button on the projector or remote control to cycle through available input sources (e.g., Computer 1, Computer 2, Video, S-Video).
5.4 Menu Navigation
Press the MENU button to access the on-screen display (OSD) menu. Use the arrow buttons to navigate and the SELECT button to confirm choices. Press MENU again to exit.
6. Maintenance
6.1 Cleaning the Projector
- Exterior: Use a soft, dry cloth to clean the projector's casing. For stubborn dirt, dampen the cloth with a mild detergent solution.
- Lens: Gently wipe the lens with a lens cleaning cloth or lens paper. Avoid harsh chemicals or abrasive materials.
- Air Filter: Regularly clean the air filter to maintain proper ventilation and prevent overheating. Refer to the filter cover for removal instructions.
6.2 Lamp Replacement
The lamp has a finite lifespan. When the lamp indicator illuminates or the image becomes dim, the lamp may need replacement. Always allow the projector to cool completely before attempting lamp replacement. Consult a qualified technician for lamp replacement if you are unsure.
Warning: High pressure lamp. Risk of explosion if improperly handled. Refer to the service manual for detailed lamp replacement procedures.
7. Troubleshooting
| Problem | Possible Cause | Solution |
|---|---|---|
| No image displayed | Incorrect input selected; loose cable connection; projector in standby. | Press INPUT to select correct source; check cable connections; press POWER button to turn on. |
| Image is blurry | Focus not adjusted; projector too close/far from screen. | Adjust the FOCUS ring; reposition the projector or use the ZOOM ring. |
| Image is trapezoidal | Projector not perpendicular to screen. | Use Auto Vertical Keystone correction or manually adjust. |
| Projector overheats and shuts down | Blocked ventilation; dirty air filter. | Ensure clear airflow around vents; clean or replace air filter. |
8. Specifications

Image: Side view of the SANYO PLC-XK2200 projector, displaying the model number label (MODEL NO. PLC-XK2200).
- Model Name: PLC-XK2200
- Brand: SANYO
- Display Technology: LCD
- Brightness: 2200 Lumens
- Contrast Ratio: 2000:1
- Native Resolution: XGA (1024 x 768)
- Aspect Ratio: 4:3 (Native)
- Form Factor: Portable
- Mounting Type: Tabletop Mount
- Input Terminals: VGA (x2), S-Video, Composite Video, Audio In (RCA)
- Output Terminals: VGA (Monitor Out), Audio Out (RCA)
- Control Port: RS-232C
- UPC: 086483079498
9. Warranty and Support
For warranty information, please refer to the warranty card included with your product or contact your local SANYO dealer. Technical support may be available through authorized service centers.
No official product videos were provided in the input data for this manual.


