Central Hydraulics 792363661515
Hydraulic Wire Crimping Tool
User Manual - Central Hydraulics
1. Introduction
This manual provides essential information for the safe and effective use of your Central Hydraulics Hydraulic Wire Crimping Tool. This tool is designed to make faster, more secure wire-crimping connections, saving time and labor. It is suitable for crimping 14 to 0 AWG copper and aluminum wires.
Please read this manual thoroughly before operation and retain it for future reference.
2. Safety Information
WARNING: Always wear appropriate personal protective equipment, including safety glasses, when operating this tool.
- Ensure the work area is clean and well-lit.
- Keep children and bystanders away while operating the tool.
- Do not operate the tool if you are tired or under the influence of drugs, alcohol, or medication.
- Inspect the tool and dies for damage before each use. Do not use if damaged.
- Use only the specified crimping dies for the wire gauge being crimped.
- Do not exceed the maximum crimping force of 8 tons.
- Keep hands and fingers clear of the crimping jaws during operation.
- Store the tool in a dry, secure place when not in use.
3. Key Features
- On/off knob on handle: For easy ram retraction.
- Vinyl-dipped grip: Provides comfort and control during use.
- Powder-coated jaws: Enhances durability and corrosion resistance.
- Maximum crimping force: 8 tons, ensuring strong connections.
- Ram travel: 3/8" for efficient crimping.
- Die sizes: Includes 9 pairs of chrome-plated steel crimping dies for 0, 2, 4, 6, 7, 8, 10, and 14 AWG wires.
4. Product Components
Your Hydraulic Wire Crimping Tool package includes the following components:
- Hydraulic Crimping Tool body
- 9 pairs of chrome-plated steel crimping dies
- Durable carrying case
- Instruction sheet (this manual)

This image displays the complete Hydraulic Wire Crimping Tool kit, including the main tool, various crimping dies, and the protective orange carrying case. An instruction sheet is also visible next to the tool.
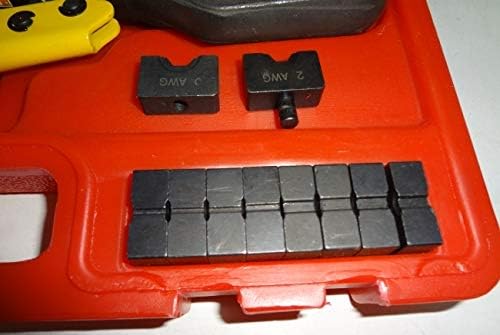
A close-up view of the various chrome-plated steel crimping dies included with the tool. These dies are essential for crimping different wire gauges and are stored in designated slots within the carrying case.
5. Setup
- Unpack: Carefully remove the crimping tool and all accessories from the carrying case.
- Inspect: Before first use, inspect the tool for any signs of shipping damage or defects. Ensure all dies are present and free from burrs or damage.
- Familiarize: Identify the main components: the hydraulic cylinder, the crimping jaws, the movable handle, the fixed handle, and the on/off knob for ram retraction.
- Select Dies: Choose the appropriate crimping dies for the specific wire gauge and terminal you intend to crimp. The dies are marked with their respective AWG sizes.
- Install Dies: Insert the selected die halves into the crimping jaws. Ensure they are seated correctly and securely.
6. Operation
- Prepare Wire: Strip the insulation from the wire to the appropriate length for your terminal.
- Insert Wire and Terminal: Place the wire and terminal into the selected crimping dies. Ensure they are properly aligned within the die cavity.
- Close On/Off Knob: Rotate the on/off knob on the handle clockwise to close the hydraulic valve. This will allow pressure to build.
- Crimp: Pump the movable handle repeatedly. The hydraulic ram will extend, closing the dies and crimping the terminal onto the wire. Continue pumping until the dies meet or the crimp is complete. Do not over-crimp.
- Release: Once the crimp is complete, rotate the on/off knob counter-clockwise to open the hydraulic valve. The ram will retract, and the crimping jaws will open.
- Remove Crimped Connection: Carefully remove the crimped wire and terminal from the jaws.
- Verify Crimp: Visually inspect the crimp for proper formation and secure connection.
7. Maintenance
- Cleaning: After each use, wipe down the tool and dies with a clean, dry cloth to remove any dirt, debris, or moisture.
- Lubrication: Periodically apply a light coat of machine oil to the moving parts and dies to prevent rust and ensure smooth operation.
- Storage: Store the tool and dies in their original carrying case in a cool, dry place, away from direct sunlight and corrosive materials.
- Inspection: Regularly inspect the tool for wear, damage, or oil leaks. If any issues are found, discontinue use and consult a qualified technician.
- Hydraulic Fluid: The hydraulic system is sealed. Do not attempt to open or refill the hydraulic fluid unless you are a trained professional.
8. Troubleshooting
| Problem | Possible Cause | Solution |
|---|---|---|
| Tool does not crimp or crimps weakly. | On/off knob is not fully closed. Incorrect die size for wire/terminal. Low hydraulic fluid. | Ensure on/off knob is turned fully clockwise. Verify correct die selection. If problem persists, tool may require professional service. |
| Ram does not retract after crimping. | On/off knob is not fully opened. Obstruction in jaws. | Turn on/off knob fully counter-clockwise. Check for and remove any obstructions. |
| Oil leakage from tool. | Damaged seals or hydraulic system. | Discontinue use immediately. This requires professional repair. Do not attempt to fix yourself. |
| Dies do not fit properly. | Incorrect die orientation or debris in die slots. | Ensure dies are inserted correctly. Clean die slots thoroughly. |
9. Specifications
| Attribute | Value |
|---|---|
| Model Number | 792363661515 |
| Crimping Range | 14 to 0 AWG (copper and aluminum) |
| Maximum Crimping Force | 8 tons |
| Ram Travel | 3/8" |
| Die Sizes Included | 0, 2, 4, 6, 7, 8, 10, 14 AWG |
| Overall Dimensions (L x W x H) | 12" L x 2" W x 7-1/4" H (approximate) |
| Weight | 7.06 lbs |
| Handle Material | Vinyl |
| Grip Type | Ergonomic |
10. Warranty and Support
Specific warranty details for this product are not provided within this manual. For warranty claims, technical support, or replacement parts, please refer to the original purchase documentation or contact Central Hydraulics customer service directly.
Please visit the manufacturer's official website or contact your retailer for the most up-to-date support information.
Related Documents - 792363661515
 |
Central Hydraulics 20 Ton Air Over Hydraulic Jack Model 95553 - Assembly & Operation Manual Comprehensive assembly, operation, maintenance, and troubleshooting guide for the Central Hydraulics 20 Ton Air Over Hydraulic Jack, Model 95553. Includes specifications, parts lists, and safety warnings from Harbor Freight Tools. |
Ask a question about this manual
Ask about setup, troubleshooting, compatibility, parts, safety, or missing instructions. Manuals+ will review the question and use this page’s manual context to help answer it.