1. Safety Instructions
Please read all instructions before using this sewing machine to ensure safe operation and prevent injury or damage. Keep this manual for future reference.
1.1 General Safety
- Always unplug the machine from the electrical outlet immediately after using, before cleaning, or when making any user servicing adjustments.
- Keep fingers away from all moving parts. Special care is required around the sewing machine needle.
- Use the correct needle plate. The wrong plate can cause the needle to break.
- Do not pull or push fabric while stitching. This may deflect the needle, causing it to break.
- Never operate the machine with any air openings blocked. Keep ventilation openings of the sewing machine and foot controller free from the accumulation of lint, dust, and loose cloth.
1.2 Electrical Safety
- This appliance is intended for household use only.
- Do not operate where aerosol (spray) products are being used or where oxygen is being administered.
- To disconnect, turn all controls to the off ('O') position, then remove the plug from the outlet.
2. Package Contents
Verify that all items listed below are included in your package:
- SIRUBA HSM-2721 Sewing Machine
- All-purpose foot
- Buttonhole foot
- Zipper foot
- Bobbin
- Screwdriver
- Needle plate screwdriver
- Felt
- Buttonhole cutter
- Feed cover plate
- Needle set (3)
- English instruction book (this manual)
- Power cord
- Foot controller
3. Product Overview
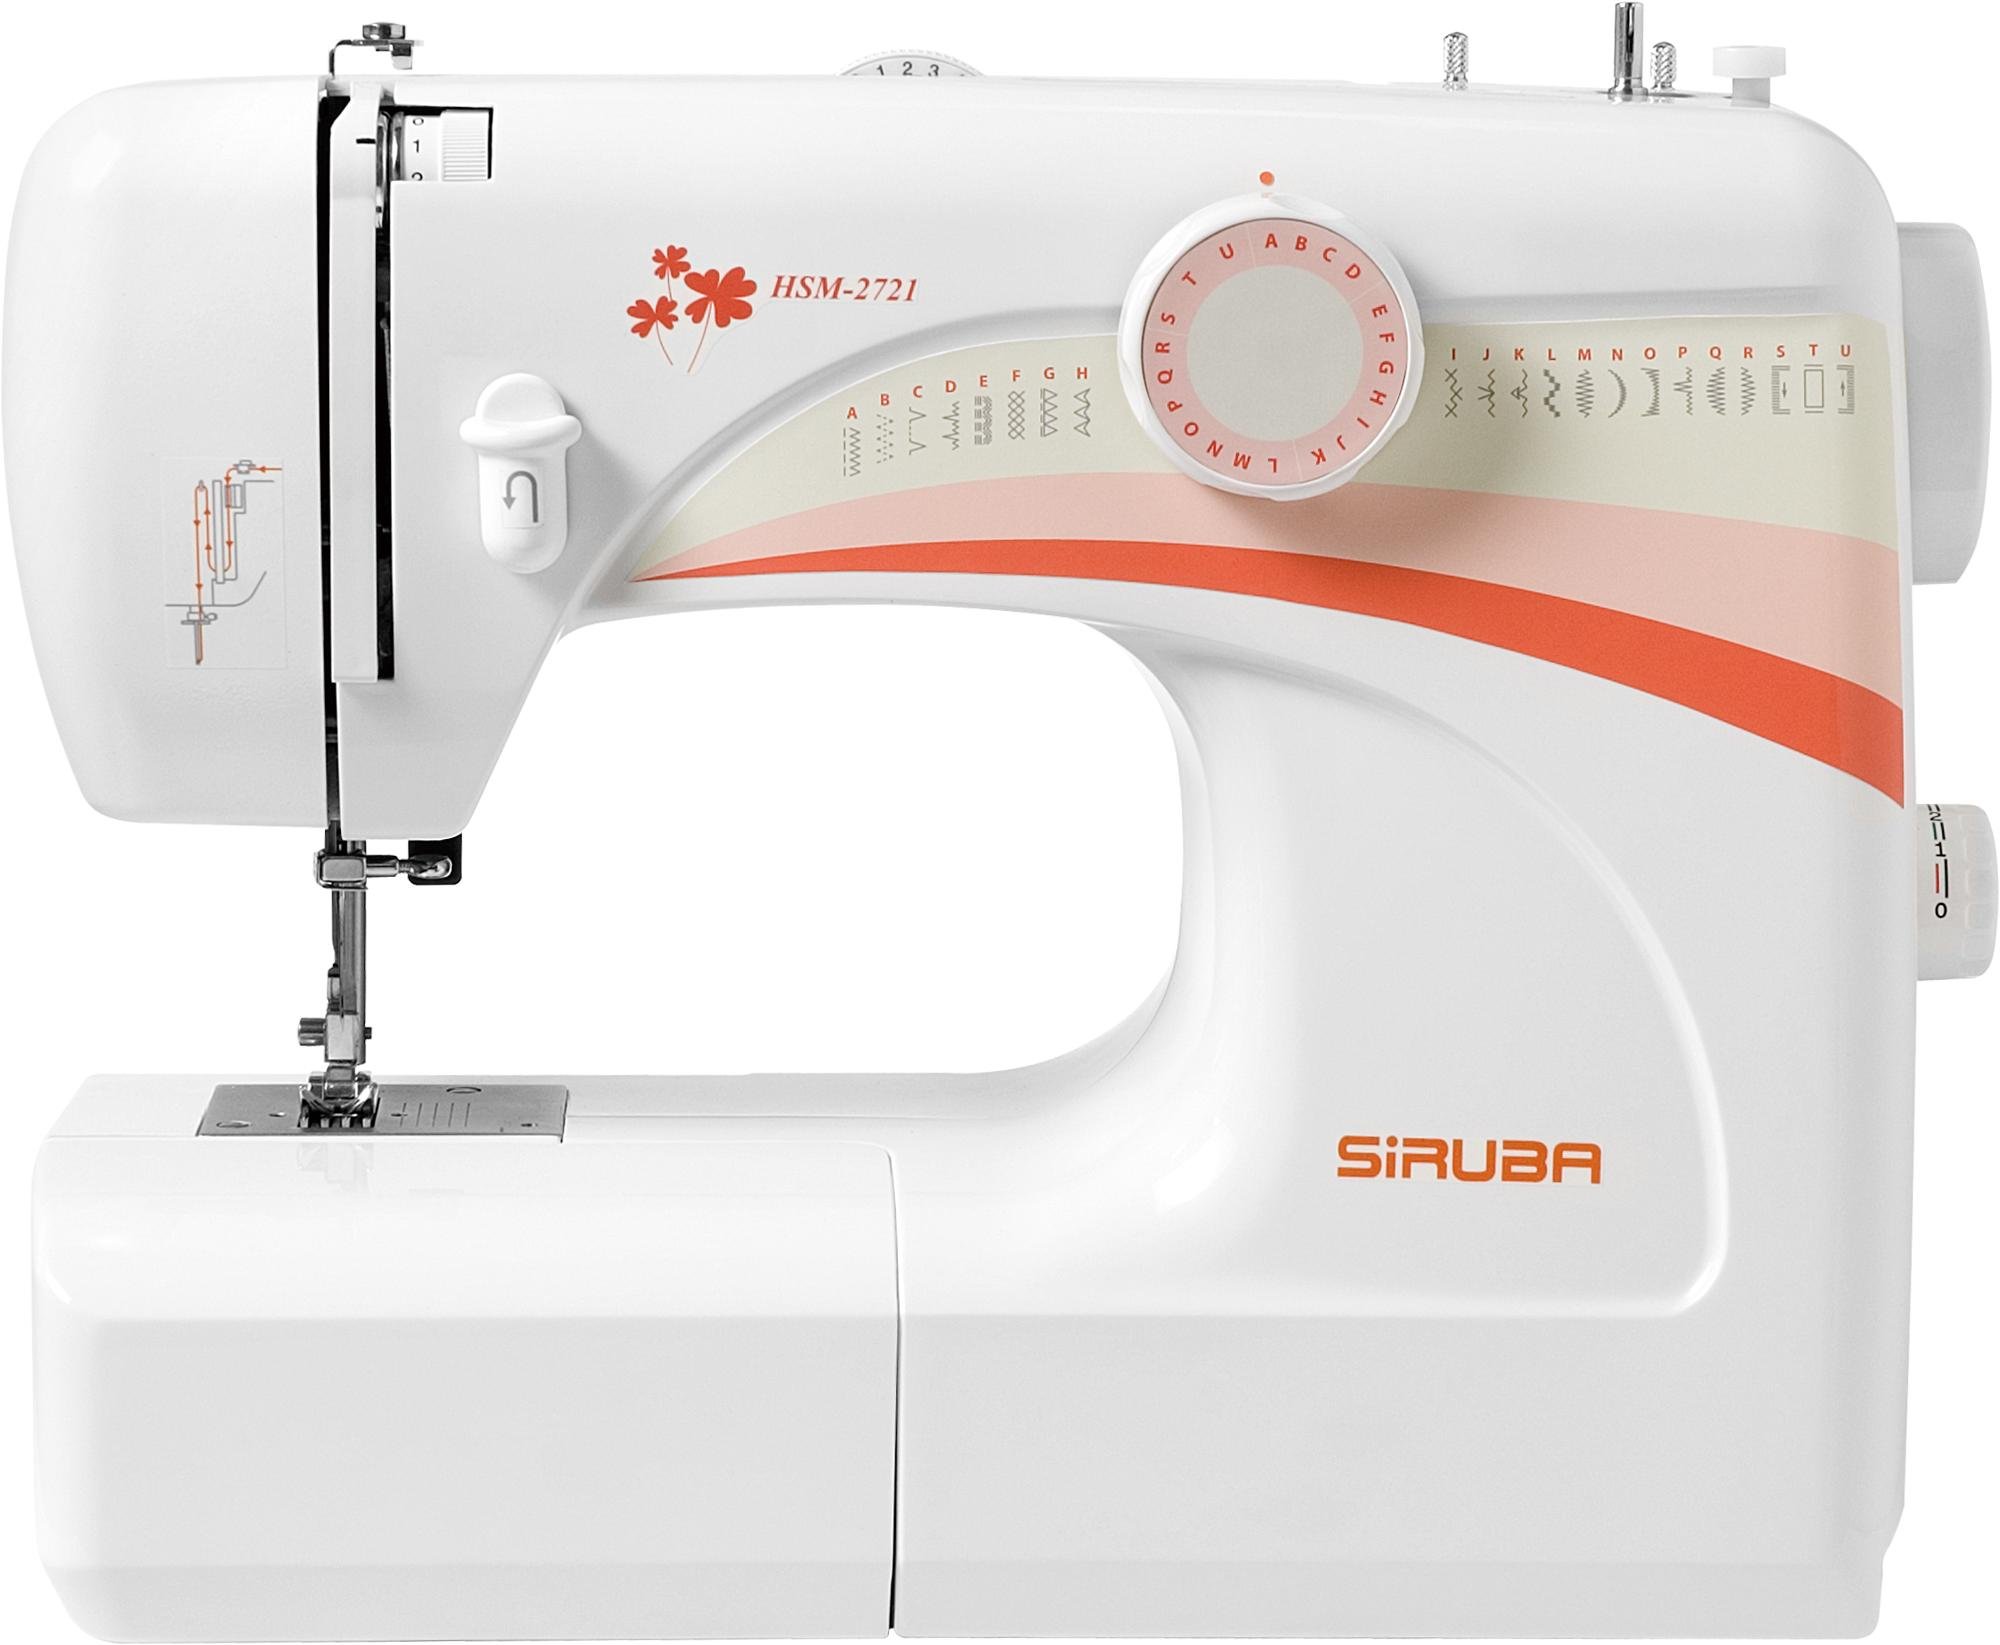
The SIRUBA HSM-2721 is a basic type sewing machine designed for ease of use, making it suitable for beginners. It features 21 stitch patterns, including essential utility stitches like zig-zag, 4-step buttonhole, and zipper stitches, allowing for a wide range of sewing tasks such as hemming, binding, and overcastting.

Key features include a stitch width and length selector dial, an adjustable tension dial, and a free arm for sewing cylindrical items. The machine operates at a speed of 720-780 stitches per minute and includes a built-in light, bobbin winder, and thread cutter for enhanced efficiency.

4. Setup
4.1 Power Connection
- Place the machine on a stable, flat surface.
- Insert the power cord plug into the machine's power socket.
- Plug the other end of the power cord into a suitable electrical outlet.
- Connect the foot controller to the machine's foot controller socket.
4.2 Threading the Machine
Proper threading is crucial for good stitch quality.
- Raise the presser foot lifter.
- Place a spool of thread on the spool pin.
- Guide the thread through the upper thread guide.
- Pass the thread through the tension discs. Ensure the thread is seated correctly within the discs.
- Bring the thread up and through the take-up lever from right to left.
- Guide the thread down through the remaining thread guides to the needle.
- Thread the needle from front to back.

4.3 Winding the Bobbin
Before you begin sewing, you will need to wind thread onto a bobbin.
- Place an empty bobbin onto the bobbin winder spindle.
- Guide the thread from the spool through the bobbin winding tension disc.
- Wrap the thread around the bobbin a few times clockwise.
- Push the bobbin winder spindle to the right.
- Gently press the foot controller to start winding. Stop when the bobbin is full.
- Cut the thread and push the bobbin winder spindle back to the left.
5. Operating Instructions
5.1 Selecting a Stitch Pattern
The HSM-2721 offers 21 stitch patterns. To select a stitch:
- Turn the stitch selector dial to the desired stitch pattern. The dial displays various stitch icons.
- Ensure the needle is in its highest position before changing the stitch pattern.
5.2 Adjusting Stitch Length and Width
The machine features a selector dial for adjusting stitch length and width, along with an adjustable tension dial.
- Stitch Length: Adjust the stitch length dial to control the distance between stitches. Shorter lengths create denser stitches, while longer lengths create looser stitches.
- Stitch Width: Adjust the stitch width dial to control the width of zig-zag or decorative stitches.
- Thread Tension: Use the tension dial to balance the upper and bobbin threads. Adjust as needed for different fabrics and threads to achieve an even stitch.
5.3 Sewing Basic Stitches
To sew a straight stitch or zig-zag stitch:
- Select the desired stitch pattern (e.g., straight stitch or zig-zag).
- Place the fabric under the presser foot.
- Lower the presser foot.
- Gently press the foot controller to start sewing. Guide the fabric smoothly.

5.4 Buttonhole Sewing
The machine features a 4-step buttonhole function.
- Attach the buttonhole foot.
- Mark the buttonhole position on your fabric.
- Follow the 4-step sequence indicated on the stitch selector dial, adjusting the dial for each step.
- After completing all four steps, use the buttonhole cutter to open the buttonhole.

5.5 Zipper Sewing
Use the zipper foot for easy zipper insertion.
- Attach the zipper foot.
- Position the fabric and zipper under the foot.
- Adjust the needle position if necessary to sew close to the zipper teeth.
- Sew slowly and carefully, guiding the zipper tape.

5.6 Using the Free Arm
The convertible free arm is ideal for sewing cuffs, sleeves, pant hems, and other small, circular items.
- Remove the accessory box by sliding it off to the left. This exposes the free arm.
- Slide the cylindrical item (e.g., sleeve) over the free arm.
- Sew as usual, rotating the fabric around the free arm as you stitch.
6. Maintenance
6.1 Cleaning the Machine
Regular cleaning ensures smooth operation and extends the life of your machine.
- Always unplug the machine before cleaning.
- Remove the needle, presser foot, and needle plate.
- Use a small brush to remove lint and dust from the feed dogs and bobbin area.
- Wipe the exterior surfaces with a soft, dry cloth. Do not use harsh chemicals.

6.2 Changing the Needle
Change the needle regularly (after 8-10 hours of sewing) or if it becomes bent or dull.
- Unplug the machine.
- Loosen the needle clamp screw.
- Remove the old needle.
- Insert a new needle with the flat side facing the back of the machine, pushing it up as far as it will go.
- Tighten the needle clamp screw securely.
7. Troubleshooting
Refer to this table for common issues and their solutions.
| Problem | Possible Cause | Solution |
|---|---|---|
| Skipped stitches | Incorrect needle, bent needle, improper threading | Change needle, re-thread machine, ensure correct needle type for fabric |
| Thread breaking | Incorrect tension, poor quality thread, bent needle, improper threading | Adjust tension, use good quality thread, change needle, re-thread machine |
| Fabric puckering | Incorrect tension, wrong stitch length, dull needle | Adjust tension, increase stitch length, change needle |
| Machine not sewing | Not plugged in, foot controller not connected, bobbin winder engaged | Check power, connect foot controller, disengage bobbin winder |
8. Specifications
Technical details for the SIRUBA HSM-2721 Sewing Machine:
| Feature | Detail |
|---|---|
| Model Number | HSM-2721 |
| Stitch Patterns | 21 (including zig-zag, 4-step buttonhole, zipper stitch) |
| Speed | 720-780 stitches per minute (s.p.m.) |
| Stitch Width | 0-5.0 mm (adjustable via selector dial) |
| Buttonhole Sewing | 4 steps |
| Free Arm Perimeter | 282mm |
| Presser Foot Highest Position | 6.0 mm |
| Power Source | Corded Electric |
| Item Weight | 17 Pounds |
9. Warranty and Support
For warranty information and customer support, please refer to the warranty card included with your product or contact SIRUBA customer service. Keep your purchase receipt as proof of purchase.
For further assistance or to inquire about replacement parts, please visit the official SIRUBA website or contact their authorized service centers.