Introduction
This user manual provides comprehensive instructions for the installation, operation, and maintenance of your Elica Hood Mini Om/Mini Io Wall 55 cm Black Glass range hood. Please read this manual carefully before using the appliance to ensure safe and efficient operation. Keep this manual for future reference.
Safety Information
Always adhere to the following safety precautions to prevent injury or damage to the appliance.
- Electrical Safety: Ensure the power supply matches the voltage specified on the rating label (220-240V). The appliance must be properly grounded. Do not use extension cords or multiple adapters.
- Installation: Installation must be performed by a qualified technician in accordance with local regulations and building codes. Ensure adequate ventilation in the room when the range hood is used simultaneously with gas or other fuel-burning appliances.
- Operation: Never leave frying food unattended. Flammable oils can ignite. Do not flambé under the range hood. Ensure filters are clean and correctly installed before operation.
- Cleaning and Maintenance: Disconnect the appliance from the power supply before any cleaning or maintenance. Use non-abrasive cleaning agents.
- Children and Vulnerable Persons: This appliance is not intended for use by persons (including children) with reduced physical, sensory or mental capabilities, or lack of experience and knowledge, unless they have been given supervision or instruction concerning use of the appliance by a person responsible for their safety.
Product Overview
The Elica Hood Mini Om/Mini Io is a wall-mounted range hood designed to efficiently remove smoke, steam, and odors from your kitchen. It features a sleek black glass finish and integrated lighting.

Figure 1: Front view of the Elica Hood Mini Om/Mini Io, showcasing its black glass panel and central circular extraction area with the Elica logo on the left.

Figure 2: The Elica Hood Mini Om/Mini Io mounted on a wall, demonstrating its integrated lighting illuminating the area below.
Main Components:
- Control Panel: Typically located on the front or bottom edge for fan speed and light control.
- Grease Filters: Mesh filters designed to trap grease particles.
- Lighting: Integrated lights to illuminate the cooking surface.
- Motor/Fan Assembly: Internal components responsible for air extraction.
- Ducting Connection: Outlet for connecting to the ventilation ductwork.
Setup and Installation
Proper installation is crucial for the performance and safety of your range hood. Refer to the detailed installation diagram for measurements.
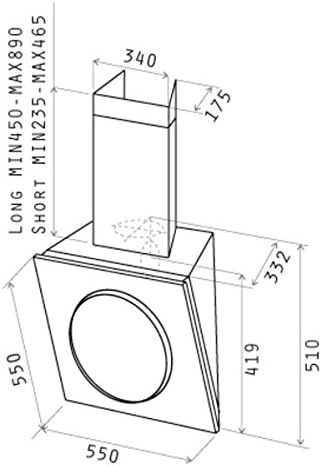
Figure 3: Technical diagram showing the dimensions of the Elica Hood Mini Om/Mini Io, including height, width, depth, and ducting measurements for installation planning.
Pre-Installation Checklist:
- Verify all components are present and undamaged.
- Ensure the wall structure is strong enough to support the hood's weight (approximately 15 kg / 33 lbs).
- Confirm electrical supply (220-240V) is available at the installation point.
- Plan ducting route to the outside. The hood requires external venting.
- Maintain minimum distance between the cooking surface and the lower part of the hood as specified by local regulations (typically 65-75 cm for electric hobs, 75-85 cm for gas hobs).
Installation Steps (Summary):
- Marking: Mark the drilling points on the wall according to the provided template and dimensions.
- Drilling: Drill holes and insert wall plugs suitable for your wall type.
- Mounting Bracket: Secure the mounting bracket to the wall.
- Hood Mounting: Carefully lift and attach the hood to the mounting bracket. Ensure it is level and secure.
- Ducting Connection: Connect the hood's outlet to the external ductwork using appropriate ducting material. Ensure airtight seals.
- Electrical Connection: Connect the hood to the main power supply. This step must be performed by a qualified electrician.
- Chimney Installation: Install the decorative chimney sections, if applicable, covering the ducting.
- Filter Installation: Install the grease filters.
For detailed step-by-step instructions, refer to the separate installation guide provided with your product packaging.
Operating Instructions
Your Elica range hood is designed for ease of use. The control panel allows you to manage fan speed and lighting.
Control Panel Functions:
- Power Button: Turns the hood on/off.
- Fan Speed Buttons: Adjusts the extraction power. Typically, there are multiple speed settings (e.g., 1, 2, 3, Intensive).
- Speed 1 (Low): For light cooking, simmering.
- Speed 2 (Medium): For general cooking.
- Speed 3 (High): For heavy cooking, frying.
- Intensive Speed: For very strong odors or steam, typically operates for a limited time before reverting to a lower speed.
- Light Button: Turns the integrated lighting on/off.
Usage Tips:
- Turn on the hood a few minutes before you start cooking to create an airflow.
- Select the appropriate fan speed based on the intensity of cooking.
- Allow the hood to run for a few minutes after cooking to clear any remaining odors or steam.
Maintenance
Regular maintenance ensures optimal performance and extends the lifespan of your range hood.
Cleaning the Grease Filters:
The mesh grease filters should be cleaned regularly, depending on usage (typically every 2-4 weeks).
- Disconnect Power: Always switch off and unplug the hood from the power supply before cleaning.
- Remove Filters: Locate the filter release latches and carefully remove the mesh filters.
- Clean Filters: Wash the filters by hand in hot soapy water or in a dishwasher (ensure they are suitable for dishwasher cleaning, check product specifications). Avoid using abrasive brushes or detergents.
- Dry and Reinstall: Allow filters to dry completely before reinstalling them. Ensure they click securely into place.
Cleaning the Exterior:
Clean the exterior surfaces with a soft cloth dampened with mild detergent. For black glass surfaces, use a glass cleaner and a microfiber cloth to avoid streaks. Do not use abrasive cleaners or corrosive products.
Replacing Lights:
If a light bulb needs replacement, ensure the hood is disconnected from power. Refer to the specific bulb type and replacement instructions in your product's detailed manual. Use only bulbs of the same type and wattage.
Troubleshooting
Before contacting customer support, review the following common issues and their solutions.
| Problem | Possible Cause | Solution |
|---|---|---|
| Hood does not turn on. | No power supply. Faulty switch. | Check if the hood is plugged in and the circuit breaker is not tripped. Contact a qualified technician. |
| Poor extraction performance. | Clogged grease filters. Obstruction in ducting. Incorrect fan speed. Insufficient room ventilation. | Clean or replace grease filters. Check ducting for blockages. Increase fan speed. Open a window or door to allow air intake. |
| Excessive noise during operation. | Loose components. Obstruction in fan. Incorrect ducting size/installation. | Check if filters are properly installed. Inspect fan for foreign objects (with power off). Ensure ducting is correctly sized and installed without sharp bends. |
| Lights not working. | Burnt-out bulb. Loose connection. | Replace the bulb (ensure power is off). Contact a qualified technician. |
If the problem persists after attempting these solutions, please contact Elica customer support.
Specifications
| Feature | Detail |
|---|---|
| Model Number | 61614583A |
| Mounting Type | Wall Mount |
| Dimensions (Product) | 13.07 x 21.65 x 20.28 inches (approx. 33.2 x 55 x 51.5 cm) |
| Item Weight | 15 Kilograms / 33 pounds |
| Voltage | 220-240V |
| Wattage | 290 watts |
| Noise Level | 48 dB |
| Filter Type | Mesh |
| Color | Black |
| Finish Type | Painted |
Warranty and Support
Elica products are manufactured to high quality standards and are covered by a limited warranty. For specific warranty terms and conditions, please refer to the warranty card included with your product or visit the official Elica website.
For technical assistance, spare parts, or service requests, please contact Elica customer support. When contacting support, please have your product model number (61614583A) and serial number ready.
Elica Official Website: www.elica.com