1. Introduction
Thank you for choosing the SENSE7 Gaming Spellcaster Ergonomic Office Chair. This manual provides essential information for the safe assembly, operation, maintenance, and troubleshooting of your new chair. Please read these instructions carefully before use and retain them for future reference.
2. Safety Information
- Ensure all components are present and undamaged before assembly. Do not use if any parts are missing or broken.
- Follow the assembly instructions precisely. Incorrect assembly can lead to instability and injury.
- Do not stand on the chair. Use it only for sitting.
- Do not exceed the maximum weight capacity of 150 kg (330 lbs).
- Keep children and pets away from the chair during assembly. Small parts can be a choking hazard.
- Avoid exposing the chair to direct sunlight or extreme temperatures, which can damage the material.
- Regularly check all bolts and screws to ensure they are tight. Retighten as necessary.
3. Package Contents
Verify that all the following components are included in your package:
- Seat
- Butterfly mechanism
- Gas lift
- Base (star base)
- 5 Wheels
- 3 Plastic covers
- Screw set
- Armrests (2)
- Cushions (2 - headrest and lumbar)
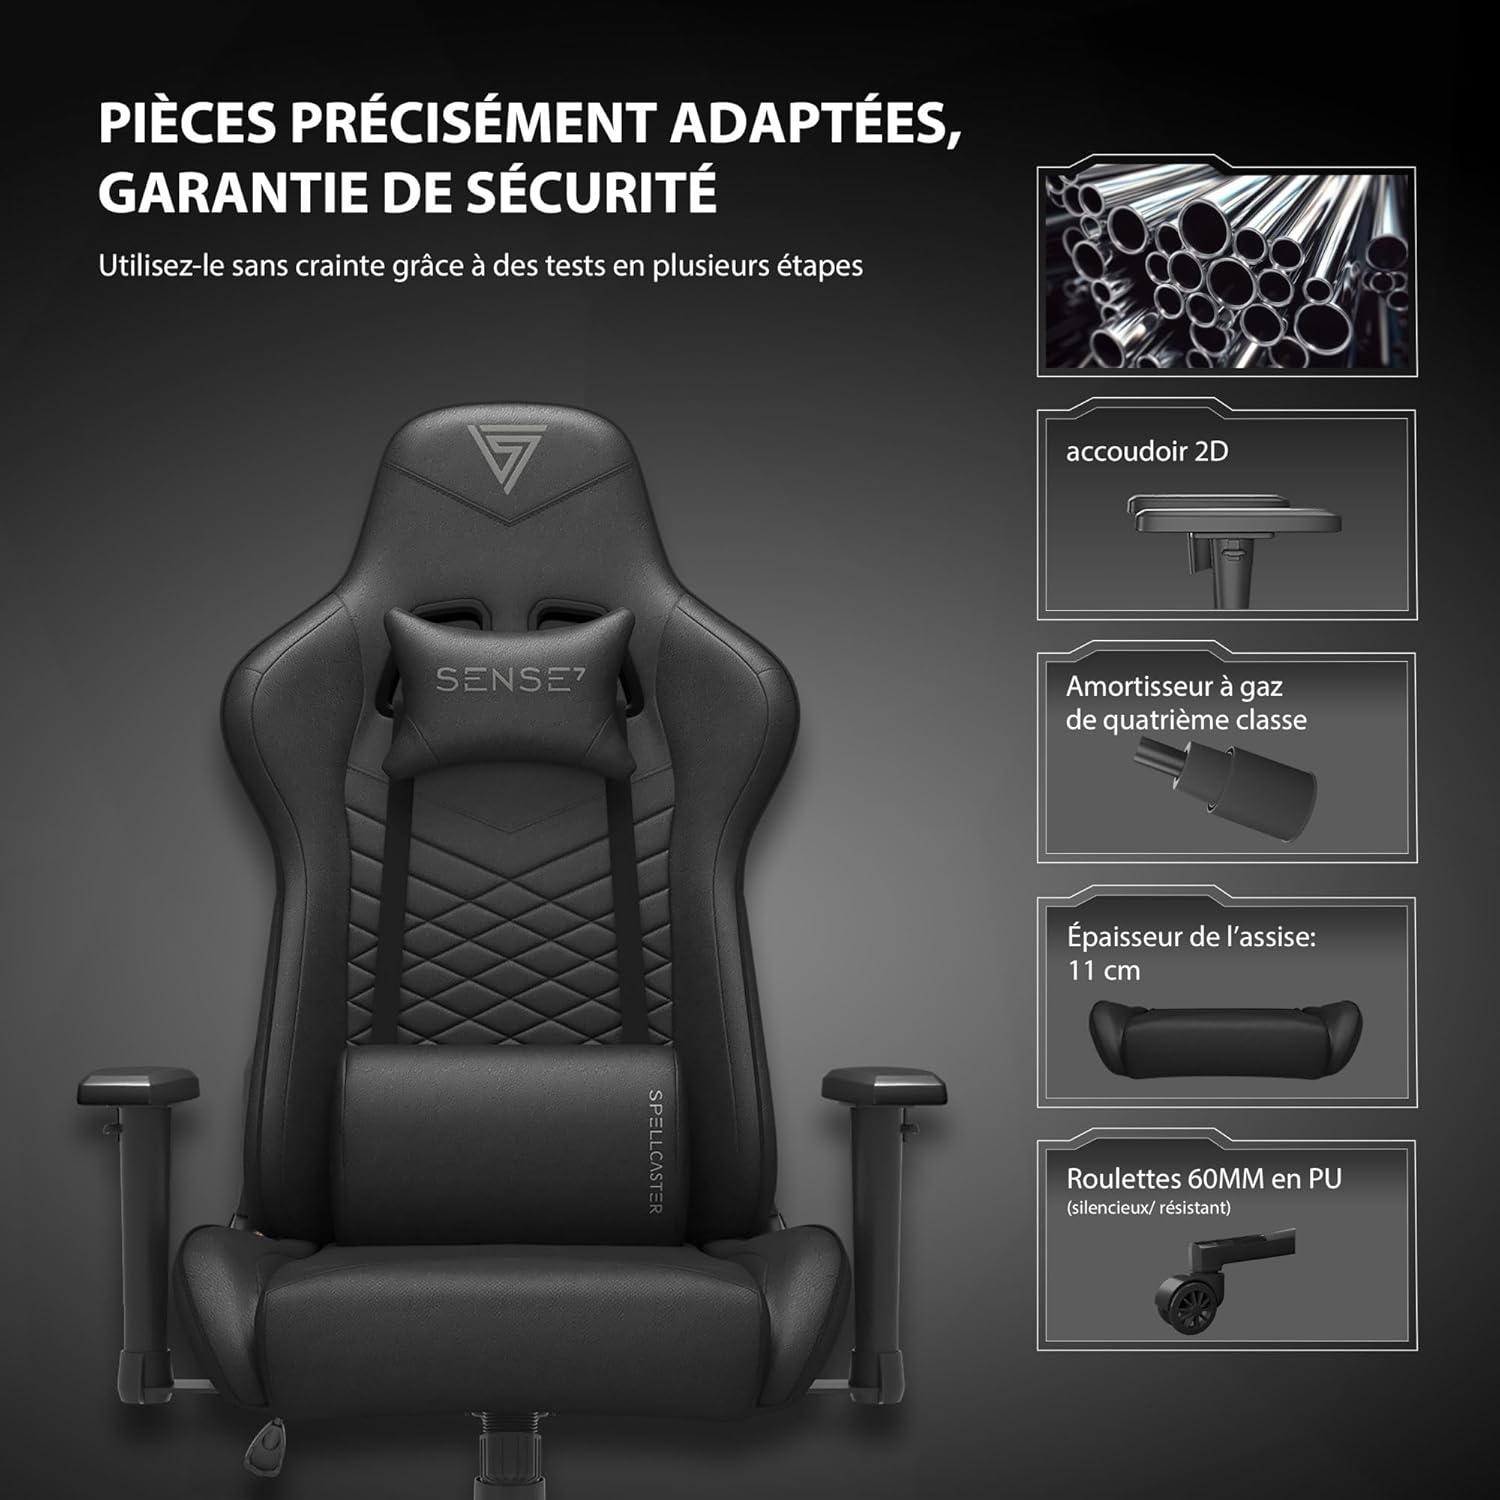
Image: Key components of the SENSE7 Gaming Spellcaster chair, including the 2D armrest, Class 4 gas lift, 11 cm thick seat, and 60mm PU wheels.
4. Assembly Instructions
Follow these steps to assemble your SENSE7 Gaming Spellcaster chair. It is recommended to assemble the chair on a soft, clean surface to prevent damage.
- Attach Wheels to Base: Insert each of the 5 wheels into the holes at the end of the star base until they click securely into place.
- Insert Gas Lift: Place the gas lift cylinder into the center hole of the star base. Cover it with the plastic cover if provided.
- Attach Mechanism to Seat: Align the butterfly mechanism with the screw holes on the underside of the seat. Ensure the tension knob faces the front of the seat. Secure with the provided screws.
- Attach Armrests: Secure the armrests to the underside of the seat using the designated screw holes and provided screws. Ensure they are firmly attached.
- Connect Backrest to Seat: Attach the backrest to the seat assembly using the side brackets and screws. Ensure the recline mechanism is correctly aligned.
- Place Seat Assembly onto Gas Lift: Carefully place the assembled seat and backrest onto the gas lift cylinder, ensuring it is centered and stable.
- Attach Cushions: Attach the headrest and lumbar support cushions using their integrated straps. Adjust their positions for optimal comfort.

Image: Illustration of the chair's base assembly, highlighting the gas lift and sturdy star base.
5. Operating Instructions
Your SENSE7 Gaming Spellcaster chair offers several adjustment options for personalized comfort.
5.1. Height Adjustment
To adjust the chair's height, locate the lever on the right side, beneath the seat. While seated, pull the lever up to lower the chair. To raise the chair, stand up and pull the lever up. Release the lever at your desired height.
5.2. Backrest Recline
The backrest can be reclined between 90° and 160°. Pull the recline lever on the left side of the chair upwards, lean back to your desired angle, and release the lever to lock it in place. Ensure the backrest is securely locked before applying full weight.

Image: Visual guide to the backrest recline function, illustrating 90° for PC gaming, 120° for mobile gaming, and 160° for relaxation.
5.3. Armrest Adjustment
The FlowTechArm 2D armrests can be adjusted in height. Locate the button on the side of each armrest. Press the button and move the armrest up or down to your preferred height. Release the button to lock the armrest.
5.4. Lumbar and Headrest Cushions
The included headrest and lumbar support cushions are adjustable. Slide them along their straps to find the optimal position for your neck and lower back support.

Image: Diagram illustrating the ergonomic design of the chair, highlighting support for cervical, shoulder, back, lumbar, and hip regions, with an emphasis on the adjustable lumbar support.
5.5. Tilt Function
The chair features a relaxing tilt function. To activate, pull the height adjustment lever outwards. To lock the tilt, push the lever inwards. The tension of the tilt can be adjusted by turning the round knob located under the seat, at the front.
5.6. Swivel Function
The chair's base allows for 360-degree swivel movement. Simply rotate the chair to your desired direction.
Product Overview Video
Video: A brief overview showcasing the SENSE7 Gaming Spellcaster chair's features and design in a gaming environment.
Design Process Video
Video: A short video illustrating the design and development process behind SENSE7 gaming chairs, emphasizing attention to detail and quality.
6. Maintenance and Care
Proper care will extend the life and appearance of your SENSE7 Gaming Spellcaster chair.
- Cleaning: For the synthetic leather material, wipe with a soft, damp cloth. Use a mild soap solution for tougher stains, then wipe dry immediately. Avoid abrasive cleaners or solvents.
- Spills: Blot spills immediately with a clean, dry cloth. Do not rub, as this can spread the stain.
- Inspection: Periodically check all screws and bolts for tightness. Retighten as needed to maintain stability and safety.
- Avoid Direct Sunlight: Prolonged exposure to direct sunlight can cause the material to fade or crack.
- Weight Limit: Adhere to the maximum weight capacity of 150 kg to prevent damage to the chair's components.

Image: Comparison of two material types, highlighting ease of maintenance for PU leather and breathability for ventilated fabric, along with softness, comfort, scratch resistance, and impermeability.
7. Troubleshooting
If you encounter any issues with your chair, refer to the following common problems and solutions:
- Chair is unstable or wobbly:
Solution: Ensure all screws and bolts are securely tightened. Check that the gas lift is properly seated in the base. - Chair does not adjust height:
Solution: Verify that the height adjustment lever is fully engaged. Check if the gas lift is damaged or improperly installed. - Backrest does not recline or lock:
Solution: Ensure the recline lever is fully pulled or pushed to engage the locking mechanism. Check for any obstructions in the recline mechanism. - Squeaking noises:
Solution: Tighten all screws and bolts. A small amount of silicone lubricant can be applied to moving parts, such as the mechanism or wheel axles, if the noise persists. - Wheels not rolling smoothly:
Solution: Check for debris (hair, dust) caught in the wheels. Clean them thoroughly. Ensure wheels are fully inserted into the base.
8. Specifications
Detailed specifications for the SENSE7 Gaming Spellcaster chair:

Image: Comprehensive diagram showing all key dimensions of the SENSE7 Gaming Spellcaster chair, including seat height, width, depth, backrest height, and maximum load capacity of 150kg.
| Feature | Detail |
|---|---|
| Model Name | Spellcaster |
| Item Model Number | 5907783039737 |
| Brand | SENSE7 |
| Color | Black/Red |
| Material Type | Synthetic Leather (Simili cuir) |
| Filling Material | Foam |
| Frame Material | Alloy Steel |
| Product Dimensions (L x W x H) | 57 x 70 x 126 cm (57P x 70l x 134H cm) |
| Item Weight | 17.5 Kilograms |
| Recommended Maximum Load | 150 Kilograms |
| Number of Recline Positions | 2 (90°-160° adjustable) |
| Arm Style | Adjustable (2D FlowTechArm) |
| Included Cushions | 2 (Headrest, Lumbar) |
| Assembly Required | Yes |
| Furniture Base Movement | Swivel |
| Recommended Uses | Relaxation, E-Sport, Gaming, Work |
9. Warranty and Support
For warranty information or technical support, please refer to the documentation included with your purchase or contact the retailer/manufacturer directly. Keep your proof of purchase for warranty claims.