Cooler Master RR-212E-20PK-R2
Cooler Master Hyper 212 EVO CPU Cooler User Manual
Model: RR-212E-20PK-R2
Brand: Cooler Master
1. Introduction and Overview
The Cooler Master Hyper 212 EVO CPU Cooler is a high-performance thermal solution designed to efficiently cool your CPU. It features an improved tower fin design, optimized heat pipe layout, and upgraded fans and fan brackets to deliver excellent cooling performance. This manual provides essential information for the proper installation, operation, and maintenance of your Hyper 212 EVO CPU Cooler.

Figure 1.1: Front view of the Cooler Master Hyper 212 EVO CPU Cooler, showcasing its 120mm PWM fan and aluminum fin stack.
2. Package Contents
Please verify that all components listed below are present in your package:
- Hyper 212 EVO Heatsink with pre-attached 120mm PWM Fan
- Universal Mounting Brackets (for Intel and AMD sockets)
- Various Screws and Standoffs for installation
- Thermal Paste (tube)
- Fan Clips (for optional second fan)

Figure 2.1: Included mounting hardware, thermal paste, and fan clips for the Hyper 212 EVO.
3. Setup and Installation
Proper installation is crucial for optimal performance. Refer to the detailed instructions provided in the included installation guide for your specific CPU socket type. General steps include:
- Prepare CPU and Motherboard: Ensure your CPU is clean and free of old thermal paste. Install the appropriate backplate and standoffs for your motherboard's CPU socket (LGA2066, LGA2011-v3, LGA2011, LGA1366, LGA1200, LGA1156, LGA1155, LGA1151, LGA1150, AM4, AM3+, AM3, AM2+, AM2, FM2+, FM2, FM1).
- Apply Thermal Paste: Apply a small, pea-sized amount of thermal paste to the center of your CPU's integrated heat spreader (IHS).
- Mount Heatsink: Carefully place the heatsink onto the CPU, aligning the mounting holes with the standoffs. Secure the heatsink using the provided screws, tightening them in a cross-pattern to ensure even pressure.
- Attach Fan: Clip the 120mm PWM fan to the heatsink using the fan clips. Ensure the fan is oriented to push air through the heatsink towards the rear exhaust of your PC case.
- Connect Fan Cable: Connect the 4-pin PWM fan cable to the CPU_FAN header on your motherboard.
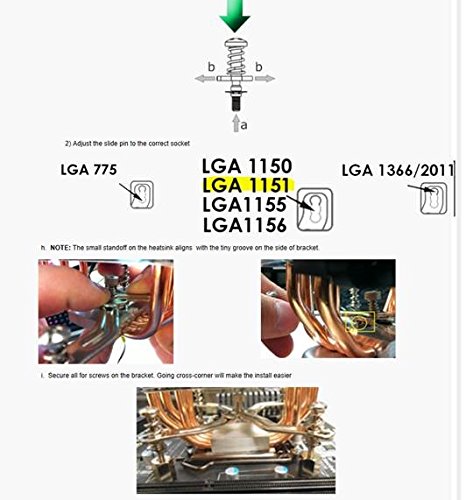
Figure 3.1: Diagram illustrating socket compatibility and key steps for mounting the cooler.
Video 3.1: Official Cooler Master video demonstrating the installation process for the Hyper 212 EVO CPU Cooler.
4. Operating Instructions
The Hyper 212 EVO features a 120mm PWM fan, which allows your motherboard to dynamically control the fan speed based on CPU temperature. This ensures optimal cooling performance while minimizing noise during lighter loads.
- Automatic Fan Control: The fan speed will automatically adjust between 600-2000 RPM (PWM) ± 10% depending on your CPU's thermal requirements and your motherboard's fan control settings.
- Airflow: The fan is designed to provide 24.9 - 82.9 CFM ± 10% of airflow, effectively dissipating heat from the aluminum fins and copper heat pipes.
- Noise Level: The fan operates within a noise range of 9 - 36 dBA, ensuring quiet operation at lower speeds and efficient cooling under heavy loads.
5. Maintenance
Regular maintenance helps ensure the longevity and optimal performance of your CPU cooler.
- Dust Cleaning: Periodically inspect the heatsink fins and fan blades for dust accumulation. Use compressed air or a soft brush to gently remove dust. Ensure the fan is not spinning rapidly when cleaning with compressed air to prevent damage to the bearings.
- Thermal Paste: While not required frequently, if you remove the cooler for any reason, it is recommended to clean off the old thermal paste from both the CPU and the cooler's base and apply new thermal paste before reinstallation.
- Fan Inspection: Check the fan for any unusual noises or wobbling. If the fan becomes excessively noisy or stops spinning, it may need replacement.
6. Troubleshooting
If you encounter issues with your Cooler Master Hyper 212 EVO, consider the following:
- High CPU Temperatures:
- Ensure the cooler is securely mounted and making proper contact with the CPU.
- Verify that thermal paste was applied correctly and evenly.
- Check if the fan is spinning. If not, ensure it is properly connected to the CPU_FAN header and that the header is enabled in your motherboard's BIOS/UEFI.
- Clean any dust buildup from the heatsink fins and fan blades.
- Ensure adequate airflow within your PC case.
- Excessive Fan Noise:
- Check for any cables or obstructions hitting the fan blades.
- Ensure the fan is securely attached to the heatsink.
- Verify fan speed settings in your motherboard's BIOS/UEFI. High fan speeds will naturally produce more noise.
- If the noise is a grinding or rattling sound, the fan bearings may be failing, and the fan might need replacement.
- Cooler Not Fitting in Case:
- Before purchase, always verify the dimensions of the cooler against your PC case's CPU cooler clearance. The Hyper 212 EVO has dimensions of 120 x 80 x 159 mm (L x W x H).
7. Specifications
| Feature | Detail |
|---|---|
| Model Number | RR-212E-20PK-R2 |
| Dimensions (L x W x H) | 120 x 80 x 159 mm / 4.7 x 3.1 x 6.3 inch |
| Heat Sink Dimensions (L x W x H) | 116 x 51 x 159 mm / 4.6 x 2.0 x 6.3 inch |
| Fan Dimensions (L x W x H) | 120 x 120 x 25 mm / 4.7 x 4.7 x 1 inch |
| Heat Sink Material | Aluminum Fins, 4 Direct Contact Copper Heat Pipes (Ø6mm) |
| Heat Sink Weight | 465g / 1.03lb |
| Fan Speed | 600-2000 RPM (PWM) ± 10% |
| Fan Airflow | 24.9 - 82.9 CFM ± 10% |
| Fan Noise Level | 9 - 36 dBA |
| Power Connector Type | 4-Pin |
| Compatible CPU Sockets | LGA2066, LGA2011-v3, LGA2011, LGA1366, LGA1200, LGA1156, LGA1155, LGA1151, LGA1150, AM4, AM3+, AM3, AM2+, AM2, FM2+, FM2, FM1 |

Figure 7.1: Detailed dimensional drawing of the Cooler Master Hyper 212 EVO CPU Cooler.
8. Warranty and Support
For warranty information, technical support, or to register your product, please visit the official Cooler Master website or contact their customer service department. Keep your purchase receipt as proof of purchase for warranty claims.
Manufacturer: Cooler Master USA, Inc.