1. Introduction
The Cherub WMT-578 is a versatile digital device combining a metronome and a tuner into a single compact unit. Designed for musicians, it offers precise timing for practice and accurate pitch detection for instrument tuning. Key features include a large LCD display for clear viewing, an accurate tuning system, and an automatic shut-off function to conserve battery life.
2. Safety Precautions
- Do not expose the unit to extreme temperatures, humidity, or direct sunlight.
- Avoid dropping or subjecting the unit to strong impacts.
- Do not attempt to disassemble or modify the unit. Refer all servicing to qualified personnel.
- Remove batteries if the unit will not be used for an extended period to prevent leakage.
- Keep out of reach of small children.
3. Product Overview
Familiarize yourself with the components of your Cherub WMT-578 unit.

Figure 3.1: Front View. This image displays the front of the Cherub WMT-578, highlighting the large LCD screen for displaying tuning and metronome information, along with the various control buttons for mode selection, tempo adjustment, and pitch settings.
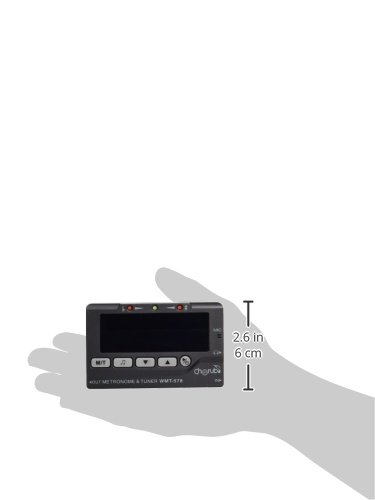
Figure 3.2: Back View. This image shows the rear of the Cherub WMT-578, featuring the battery compartment cover and the integrated fold-out stand for convenient placement on a flat surface. The speaker grille is also visible.
4. Setup
4.1 Battery Installation
- Locate the battery compartment on the back of the unit (refer to Figure 3.2).
- Slide the battery compartment cover downwards to open it.
- Insert two (2) AAA batteries, ensuring correct polarity (+/-) as indicated inside the compartment.
- Replace the battery compartment cover by sliding it back into place until it clicks securely.
Note: Two AAA batteries are typically included with the unit.
4.2 Powering On/Off
- To power on the unit, press and hold the [POWER] button (usually located on the front panel) for approximately 2 seconds.
- To power off the unit, press and hold the [POWER] button again for approximately 2 seconds.
- The unit features an auto shut-off function to conserve battery life. If no operation is performed for a certain period (e.g., 3 minutes), the unit will automatically power off.
5. Operating the Metronome
The metronome function provides a steady beat for practice.
5.1 Selecting Metronome Mode
- After powering on, press the [MODE] button until the metronome icon (often a musical note or 'MET') is displayed on the LCD.
5.2 Adjusting Tempo (BPM)
- Use the [UP] and [DOWN] arrow buttons to increase or decrease the beats per minute (BPM). The tempo range is typically from 30 to 250 BPM.
5.3 Setting Beat and Rhythm
- Press the [BEAT] button to cycle through different beat patterns (e.g., 0, 1, 2, 3, 4, 5, 6, 7, 8, 9).
- Press the [RHYTHM] button to select various rhythm subdivisions (e.g., quarter notes, eighth notes, sixteenth notes, triplets).
5.4 Starting and Stopping the Metronome
- Press the [START/STOP] button to begin the metronome click.
- Press the [START/STOP] button again to stop the metronome.
5.5 Adjusting Volume
- Use the volume control dial or buttons (if present, typically on the side or front) to adjust the loudness of the metronome click.
6. Operating the Tuner
The tuner function helps you accurately tune your musical instrument.
6.1 Selecting Tuner Mode
- After powering on, press the [MODE] button until the tuner icon (often a tuning fork or 'TUNER') is displayed on the LCD.
6.2 Input Methods
- Built-in Microphone: For acoustic instruments, place the unit near the sound source. The internal microphone will pick up the sound.
- Input Jack: For electric instruments or instruments with pickups, connect a 1/4-inch (6.35mm) instrument cable from your instrument to the input jack on the unit.
6.3 Tuning Process
- Pluck a single string or play a single note on your instrument.
- Observe the LCD display. The display will show the detected note (e.g., A, C#, E) and a needle or indicator showing pitch deviation.
- Adjust your instrument's tuning peg until the needle or indicator is centered, and the display shows the correct note for your desired pitch. Green lights typically indicate in-tune, while red or orange lights indicate flat or sharp.
6.4 Adjusting A4 Calibration
- If necessary, press the [CALIB] or [PITCH] button to adjust the A4 reference frequency (typically 440Hz). Use the [UP] and [DOWN] buttons to change the value.
7. Maintenance
7.1 Cleaning
- Wipe the unit with a soft, dry cloth.
- Do not use abrasive cleaners, waxes, or solvents, as these may damage the finish.
7.2 Battery Replacement
- When the display becomes dim or the unit functions erratically, replace the batteries as described in Section 4.1.
- Always replace both batteries at the same time with new ones of the same type.
7.3 Storage
- Store the unit in a cool, dry place away from direct sunlight and extreme temperatures.
- If storing for an extended period, remove the batteries to prevent leakage and potential damage to the unit.
8. Troubleshooting
- Unit does not power on: Check if batteries are inserted correctly with proper polarity. Replace with fresh batteries if necessary.
- Display is dim or flickering: Batteries are low. Replace them.
- Metronome sound is too low/high: Adjust the volume control.
- Tuner is not detecting sound: Ensure the unit is in tuner mode. For acoustic instruments, place it closer to the sound source. For electric instruments, check the cable connection to the input jack.
- Tuner seems inaccurate: Ensure the A4 calibration is set correctly (typically 440Hz).
9. Specifications
| Feature | Specification |
|---|---|
| Brand | Cherub |
| Model | WMT-578 |
| Product Dimensions | 5.89 x 3.1 x 1.5 cm |
| Item Weight | 38.1 g |
| Batteries | 2 AAA batteries required (included) |
| Battery Cell Composition | Alkaline |
| Metronome Tempo Range | 30-250 BPM (typical) |
| Tuner A4 Calibration Range | 430-450Hz (typical) |
| Auto Shut-off | Yes |
10. Warranty and Support
This product is covered by a standard manufacturer's warranty against defects in materials and workmanship. The specific terms and duration of the warranty may vary by region and retailer. Please retain your proof of purchase for warranty claims.
For technical support, troubleshooting assistance beyond this manual, or warranty inquiries, please contact your local Cherub distributor or the retailer from whom you purchased the product. Contact information can typically be found on the product packaging or the official Cherub website.