Introduction
This manual provides essential instructions for the safe and effective operation of your Toshiba Camileo X200 HD 1080p Camcorder. Please read this manual thoroughly before using the device and retain it for future reference. The Camileo X200 is designed for capturing high-definition video and still images with ease.
What's in the Box
Verify that all items are present in the packaging:
- Toshiba Camileo X200 HD 1080p Camcorder
- Battery
- USB Cable
- AC Adapter
- Mini HDMI Cable
- Remote Control
Product Overview
Familiarize yourself with the main components of your Camileo X200 camcorder.

Image: Front and side view of the Toshiba Camileo X200 camcorder with the 3-inch LCD screen open. The lens with "12X OPTICAL ZOOM" is visible, along with the "TOSHIBA" logo on the screen's exterior and "20x advanced zoom FULL HD 1920x1080" markings.
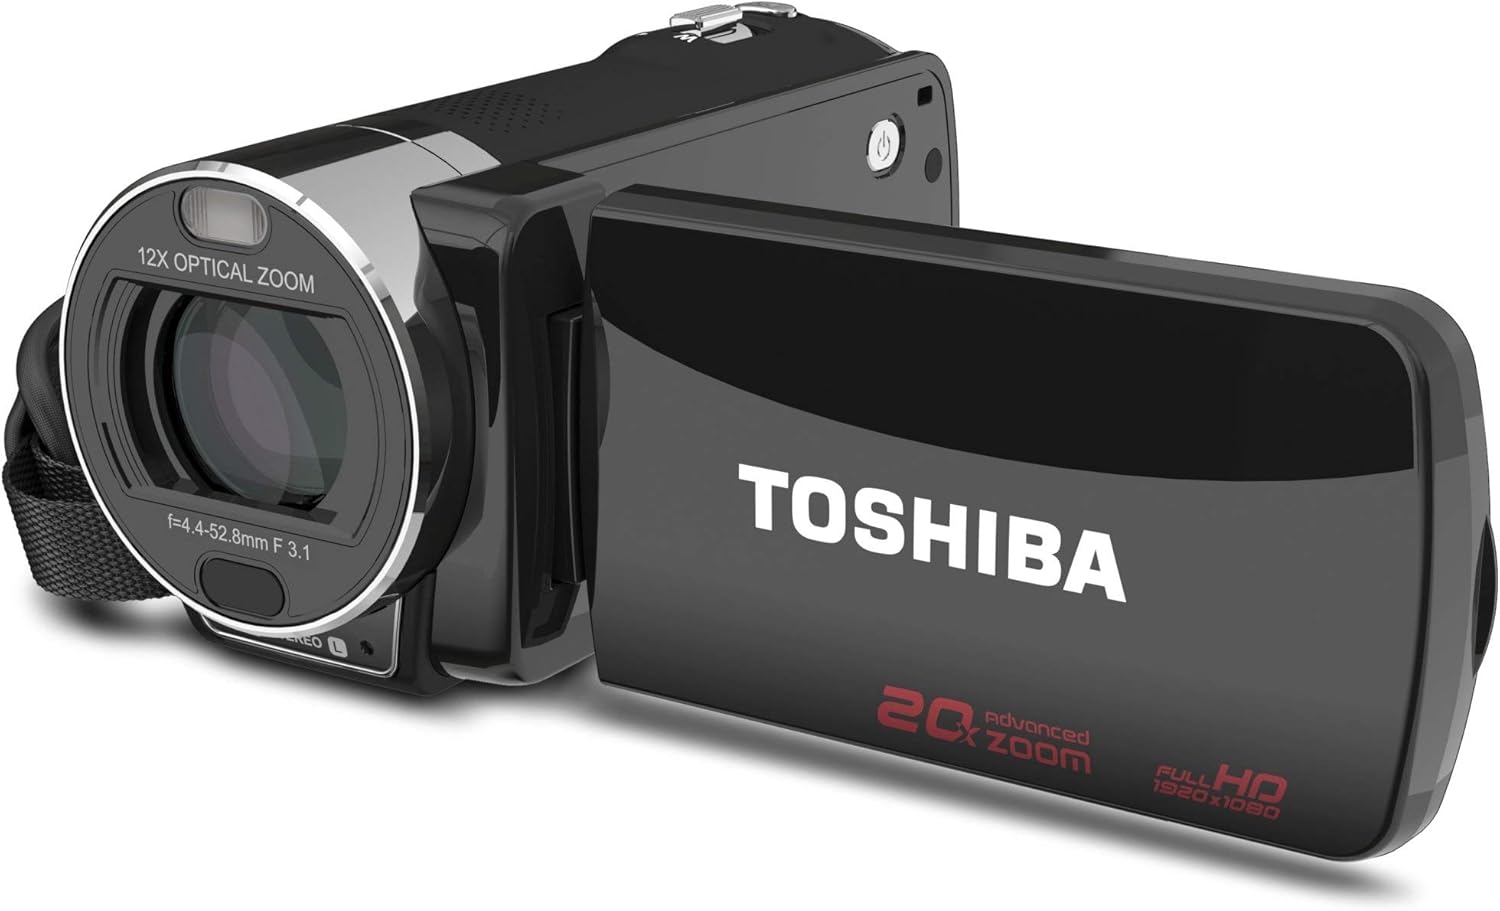
Image: Side view of the Toshiba Camileo X200 camcorder, showing the USB and HDMI ports under a protective cover, and the record button.

Image: Top view of the Toshiba Camileo X200 camcorder, highlighting the zoom lever and power button.
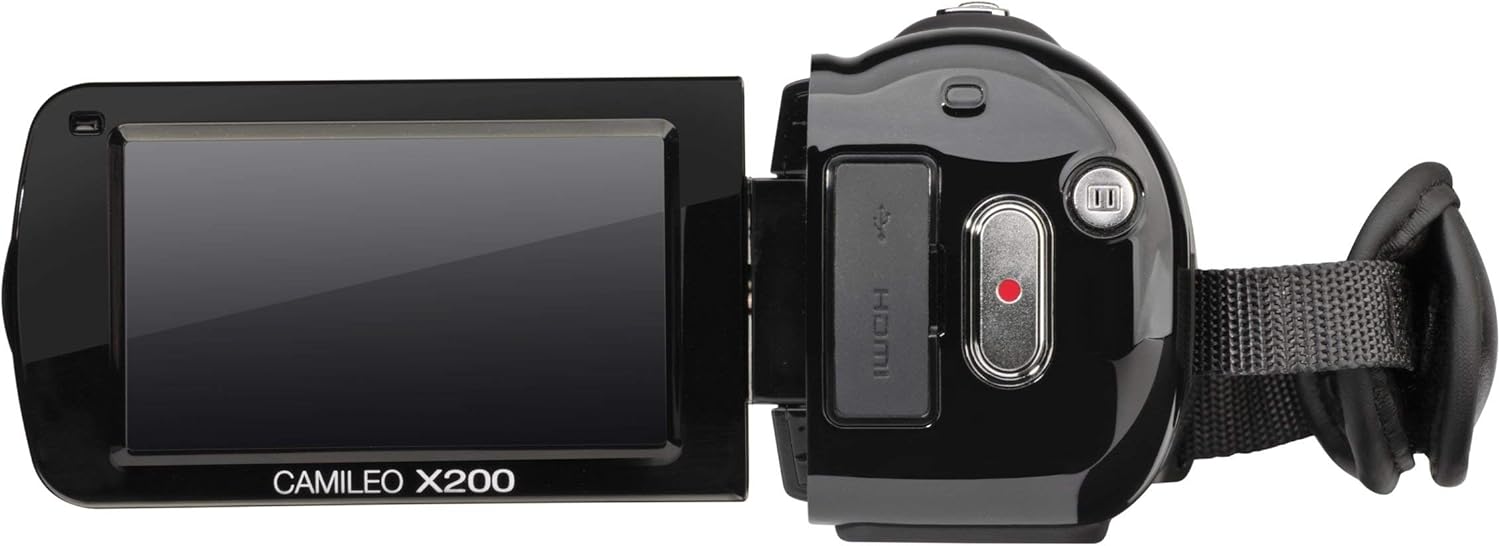
Image: Another view of the Toshiba Camileo X200 camcorder with the screen open, showing the "CAMILEO X200" branding on the interior of the screen panel.
Key Components:
- Lens: Features 12x optical zoom and 60x digital zoom.
- 3" Swiveling LCD Monitor: Touch screen interface for navigation and playback.
- Record Button: Initiates and stops video recording.
- Power Button: Turns the camcorder on or off.
- USB Port: For connecting to a computer and charging.
- HDMI Port: For connecting to an HDTV or monitor.
- Microphone Jack: For connecting an external microphone.
- SD Card Slot: For memory expansion (SD/SDHC/XD cards).
Setup
1. Inserting the Battery
- Open the battery compartment cover located on the bottom of the camcorder.
- Insert the provided Lithium-Ion battery, ensuring the contacts align correctly.
- Close the battery compartment cover until it clicks securely.
2. Charging the Battery
Before first use, fully charge the battery.
- Connect the AC adapter to the camcorder's USB port.
- Plug the AC adapter into a power outlet. The charging indicator light will illuminate.
- Charging can also be done via USB connection to a computer.
3. Inserting a Memory Card
The Camileo X200 requires an SD, SDHC, or XD memory card (not included) for recording.
- Locate the memory card slot, usually on the side or bottom of the camcorder.
- Insert the memory card with the metal contacts facing down (or as indicated by the diagram near the slot) until it clicks into place.
- To remove, gently push the card in until it springs out.
Operating Instructions
1. Powering On/Off
- To power on, open the LCD screen or press the Power button.
- To power off, close the LCD screen or press and hold the Power button.
2. Recording Video
- Ensure a formatted memory card is inserted.
- Turn on the camcorder.
- Frame your shot using the LCD screen.
- Press the Record button (usually a red circle) to start recording. The recording indicator will light up.
- Press the Record button again to stop recording.
- Note: The camcorder records in 1920x1080p Full HD resolution.
3. Taking Photos
- Switch the camcorder to photo mode (if applicable, via the touch screen menu).
- Frame your shot.
- Press the Shutter button (often integrated with the record button or a separate button) to capture a 16MP interpolated photo.
4. Using Zoom
- Use the zoom lever (typically located near the top of the camcorder) to zoom in (T for Telephoto) or zoom out (W for Wide).
- The camcorder features 12x optical zoom and 60x digital zoom. Optical zoom provides higher quality without pixelation.
5. Using the 3" Touch Screen
- Navigate menus, change settings, and review footage by touching the LCD screen.
- On-screen editing features allow for trimming videos directly on the device.
6. Electronic Image Stabilization (EIS)
The Camileo X200 includes Electronic Image Stabilization to reduce blur caused by camera shake during recording. This feature is automatically engaged.
7. Audio Features
- The camcorder has a built-in stereo microphone for capturing audio.
- An external microphone can be connected via the microphone jack for enhanced audio quality.
8. Special Features
Explore the menu for options such as slow-motion recording, time-lapse, and various color filters (e.g., black and white).
9. Connecting to a Computer
- Connect the camcorder to your computer using the supplied USB cable.
- The camcorder will appear as a removable drive, allowing you to transfer video and photo files.
- The Toshiba CAMILEO Uploader software (if available for your OS) can assist with web uploads.
10. Connecting to a TV (HDMI)
- Use the included mini HDMI cable to connect the camcorder to an HDTV or monitor.
- Switch your TV's input to the corresponding HDMI port to view your recordings in high definition.
Maintenance
Cleaning the Camcorder
- Use a soft, dry cloth to clean the exterior of the camcorder.
- For the lens and LCD screen, use a specialized lens cleaning cloth and solution to avoid scratches.
- Avoid using harsh chemicals or abrasive materials.
Battery Care
- Store the battery in a cool, dry place when not in use.
- Avoid fully discharging the battery frequently to prolong its lifespan.
- If storing for extended periods, charge the battery to about 50% capacity.
Storage
- Store the camcorder in a protective case to prevent dust and damage.
- Avoid exposing the camcorder to extreme temperatures or high humidity.
Troubleshooting
Refer to the following common issues and solutions:
| Problem | Possible Cause / Solution |
|---|---|
| Camcorder does not power on. | Battery is depleted. Charge the battery using the AC adapter or USB cable. Ensure the battery is correctly inserted. |
| Poor autofocus performance. | The camcorder may take a few seconds to focus, especially during zoom operations or in low light. Ensure sufficient lighting and stable camera movement. |
| Video appears shaky or blurry. | While Electronic Image Stabilization (EIS) is present, excessive movement, especially at higher zoom levels, can still cause blur. Use a tripod or stabilize the camcorder for best results. |
| Short battery life. | Battery life can vary based on usage and settings. Ensure the battery is fully charged. For extended recording, consider using the AC adapter or having a spare charged battery. |
| Cannot transfer files to computer. | Ensure the USB cable is securely connected to both the camcorder and the computer. Check if the camcorder is recognized as a removable drive. Try a different USB port or cable. |
| Touch screen is unresponsive. | Clean the screen with a soft cloth. Restart the camcorder. If the issue persists, contact customer support. |
Specifications
| Feature | Detail |
|---|---|
| Video Capture Resolution | 1080p Full HD (1920x1080) |
| Photo Sensor Technology | CMOS (8MP sensor, 16MP interpolated photos) |
| Optical Zoom | 12x |
| Digital Zoom | 60x |
| Screen Size | 3 Inches (swiveling LCD touch screen) |
| Image Stabilization | Electronic Image Stabilization (EIS) |
| Flash Memory Type | SD; SDHC; XD (card not included) |
| Video Capture Format | H.264, MPEG-4 |
| Supported Audio Format | AAC, MP3 |
| Connectivity Technology | HDMI, USB |
| Item Weight | 1.2 pounds |
| Product Dimensions | 4.69 x 2.09 x 2.36 inches |
| Model Number | PA3973U-1C0K |
| Batteries Required | 1 Lithium Ion battery (included) |
Official Product Videos
Watch this official video for additional guidance on using your Toshiba Camileo X200.
Video: A short preview video demonstrating the Toshiba Camileo X200 camcorder's features and usage. This video is provided by the seller.
Warranty and Support
For warranty information and technical support, please refer to the documentation included with your purchase or visit the official Toshiba support website. Keep your proof of purchase for warranty claims.