
Introduction
Thank you for choosing the Butterfly BL-3L Blue Line Stainless Steel Pressure Cooker. This manual provides essential information for the safe and efficient use of your new appliance. Please read all instructions carefully before first use and retain this manual for future reference.
This pressure cooker is designed for efficient cooking, featuring a durable stainless steel body and lid, an Aluminum Thermal Base (ATB) for even heating, a Gasket Release Vent (GRV), a safety valve, and ergonomically designed handles for comfortable use.
Product Overview
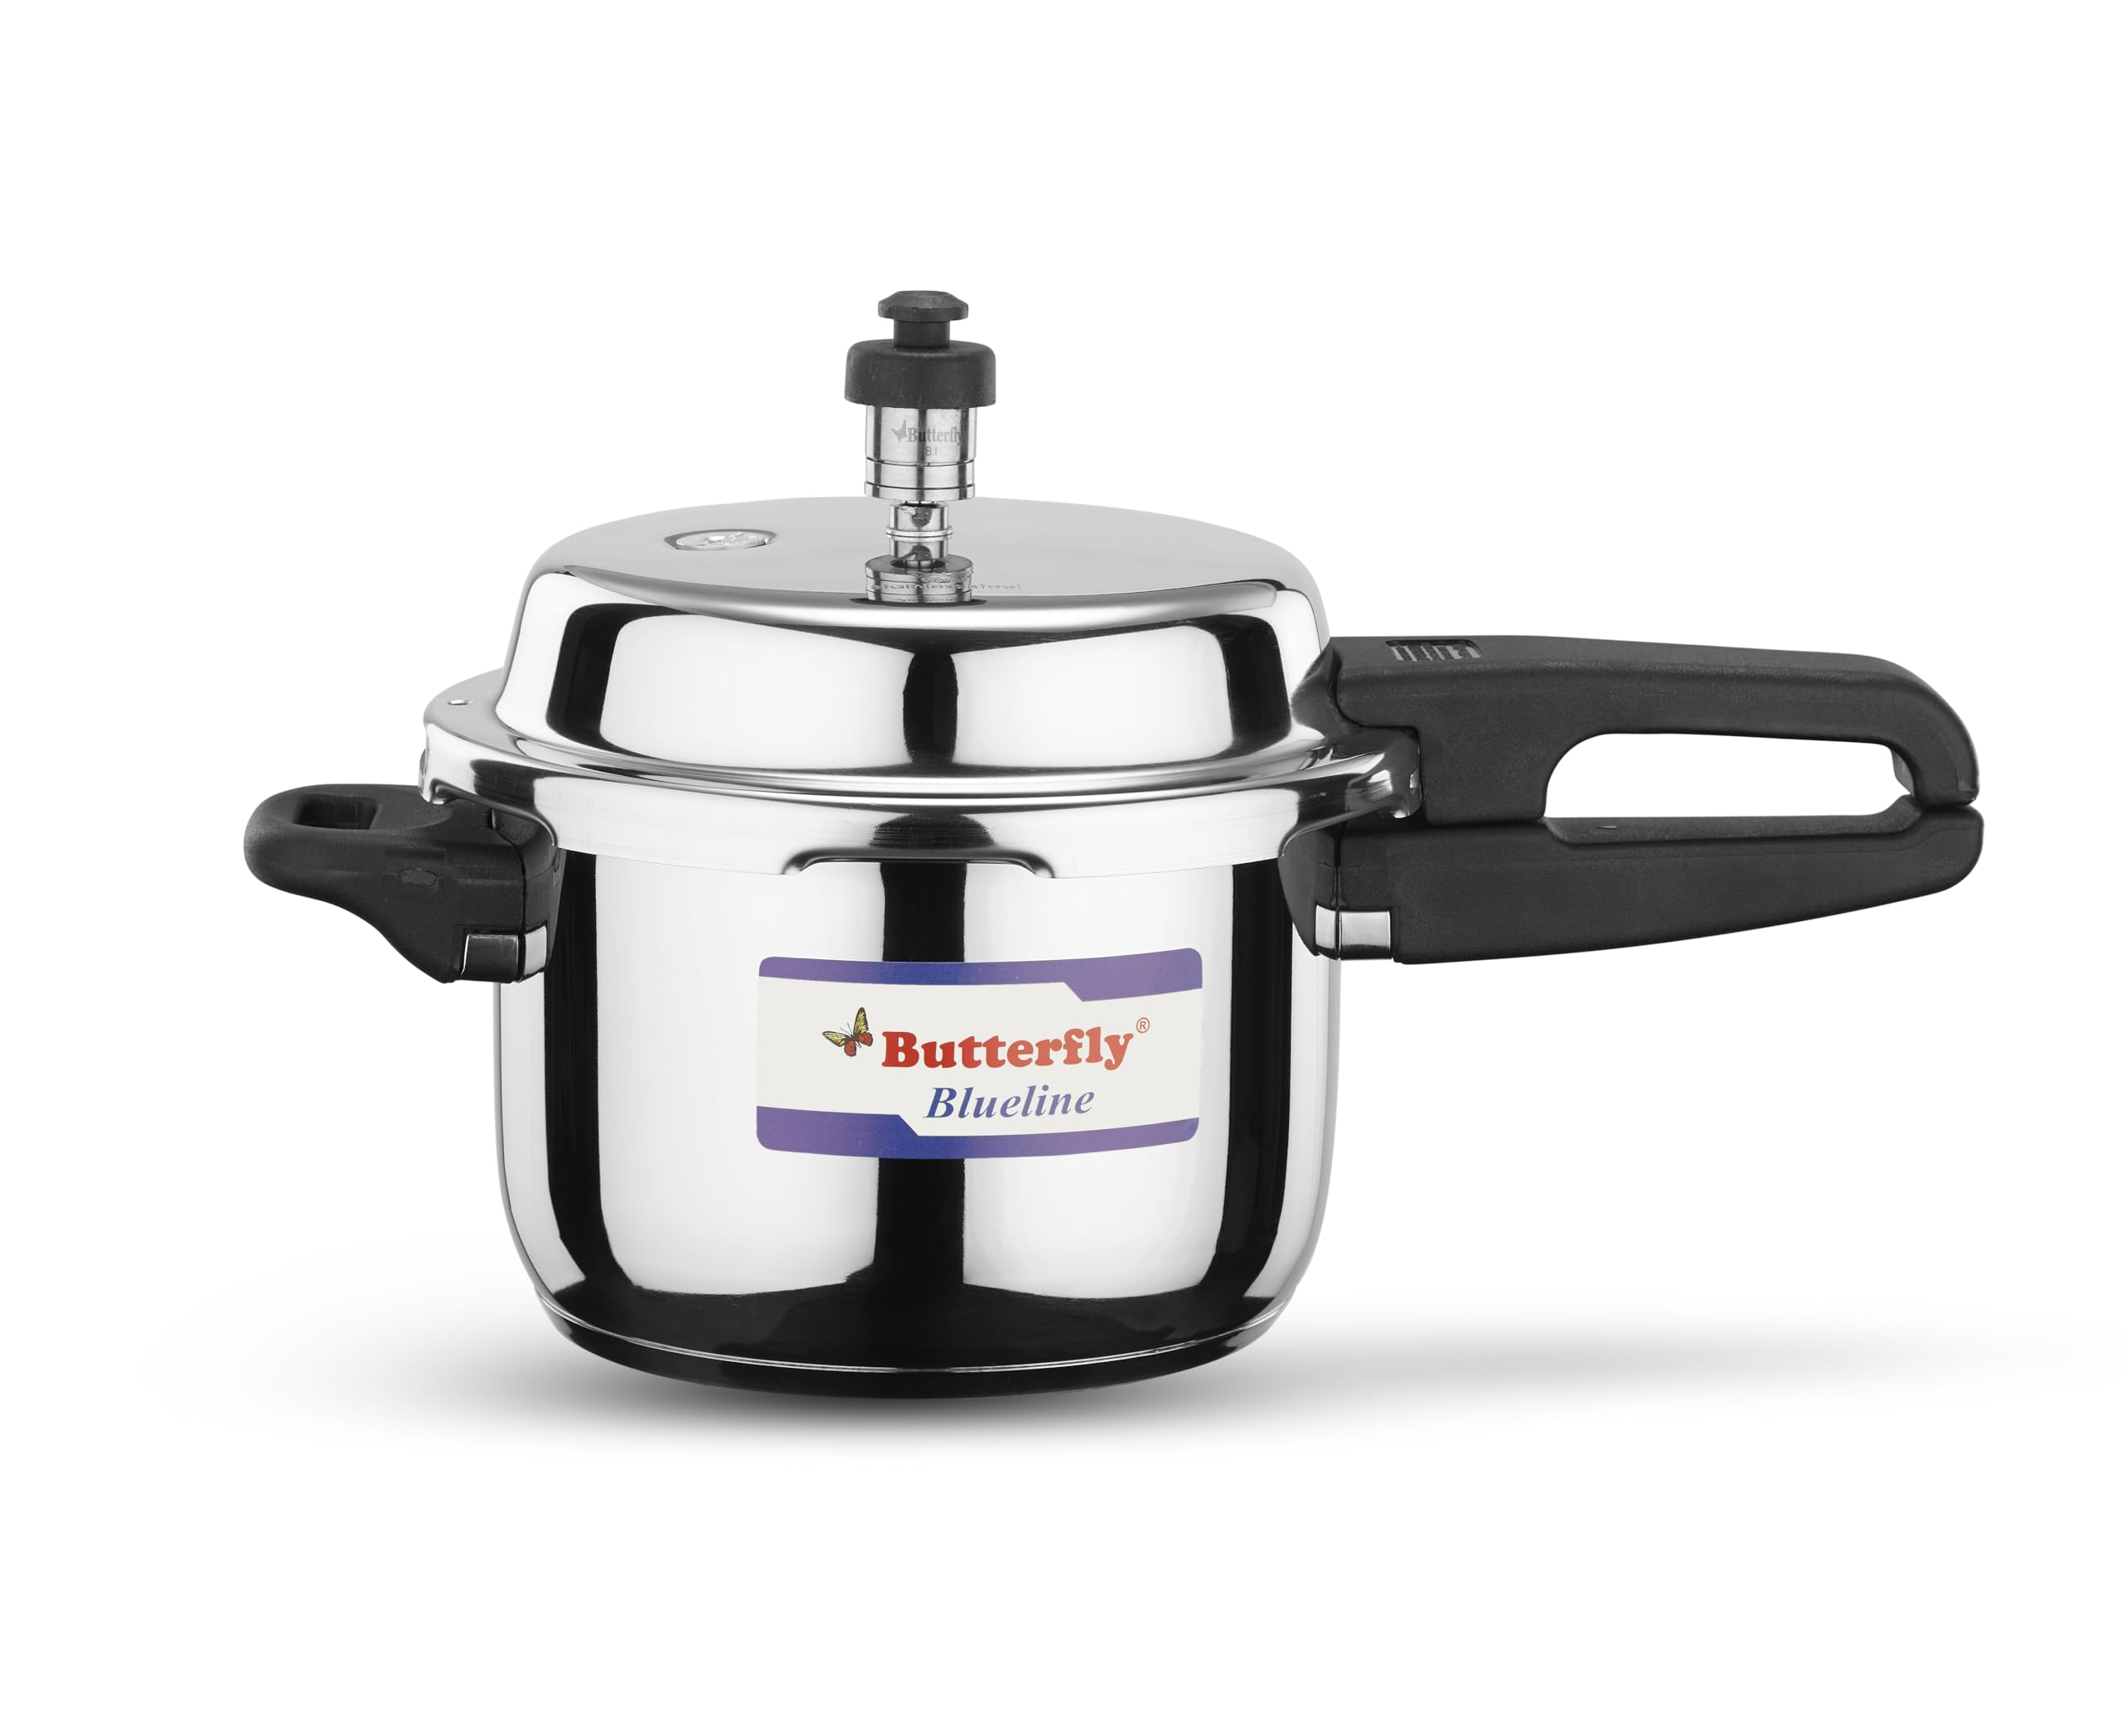
Image: The Butterfly BL-3L Blue Line Stainless Steel Pressure Cooker, showcasing its polished exterior and handles, placed on a kitchen counter with fresh vegetables.
Important Safety Instructions
Failure to follow these safety instructions may result in serious injury or property damage.
- Read all instructions before using the pressure cooker.
- Do not touch hot surfaces. Use handles or knobs.
- Close supervision is necessary when the pressure cooker is used near children.
- Do not place the pressure cooker in a heated oven.
- Exercise extreme caution when moving a pressure cooker containing hot liquids.
- Do not use the pressure cooker for purposes other than its intended use.
- This appliance cooks under pressure. Improper use may result in scalding injury. Make certain unit is properly closed before operating. See "Operating Instructions."
- Never force open the pressure cooker. Make sure internal pressure is completely released before opening. See "Operating Instructions."
- Do not use this pressure cooker for deep frying with oil.
- Do not fill the unit more than two-thirds full. When cooking foods that expand during cooking, such as rice or dried vegetables, do not fill the unit more than half full. Overfilling may cause a risk of clogging the vent pipe and developing excess pressure.
- Be aware that certain foods, such as applesauce, cranberries, pearl barley, oatmeal or other cereals, split peas, noodles, macaroni, rhubarb, or spaghetti can foam, froth, and sputter, and clog the pressure release device. These foods should not be cooked in a pressure cooker.
- Always check the pressure release device for clogging before use.
- Use only genuine Butterfly replacement parts.
- Ensure the gasket is properly seated and not damaged before each use.
Components
Familiarize yourself with the main parts of your Butterfly pressure cooker:
- Cooker Body: The main pot, made of premium quality stainless steel.
- Lid: Stainless steel lid with safety features.
- Weight Set (Pressure Regulator): Regulates optimum pressure during cooking.
- Gasket Release Vent (GRV): A safety mechanism to release excess pressure.
- Safety Valve: A lead-free safety valve for added protection in case of excessive pressure buildup.
- Main Handle: Ergonomically designed for a secure grip.
- Auxiliary Handle: Provides additional support for lifting and carrying.
- Gasket: A silicone ring that creates an airtight seal between the lid and the body.
- Aluminum Thermal Base (ATB): Ensures uniform heat distribution.
Safety System Overview

Image: A detailed view of the pressure cooker's lid, highlighting the Weight Set, Gasket Release Vent, and Safety Valve, which form the triple-level safety system.
Lid and Gasket Detail

Image: An overhead view of the pressure cooker lid, showing the securely fitted silicone gasket that ensures a reliable, long-lasting seal for safe operation.
Setup and First Use
- Unpacking: Carefully remove all packaging materials and inspect the pressure cooker for any damage.
- Initial Cleaning: Before first use, wash the cooker body, lid, gasket, and weight set with warm soapy water. Rinse thoroughly and dry completely.
- Gasket Placement: Ensure the silicone gasket is properly seated inside the lid rim. It should fit snugly and evenly.
- Safety Valve Check: Verify that the safety valve is clean and free from any obstructions.
- Test Run (Optional but Recommended): Fill the cooker with 2 cups of water. Close the lid securely and place the weight set on the vent pipe. Heat on medium-high until steam escapes steadily from the vent pipe, then reduce heat and let it cook for 5 minutes. Allow it to cool naturally before opening. This helps to clean the cooker and ensures all parts are functioning correctly.
Operating Instructions
1. Preparing for Cooking
- Add Ingredients: Place your food and the required amount of liquid into the pressure cooker. Do not exceed the maximum fill lines (2/3 full for most foods, 1/2 full for expanding foods like rice or beans).
- Secure the Lid: Place the lid on the cooker body, aligning the arrow on the lid with the arrow on the handle. Rotate the lid clockwise until it locks securely into place. Ensure the handles are aligned and the lid is tight.
- Place Weight Set: Position the weight set firmly on the vent pipe of the lid.
2. Cooking Under Pressure
- Heat Application: Place the pressure cooker on a suitable heat source (gas, electric, induction). Use high heat until steam begins to escape steadily from the vent pipe and the weight set starts to jiggle or whistle.
- Reduce Heat: Once the weight set begins to jiggle or whistle consistently, reduce the heat to maintain a steady, gentle jiggling or whistling. This indicates that the desired pressure has been reached.
- Cooking Time: Begin timing your recipe from this point.
3. Releasing Pressure
There are two primary methods for releasing pressure:
- Natural Release: Remove the cooker from the heat source and allow it to cool down naturally. The pressure will gradually decrease. This method is ideal for foods that benefit from additional cooking time, such as stews and roasts. Do not open until the pressure indicator drops completely and no steam is released when the weight set is gently nudged.
- Quick Release (under cold water): For faster pressure release, carefully place the cooker under a cold water tap, allowing cold water to run over the lid (avoiding the vent pipe and safety valve) until the pressure indicator drops and no steam escapes. This method is suitable for delicate foods like vegetables to prevent overcooking.
Never attempt to open the lid until all internal pressure has been released. Forcing the lid open can cause severe injury.
4. Opening the Cooker
Once pressure is fully released, gently rotate the lid counter-clockwise to unlock and remove it. Always open the lid away from your face to avoid residual steam.
Capacity Guide
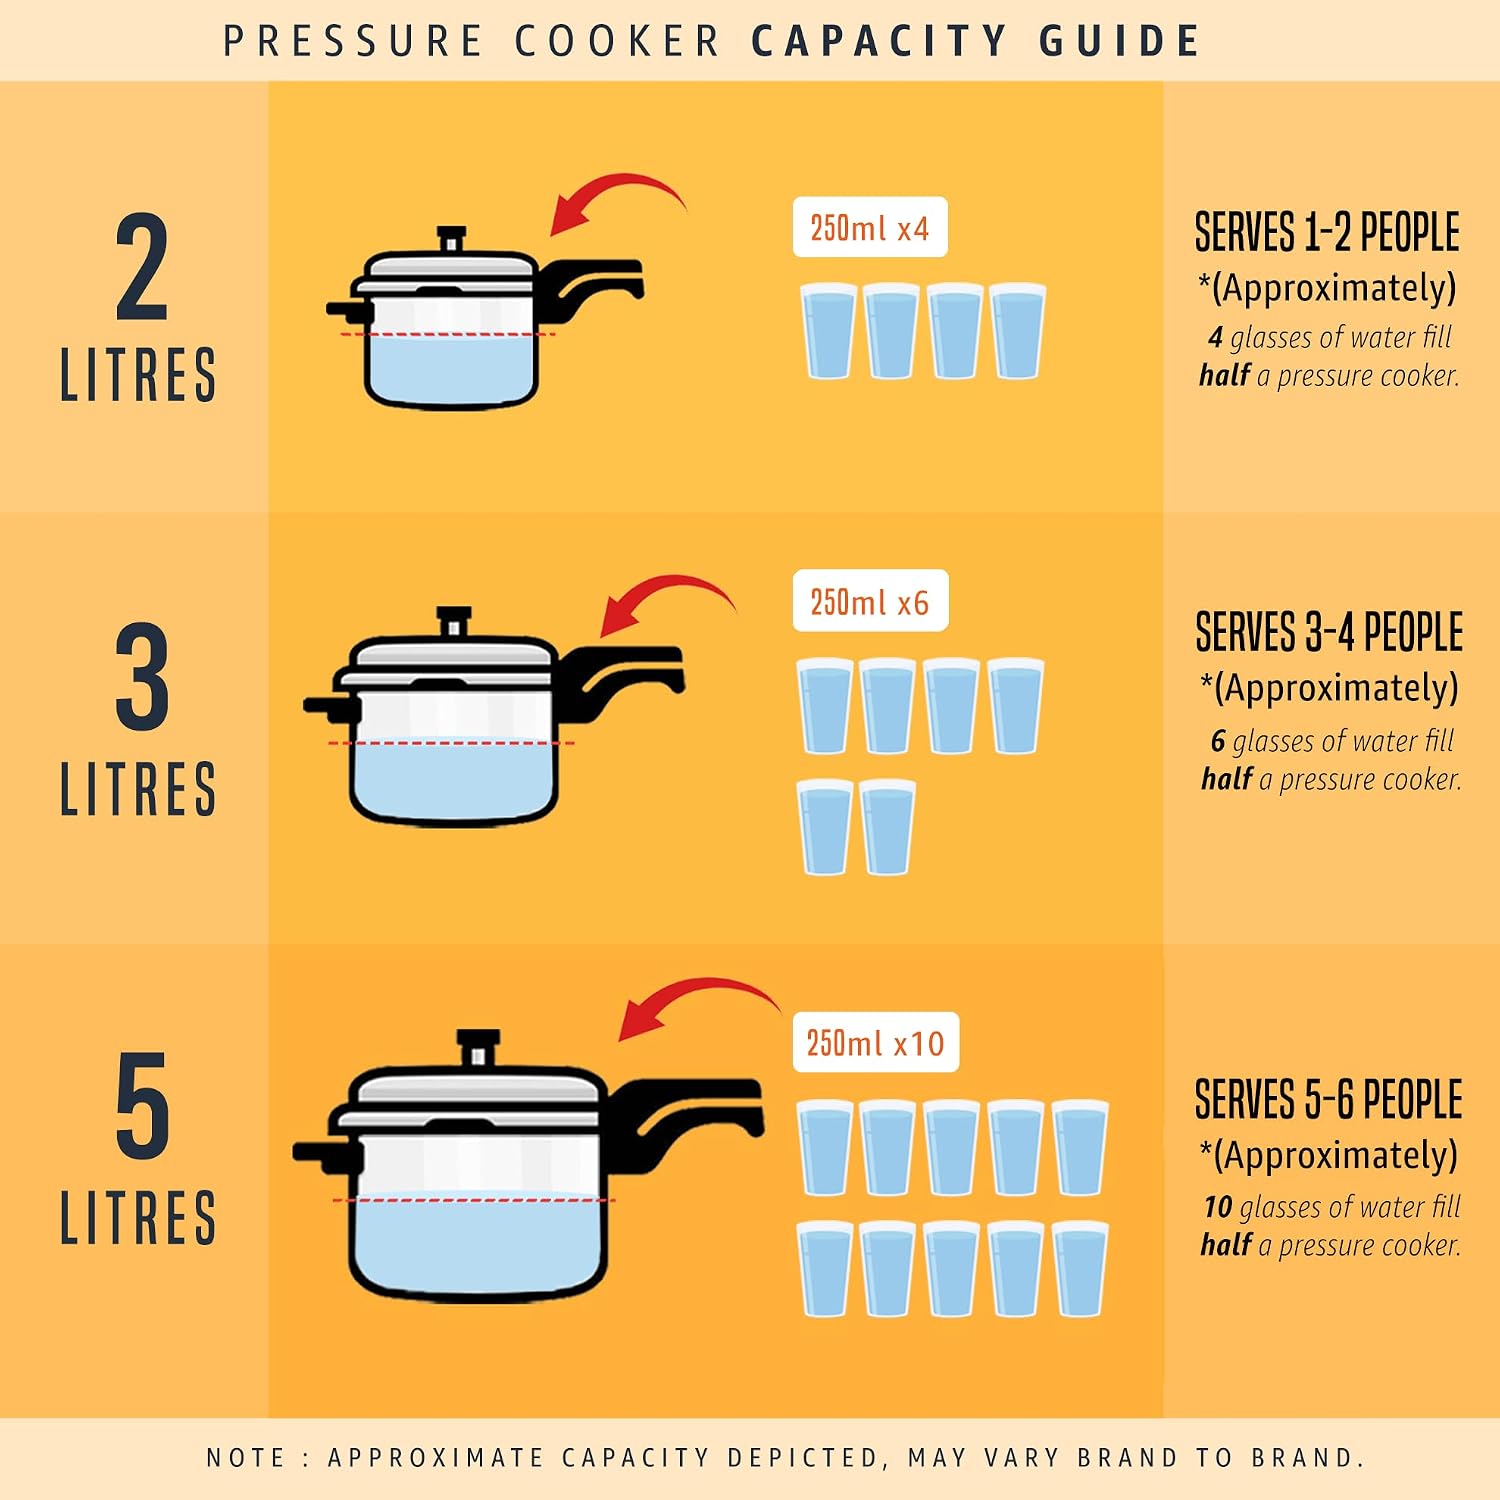
Image: A visual guide illustrating recommended fill levels for 2-liter, 3-liter, and 5-liter pressure cookers, indicating approximate servings and water quantities. For this 3-liter model, it serves 3-4 people with approximately 6 glasses (250ml each) of water, filling half the cooker.
Maintenance and Cleaning
Proper maintenance ensures the longevity and safe operation of your pressure cooker.
- After Each Use: Allow the cooker to cool completely before cleaning. Wash the cooker body, lid, gasket, and weight set with warm, soapy water.
- Gasket Care: Remove the gasket from the lid for thorough cleaning. Inspect it for cracks, tears, or hardening. Replace the gasket if it shows signs of wear or damage, typically every 6-12 months depending on usage.
- Vent Pipe and Safety Valve: Ensure the vent pipe and safety valve are clear of food particles. Use a small brush or toothpick if necessary to clear any blockages.
- Exterior Cleaning: The stainless steel exterior can be cleaned with a soft cloth and mild detergent. Avoid abrasive cleaners or scouring pads that can scratch the surface.
- Drying and Storage: Dry all parts thoroughly before reassembling and storing. Store the cooker with the lid inverted or slightly ajar to prevent odors and to prolong gasket life.
Durable Construction

Image: A close-up of the pressure cooker's heat-resistant Bakelite handles, emphasizing their ergonomic design and robust attachment to the stainless steel body, ensuring durability and performance.
Troubleshooting
| Problem | Possible Cause | Solution |
|---|---|---|
| Steam leaking from lid rim | Gasket improperly seated, worn, or damaged; lid not closed properly; food particles on rim. | Check gasket placement, clean rim, replace gasket if worn, ensure lid is securely locked. |
| Weight set not jiggling/whistling | Insufficient heat; vent pipe clogged; not enough liquid; lid not sealed. | Increase heat, check/clear vent pipe, add more liquid, ensure lid is sealed. |
| Pressure not building up | Same as above; safety valve activated. | Check all seals and vent pipe. If safety valve activated, allow to cool, inspect, and clean. |
| Food undercooked | Insufficient cooking time; pressure not maintained. | Increase cooking time, ensure consistent heat and pressure. |
| Food overcooked | Excessive cooking time; heat too high. | Reduce cooking time, lower heat once pressure is reached. |
Specifications
- Model: BL-3L
- Capacity: 3 Liters
- Material: Stainless Steel
- Color: Silver
- Finish Type: Stainless Steel
- Product Dimensions (Approximate): 12"D x 12"W x 12"H (30.48 cm x 30.48 cm x 30.48 cm)
- Item Weight: Approximately 2000 g (4.4 lbs)
- Special Features: Manual Operation, Aluminum Thermal Base (ATB), Gasket Release Vent (GRV), Safety Valve, Ergonomic Handles
- Closure Type: Inner Lid, Outer Lid
- UPC: 120619871249
- ASIN: B005LFWO8K
Product Dimensions

Image: A visual representation of the pressure cooker with its approximate dimensions labeled as 12 inches in depth, width, and height.
Warranty and Support
For warranty information, product support, or to purchase replacement parts, please refer to the official Butterfly website or contact their customer service directly. Keep your purchase receipt as proof of purchase for any warranty claims.
Manufacturer: Gandhi - Appliances


