ProfiCook KM1004
PROFI COOK PC-KM 1004 Food Processor
Instruction Manual
1. Introduction
Thank you for choosing the ProfiCook PC-KM 1004 Food Processor. This appliance is designed for versatile kitchen tasks, including mixing, kneading, beating, grinding, and blending. To ensure safe and efficient operation, please read this instruction manual thoroughly before first use and keep it for future reference.
2. Important Safety Instructions
- Always disconnect the appliance from the power supply before assembly, disassembly, or cleaning.
- Do not immerse the motor unit in water or other liquids.
- Keep hands and utensils away from moving parts during operation to prevent injury.
- Ensure all attachments are securely locked in place before operating the appliance.
- This appliance is not intended for use by persons with reduced physical, sensory or mental capabilities, or lack of experience and knowledge, unless they have been given supervision or instruction concerning use of the appliance by a person responsible for their safety.
- Children should be supervised to ensure that they do not play with the appliance.
- Do not operate the appliance with a damaged cord or plug, or after the appliance malfunctions or has been damaged in any manner.
- Use only original accessories and spare parts.
3. Product Overview and Components
The ProfiCook PC-KM 1004 is a versatile kitchen machine equipped with various attachments for different culinary tasks.
Main Unit and Bowl

Image: The main unit of the ProfiCook PC-KM 1004 food processor, featuring the robust motor housing and the large 6-liter stainless steel mixing bowl with a handle and a transparent splash guard lid. The bowl securely locks into the base for stable operation.
The main unit houses the powerful 1400 Watt motor and features a control panel for speed adjustment. The extra-large 6-liter stainless steel bowl is designed for processing significant quantities of ingredients.
Control Panel
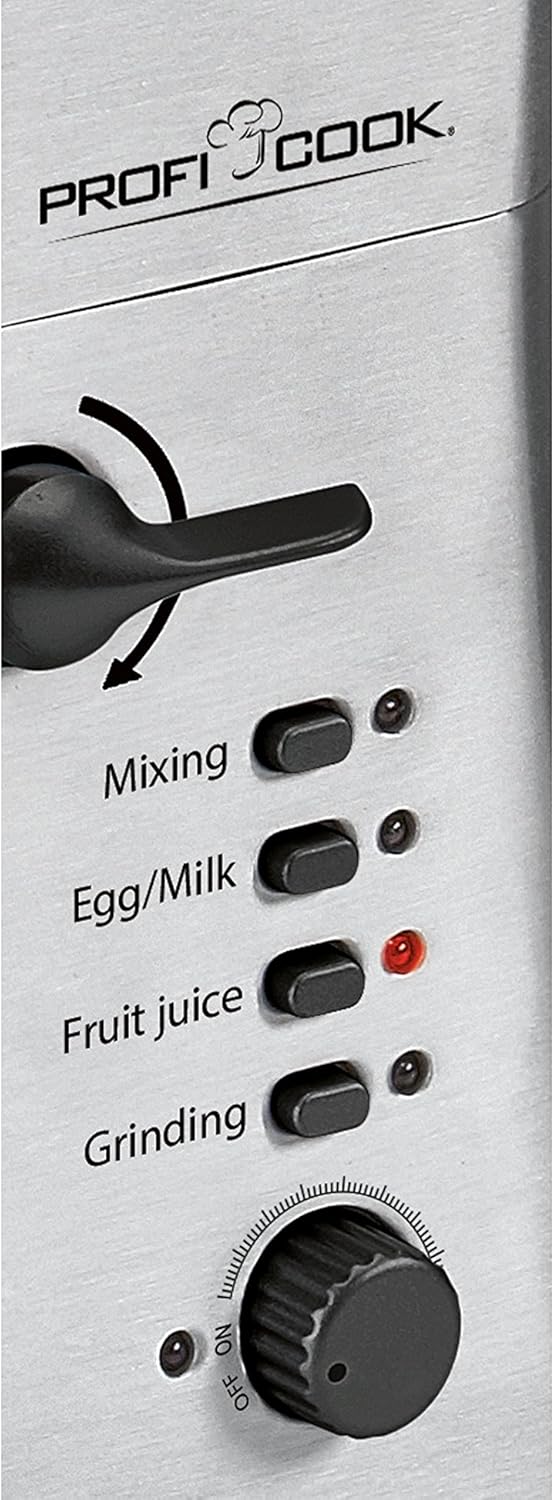
Image: Close-up of the ProfiCook PC-KM 1004 control panel, showing the continuous speed adjustment dial and illuminated buttons for specific functions like Mixing, Egg/Milk, Fruit Juice, and Grinding. The lever for releasing the mixing arm is also visible.
The control panel includes a continuous speed adjustment dial and specific function buttons for optimized performance. The lever allows for easy lifting and lowering of the mixing arm.
Included Accessories

Image: A comprehensive view of the accessories included with the ProfiCook PC-KM 1004 food processor. This includes the whisk, dough hook, flat beater, and various components for the meat grinder attachment such as different grinding plates and a sausage filler.
- Whisk: For whipping cream, egg whites, and light batters.
- Dough Hook: For kneading heavy doughs like bread or pizza dough.
- Flat Beater: For mixing cakes, cookies, and mashed potatoes.
- Meat Grinder Attachment: For grinding meat and making sausages.
- Blender Attachment: For blending liquids, smoothies, and sauces.
Meat Grinder Attachment

Image: The meat grinder attachment securely mounted on the front port of the ProfiCook PC-KM 1004 food processor. It features a feeding tray, a grinding screw, and a cutting plate, ready for processing meat.
Blender Attachment

Image: The robust glass blender attachment positioned on the top port of the ProfiCook PC-KM 1004 food processor. It includes a lid with a removable cap for adding ingredients during blending, ideal for smoothies and sauces.
4. Setup and First Use
- Unpacking: Carefully remove all components from the packaging. Retain packaging for future storage or transport.
- Cleaning: Before first use, clean all parts that will come into contact with food. Refer to the "Maintenance and Cleaning" section for detailed instructions.
- Placement: Place the main unit on a stable, flat, and dry surface. Ensure adequate ventilation around the appliance.
- Attaching the Mixing Bowl: Place the stainless steel mixing bowl onto the base and turn it clockwise until it locks securely in place.
- Attaching the Mixing Arm: Lift the mixing arm using the release lever. Select the desired attachment (whisk, dough hook, or flat beater) and insert it into the attachment shaft. Turn it slightly until it clicks into place. Lower the mixing arm until it locks.
- Attaching Other Accessories: For the meat grinder or blender, refer to their specific assembly instructions provided with the accessory. Ensure they are correctly and securely attached to the designated ports.
- Power Connection: Plug the power cord into a grounded electrical outlet (230V).
5. Operating Instructions
Always ensure the appliance is switched off and unplugged before changing attachments or adding ingredients.
Using the Mixing Bowl Attachments (Whisk, Dough Hook, Flat Beater)
- Ensure the mixing bowl and desired attachment are correctly installed.
- Add ingredients to the mixing bowl. Do not overfill.
- Lower the mixing arm and ensure it is locked.
- Plug in the appliance.
- Turn the speed dial to the desired setting. The appliance offers 4 speeds with continuous adjustment. Start with a low speed and gradually increase as needed.
- For specific tasks, you may use the function buttons (e.g., "Mixing", "Egg/Milk").
- After use, turn the speed dial to "OFF", unplug the appliance, and then lift the mixing arm to remove the bowl and attachment.
Using the Meat Grinder
- Assemble the meat grinder attachment according to its specific instructions, ensuring the desired grinding plate is in place.
- Attach the assembled grinder to the front port of the main unit and secure it.
- Place a bowl or plate under the grinder outlet to collect the processed food.
- Cut meat into small pieces that fit into the feeding tube.
- Plug in the appliance. Select the "Grinding" function button or set the speed dial to a medium setting.
- Feed the meat into the tube using the food pusher. Never use your fingers or other utensils.
- After use, turn the speed dial to "OFF", unplug the appliance, and disassemble the grinder for cleaning.
Using the Blender
- Assemble the glass blender jug onto the top port of the main unit and secure it.
- Add ingredients to the blender jug. Do not exceed the maximum fill line.
- Securely place the lid on the blender jug.
- Plug in the appliance. Select the "Fruit Juice" function button or set the speed dial to a desired blending speed.
- For adding ingredients during blending, remove the small cap from the lid.
- After use, turn the speed dial to "OFF", unplug the appliance, and disassemble the blender for cleaning.
6. Maintenance and Cleaning
Proper cleaning and maintenance will extend the life of your appliance.
- Always unplug the appliance before cleaning.
- Motor Unit: Wipe the motor unit with a damp cloth. Never immerse it in water or other liquids.
- Mixing Bowl and Attachments: The stainless steel mixing bowl, whisk, dough hook, and flat beater can be washed in warm soapy water or in a dishwasher (check individual accessory instructions for dishwasher compatibility). Rinse thoroughly and dry immediately.
- Meat Grinder Parts: Disassemble all parts of the meat grinder. Wash them immediately after use in warm soapy water to prevent food residue from drying. Use a brush for hard-to-reach areas. Rinse and dry thoroughly.
- Blender Jug: The glass blender jug can be washed in warm soapy water or in a dishwasher. Ensure the blade assembly is thoroughly cleaned.
- Storage: Store the cleaned and dried appliance and its accessories in a dry, safe place, away from direct sunlight and moisture.
7. Troubleshooting
| Problem | Possible Cause | Solution |
|---|---|---|
| Appliance does not start. | Not plugged in; power switch off; mixing arm not locked; bowl not locked. | Check power connection; ensure speed dial is not on "OFF"; ensure mixing arm is fully lowered and locked; ensure mixing bowl is locked. |
| Motor stops during operation. | Overload protection activated. | Turn off and unplug the appliance. Reduce the amount of ingredients. Let the motor cool down for 15-20 minutes before restarting. |
| Loud noise or vibration. | Appliance not on a stable surface; attachment not properly installed; too much load. | Place on a stable, flat surface. Re-install attachment correctly. Reduce ingredients. |
| Meat grinder not grinding effectively. | Meat pieces too large; grinding plate clogged; blade dull. | Cut meat into smaller pieces. Disassemble and clean the grinding plate. Check blade for sharpness. |
| Blender not blending smoothly. | Too little liquid; ingredients too large; jug overfilled. | Add more liquid. Cut ingredients into smaller pieces. Do not exceed max fill line. |
8. Technical Specifications
- Model: PC-KM 1004
- Brand: ProfiCook
- Power: 1400 Watts
- Voltage: 230 Volts
- Mixing Bowl Capacity: 6 Liters
- Speeds: 4 speeds with continuous electronic control
- Material: Stainless Steel housing and bowl
- Dimensions (L x W x H): 24 x 42 x 40 cm
- Weight: 11 Kilograms
- Features: Integrated meat grinder, blender attachment
9. Warranty and Customer Support
ProfiCook products are manufactured with care and undergo strict quality controls. In the unlikely event of a defect, please contact your retailer or the ProfiCook customer service department. Please retain your purchase receipt as proof of purchase for warranty claims.
For further assistance or inquiries, please visit the official ProfiCook website or contact their customer support. Information regarding spare parts availability is currently unavailable.
Ask a question about this manual
Ask about setup, troubleshooting, compatibility, parts, safety, or missing instructions. Manuals+ will review the question and use this page’s manual context to help answer it.