Introduction
Thank you for choosing the Sunbeam SB1818 Compact Sewing Machine. This machine is designed for everyday mending, hemming, and small sewing projects. It features 18 built-in stitches, including a buttonhole stitch, and comes with a comprehensive sewing kit. Please read this manual thoroughly before operating your machine to ensure safe and efficient use.

Figure 1: Sunbeam SB1818 Compact Sewing Machine overview.
Important Safety Instructions
- Always unplug the machine from the electrical outlet immediately after using and before cleaning, making any adjustments, or removing any parts.
- Do not operate the machine with a damaged cord or plug. If the machine is not working properly, has been dropped or damaged, return it to the nearest authorized service dealer for examination, repair, or electrical or mechanical adjustment.
- Keep fingers away from all moving parts. Special care is required around the sewing machine needle.
- Never drop or insert any object into any opening.
- Do not use outdoors.
- Do not operate where aerosol (spray) products are being used or where oxygen is being administered.
- To disconnect, turn all controls to the off position, then remove plug from outlet.
Product Components and Features
The Sunbeam SB1818 is equipped with several features designed for ease of use and versatility.

Figure 2: Key features including compact design, 12-stitch dial, reverse stitching, and dual speed capability.
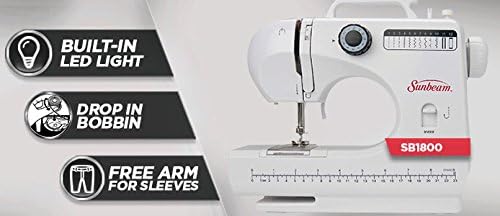
Figure 3: Additional features such as the built-in LED light, easy drop-in bobbin, and free arm for sleeves.
The machine also includes a built-in measuring tape and a convenient carry handle for portability.
Setup
- Power Connection: Connect the power cord to the machine and then to a suitable electrical outlet.
- Foot Pedal Connection: Insert the foot pedal plug into the designated port on the machine. The machine can be operated with the foot pedal or the sewing lever on the front.
- Bobbin Winding: Place an empty bobbin onto the bobbin winder spindle. Guide the thread from the spool pin through the tension disc and around the bobbin. Engage the bobbin winder and start the machine to wind the bobbin. Stop when the bobbin is full.
- Inserting the Bobbin: The SB1818 features a top drop-in bobbin. Open the bobbin cover plate, insert the wound bobbin with the thread unwinding in the correct direction (usually counter-clockwise), and pull the thread through the tension spring. Close the cover plate.
- Threading the Machine: Follow the numbered threading path indicated on the machine. Ensure the thread passes through all guides, the tension discs, and the take-up lever before threading the needle from front to back.
- Raising the Bobbin Thread: Hold the upper thread lightly, turn the hand wheel towards you to lower and raise the needle. The needle will catch the bobbin thread, bringing it up through the needle plate. Pull both threads under the presser foot and towards the back of the machine.
Operating Instructions
- Stitch Selection: Use the easy-turn dial to select one of the 18 available stitches, including straight stitches, zigzag stitches, and a buttonhole stitch.
- Tension Adjustment: The machine has an automatic and manual tension adjustment. For most fabrics, the automatic setting is sufficient. If stitches appear loose or tight, adjust the tension dial as needed.
- Reverse Stitching: Press and hold the reverse sewing button to sew backwards, which is useful for securing seams at the beginning and end of your stitching.
- Dual Speed: Select between high and low speed settings using the speed switch, allowing for greater control, especially for beginners or intricate work.
- Free Arm: To use the free arm for sewing cuffs, sleeves, or other small circular items, slide off the accessory storage drawer.
- Work Space LED Light: The built-in LED light illuminates your sewing area for better visibility.
- Included Sewing Kit: The machine comes with a 100+ piece sewing kit, including bobbins, buttons, thread, safety pins, tape measure, fasteners, scissors, seam ripper, pin cushion, needles, and a thimble.

Figure 4: The comprehensive sewing kit included with the machine.
Maintenance
- Cleaning: Regularly clean lint and dust from the bobbin area and feed dogs using a small brush. Always unplug the machine before cleaning.
- Needle Replacement: Change the needle frequently, especially when sewing different types of fabric or if the needle becomes bent or dull. Use only appropriate needles for sewing machines.
- General Care: Store the machine in a dry, clean place. Cover it when not in use to prevent dust accumulation.
Troubleshooting
| Problem | Possible Cause | Solution |
|---|---|---|
| Machine not starting | Power cord not plugged in; foot pedal not connected; power switch off. | Check power connections; ensure foot pedal is securely plugged in; turn power switch on. |
| Skipped stitches | Incorrect needle size or type; bent needle; improper threading. | Replace needle with correct type/size; re-thread the machine carefully. |
| Thread breaking | Incorrect tension; poor quality thread; needle bent or dull; improper threading. | Adjust tension; use good quality thread; replace needle; re-thread the machine. |
| Bobbin thread tangling | Bobbin incorrectly inserted; bobbin wound unevenly; lint in bobbin case. | Re-insert bobbin correctly; re-wind bobbin evenly; clean bobbin area. |
| Machine runs continuously when plugged in | Potential electrical issue or switch malfunction. | Immediately unplug the machine. Contact customer support for assistance. Do not attempt to repair yourself. |
Specifications
| Model Number: | SB1818 |
| Product Type: | Electronic Sewing Machine |
| Brand: | Sunbeam |
| Stitch Count: | 18 (including buttonhole) |
| Needle Threading System: | Automatic |
| Bobbin Winding: | Automatic |
| Light Included: | Yes (LED) |
| Reverse Stitching: | Yes |
| Thread Tension Adjustment: | Automatic; Manual |
| Free Arm: | Yes |
| Power Source: | AC/DC |
| Item Weight: | 6 lbs |
| Product Dimensions (D x W x H): | 6" x 16" x 12.25" |
| Material: | Metal |
Warranty and Support
This Sunbeam SB1818 Compact Sewing Machine is covered by a manufacturer's warranty. Please refer to the warranty card included with your purchase for specific terms and conditions. For technical support, service, or to inquire about replacement parts, please contact Sunbeam customer service. Contact information can typically be found on the product packaging or the official Sunbeam website.