1. Introduction
This manual provides instructions for assembling the Trumpeter 1/700 German Tirpitz Battleship 1943 Model Kit. This kit is designed for modelers aged 14 and above. It is a ready-to-assemble plastic model kit featuring hundreds of pieces to accurately represent the military ship. Please read all instructions carefully before beginning assembly.
The kit allows for construction as either a full hull or waterline version. Glue and paint are not included and must be purchased separately.
2. Safety Information
- Small Parts: This kit contains small parts which may pose a choking hazard. Keep out of reach of small children.
- Sharp Tools: Assembly requires the use of sharp tools such as hobby knives and tweezers. Exercise caution to prevent injury.
- Adhesives and Paints: Use adhesives and paints in a well-ventilated area. Refer to the manufacturer's safety data sheets for specific product warnings.
- Eye Protection: Consider wearing eye protection during assembly to guard against small flying plastic pieces or chemical splashes.
3. Parts List and Decals
Before starting assembly, verify that all parts are present and undamaged. Refer to the included parts diagram (usually found on the first page of the physical instruction booklet) to identify all components. The kit includes multiple sprues with hundreds of plastic parts.

Figure 3.1: Example of the instruction manual cover, showing assembly symbols and decal application guide.
The kit also includes a decal sheet for markings. Handle decals carefully to avoid damage.
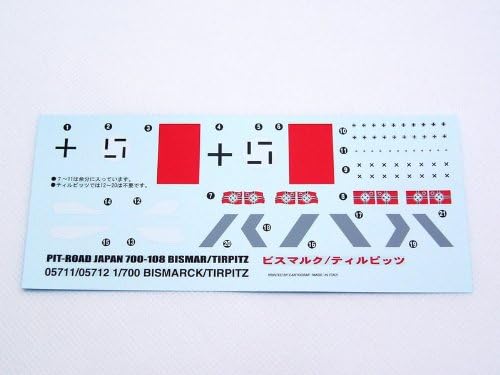
Figure 3.2: Decal sheet for the Trumpeter 1/700 Bismark/Tirpitz model, including various markings and numbers.
4. Setup and Assembly
4.1 Preparation
- Workspace: Prepare a clean, well-lit workspace.
- Tools: Gather necessary tools: hobby knife, plastic cement, tweezers, sanding sticks/files, and paint (if desired).
- Part Identification: Familiarize yourself with the parts on the sprues and the assembly steps in the instruction booklet.
4.2 Basic Assembly Steps
Follow the numbered steps in the provided instruction booklet. Generally, assembly proceeds as follows:
- Cut Parts: Carefully cut parts from the sprues using a hobby knife or sprue cutters. Trim any excess plastic (flash).
- Dry Fit: Always dry fit parts before applying glue to ensure proper alignment and fit.
- Glue: Apply plastic cement sparingly to the mating surfaces. Hold parts together until the glue sets.
- Sub-Assemblies: Assemble smaller components (e.g., turrets, lifeboats, superstructure sections) first, then attach them to the main hull.
- Hull Assembly: Decide whether to build the full hull or waterline version. The kit provides parts for both.

Figure 4.1: Box art illustration of the Tirpitz Battleship, depicting its camouflage and overall appearance. This image serves as a visual guide for the completed model.
Note: Some parts, particularly small anti-aircraft cannons, are very tiny and require precision. Using fine-tipped tweezers and a magnifying glass is recommended for these components.
5. Finishing and Display
5.1 Painting
After assembly, the model can be painted. Refer to historical references or the box art for accurate color schemes. Apply paint in thin, even coats.
5.2 Decal Application
To apply decals:
- Cut the desired decal from the sheet.
- Dip the decal in warm water for approximately 10-20 seconds until it separates from the backing paper.
- Slide the decal onto the model surface.
- Position the decal carefully using tweezers.
- Gently press down with a soft cloth or cotton swab to remove excess water and air bubbles.
5.3 Display
Once completed, the model can be displayed on a shelf or in a display case. The kit may include a display stand for the full hull version.

Figure 5.1: A detailed view of the completed model, showcasing the intricate deck structures and weaponry.

Figure 5.2: Front view of the assembled model, highlighting the bow and forward superstructure.

Figure 5.3: Side profile of the completed model, illustrating the full hull and camouflage pattern.
6. Maintenance
- Cleaning: Dust the model regularly with a soft brush or compressed air to prevent dust buildup. Avoid using harsh chemicals or abrasive materials.
- Storage: Store the model in a stable environment, away from direct sunlight, extreme temperatures, and high humidity, which can cause plastic to warp or decals to degrade.
- Handling: Handle the model carefully, grasping it by the main hull rather than delicate protrusions to avoid breakage.
7. Troubleshooting Common Issues
| Issue | Possible Cause | Solution |
|---|---|---|
| Parts do not fit together | Excess plastic (flash) on parts; incorrect part orientation. | Carefully trim flash with a hobby knife. Dry fit parts to ensure correct orientation before gluing. |
| Decals do not adhere or wrinkle | Insufficient water; surface not smooth; air bubbles trapped. | Ensure decal is fully soaked. Apply to a glossy surface. Gently press out air bubbles with a soft cloth. Consider using decal setting solutions. |
| Small parts break during assembly | Excessive force; improper tools. | Use appropriate tools (e.g., fine-tipped tweezers). Apply gentle, even pressure. Reinforce delicate joints with a small amount of extra cement if needed. |
8. Specifications
- Brand: Trumpeter
- Model: German Tirpitz Battleship 1943
- Scale: 1:700
- Material: Plastic
- Number of Pieces: Approximately 290
- Recommended Age: 14+
- Item Dimensions (L x W x H): 15.08 x 2.54 x 3 inches (approximate assembled size)
- ASIN: B005GNX5F8
9. Warranty Information
This product comes with a 30-day warranty against manufacturer defects. This warranty covers defects in materials and workmanship under normal use. It does not cover damage resulting from improper assembly, misuse, accidents, or modifications. Please retain your proof of purchase for warranty claims.
10. Customer Support
For questions regarding assembly, missing parts, or warranty claims, please contact the manufacturer, Stevens International, or your retailer. Please have your model number (05712) and proof of purchase available when contacting support.
Manufacturer: Stevens International
Note: Contact information for Stevens International is typically found on the product packaging or their official website.