
Introduction
This manual provides comprehensive instructions for the setup, operation, maintenance, and troubleshooting of your Avaya 1416 Digital Deskphone. The Avaya 1416 is designed for users who manage incoming calls, transfer calls, and monitor multiple lines, making it ideal for receptionists, assistants, and other administrative staff.
Safety Information
Please read all safety instructions before using the phone to prevent injury or damage. Keep the phone away from water and excessive heat. Use only the power adapter supplied with the device. Do not attempt to open or repair the phone yourself.
Product Overview
The Avaya 1416 Digital Deskphone features a robust design with essential functionalities for efficient call handling.
Key Features:
- 4 line x 24 character tilting backlit display for clear visibility.
- 16 programmable line/feature buttons with dual LEDs for quick access to functions and line status.
- Built-in speakerphone for hands-free communication.
- Integrated headset jack and built-in headset button for convenient headset use.
Components:

Figure 1: Front view of the Avaya 1416 Digital Deskphone, showing the display, keypad, and programmable buttons.
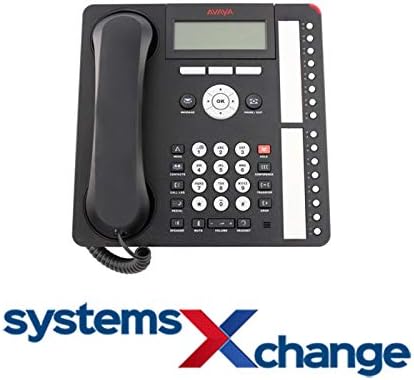
Figure 2: Top-down view of the Avaya 1416 Digital Deskphone, highlighting the layout of the buttons and display.
The phone includes a handset, a coiled handset cord, an Ethernet cable, and a desk stand. Familiarize yourself with the location of the display, navigation cluster, message waiting indicator, and various function buttons.
Setup
- Connect the Handset: Plug one end of the coiled handset cord into the handset and the other end into the handset port on the phone base.
- Connect to Network: Connect one end of the Ethernet cable to the LAN port on the phone and the other end to your network jack or switch.
- Connect Power (if applicable): If your network does not provide Power over Ethernet (PoE), connect the optional power adapter (sold separately) to the power port on the phone and then to a power outlet.
- Adjust Desk Stand: Attach the desk stand to the phone base and adjust it to your preferred viewing angle.
- Initial Boot-up: The phone will power on automatically and begin its boot-up sequence. This may take a few moments as it connects to your Avaya communication system.
Operating Instructions
Making Calls:
- Dialing: Lift the handset, press the Speaker button, or press a line appearance button. Dial the number.
- Redial: Press the Redial button to call the last dialed number.
- Contacts: Press the Contacts button to access your stored directory.
Answering Calls:
- When the phone rings, lift the handset or press the Speaker button.
- Alternatively, press the flashing line appearance button.
Call Management:
- Hold: During a call, press the Hold button. The line button will flash. To retrieve, press the flashing line button.
- Transfer: During a call, press the Transfer button. Dial the number to transfer to, then press Transfer again to complete (or wait for answer for supervised transfer).
- Conference: During a call, press the Conference button. Dial the number of the third party, and once connected, press Conference again to join all parties.
- Mute: Press the Mute button to mute your microphone. Press again to unmute.
- Volume: Use the Volume buttons to adjust handset, speaker, or ringer volume.
Using Programmable Buttons:
The 16 programmable buttons can be configured for various functions such as line appearances, speed dials, or feature access codes. Consult your system administrator for specific programming details.
Maintenance
- Cleaning: Use a soft, dry cloth to clean the phone's surface. Do not use liquid cleaners or aerosols directly on the phone.
- Cord Management: Ensure all cords are neatly arranged and not tangled to prevent damage or tripping hazards.
- Environmental Conditions: Keep the phone in a dry environment, away from direct sunlight and extreme temperatures.
Troubleshooting
| Problem | Possible Cause | Solution |
|---|---|---|
| Phone does not power on. | No power from PoE or power adapter. | Check Ethernet cable connection. If using power adapter, ensure it's securely plugged in. |
| No dial tone. | Network connection issue or system registration failure. | Verify network cable. Restart the phone. Contact your system administrator. |
| Cannot hear caller / Caller cannot hear me. | Volume too low or Mute activated. | Adjust volume using the Volume buttons. Check if the Mute button is illuminated. |
| Display is blank or unreadable. | Power issue or display settings. | Check power connection. Adjust display tilt. If problem persists, contact support. |
For issues not listed here, please contact your IT department or Avaya support.
Specifications
| Feature | Detail |
|---|---|
| Model Number | 700469869 |
| Product Dimensions (L x W x H) | 3.87 x 1.39 x 4.5 inches |
| Item Weight | 2.86 pounds (1.3 Kilograms) |
| Color | Black |
| Telephone Type | Corded |
| Power Source | Corded Electric (PoE or optional power adapter) |
| Dialer Type | Single Keypad |
| Answering System Type | Digital |
| Compatible Systems | Avaya Aura Communication Manager Rls 5.2.1+, Avaya IP Office 400/500 Systems Rls 6.0+ |
| Display | 4 line x 24 character tilting backlit display |
| Programmable Buttons | 16 with dual LEDs |
| Headset Support | Integrated headset jack |
Warranty and Support
For warranty information, please refer to the documentation provided at the time of purchase or contact your Avaya reseller. For technical support, please contact your system administrator or Avaya customer service. Keep your model number (700469869) and serial number ready when contacting support.