Introduction
The Rockler Trim Router Table is a compact and portable accessory designed to convert your trim router into a stationary routing solution. This table allows for greater control and precision when performing routing tasks such as creating round-overs, chamfers, and small dadoes. Its design facilitates quick setup and easy detachment of the router for handheld use.

Figure 1: Rockler Trim Router Table with its packaging.
Components
The Rockler Trim Router Table includes the following components:
- Trim Router Tabletop: The main work surface for routing operations.
- High-Visibility Bit Guard: A clear guard for enhanced safety during operation.
- 1/4" Thick x 5-3/4" Diameter Acrylic Base: Designed to attach to your trim router.
- Adjustable Fence: For guiding workpieces and ensuring straight cuts.
- T-Knobs: For quick and secure fence adjustments.

Figure 2: The Rockler Trim Router Table with its primary components.
Note: A dust collection shroud, while shown in some promotional images (e.g., Figure 3), is typically sold separately and is not included with the standard package.
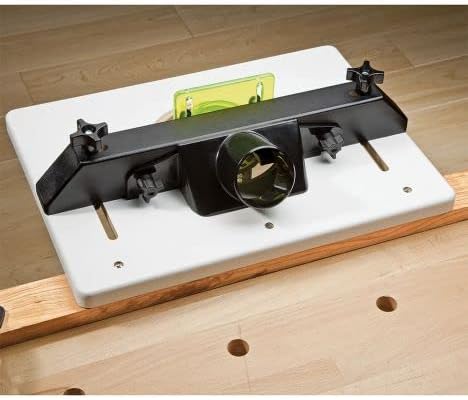
Figure 3: An optional dust port accessory for the router table (sold separately).
Setup
1. Attaching Your Trim Router
- Ensure your trim router is unplugged and the power switch is off.
- Remove the existing base plate from your trim router.
- Align the included 1/4" thick acrylic base with the mounting holes on your trim router. The base is pre-drilled for common models such as Bosch Colt, Porter Cable 450 and 7310, and DeWalt DW 611. For other models, you may need to drill new holes in the acrylic base to match your router's mounting pattern.
- Secure the acrylic base to your router using the appropriate screws.
- Insert the router with the attached acrylic base into the opening on the underside of the router tabletop. The acrylic base should sit flush with the tabletop surface.

Figure 4: A trim router with the clear acrylic base attached.

Figure 5: Close-up view of the router's attachment to the acrylic base.
2. Securing the Router Table
The trim router table can be secured to various work surfaces using clamps. It is designed to be attached to the edge of a bench, a table, a piece of plywood, or even a sawhorse.
- Place the router table on your desired work surface with the router hanging below.
- Use appropriate clamps (not included) to firmly secure the table to the work surface. Ensure the table is stable and does not wobble during operation.

Figure 6: The router table securely clamped to a workbench.

Figure 7: The router table clamped to sawhorses for portable use.
Operating Instructions
1. Adjusting the Fence
The adjustable fence allows for precise guiding of your workpiece. Loosen the T-knobs on the fence, slide the fence to the desired position relative to the router bit, and then tighten the T-knobs to secure it.
2. Using the Bit Guard
The high-visibility bit guard should always be in place during operation to protect against accidental contact with the spinning bit. Adjust its position as needed to accommodate your workpiece while maintaining maximum protection.
3. Performing Routing Operations
With the router securely mounted and the table clamped, you can now perform routing tasks. Always ensure your workpiece is properly supported and guided against the fence. Feed the material smoothly and consistently to achieve optimal results.
4. Converting to Handheld Use
One of the key features of this table is the ability to quickly convert your trim router for handheld use. Simply loosen the screws holding the acrylic base to the table, remove the router, and use it as a standard handheld trim router. Re-attach the acrylic base to the table when you wish to use it in the table configuration again.
Video 1: Demonstration of quickly converting the trim router between table-mounted and handheld use.
5. Compatible Trim Routers
This router table is compatible with many popular trim routers, including:
- Bosch Colt
- Porter Cable 450
- Porter Cable 7310
- DeWalt DW 611
For other models, the acrylic base can be drilled to fit your specific router.

Figure 8: Examples of trim routers compatible with the table.
Maintenance
To ensure the longevity and optimal performance of your Rockler Trim Router Table, follow these maintenance guidelines:
- Cleaning: Regularly wipe down the tabletop and fence with a clean, damp cloth to remove sawdust and debris. Avoid using harsh chemicals that may damage the acrylic or other surfaces.
- Inspection: Periodically inspect all fasteners, especially the T-knobs and screws securing the acrylic base, to ensure they are tight. Vibration during use can sometimes cause them to loosen.
- Storage: Store the router table in a dry, clean environment when not in use to prevent rust or damage to components.
Troubleshooting
Issue: Tabletop or router base becomes unstable during use.
Possible Cause: Clamps securing the table to the workbench are loose, or the leveling screws/fasteners for the acrylic base are not sufficiently tightened.
Solution: Ensure all clamps are firmly tightened to the work surface. Verify that the screws holding the acrylic base to the router and the table are secure. If the acrylic base has leveling screws, ensure they are properly adjusted to provide a stable, flush surface and are tightened to prevent movement from vibration.
Issue: Difficulty achieving consistent cuts.
Possible Cause: The fence is not securely locked, or the workpiece is not being fed consistently.
Solution: Double-check that the fence T-knobs are fully tightened. Practice feeding scrap material to develop a smooth, consistent feed rate. Ensure the workpiece is always firmly pressed against the fence.
Specifications
| Feature | Specification |
|---|---|
| Brand | ROCKLER |
| Model Number | 04032018_854-Rockler-38.79 |
| Item Weight | 6.69 pounds |
| Product Dimensions | 4 x 0.01 x 5 inches (Tabletop: Approximately 11" x 15") |
| Base Type | Fixed (for router attachment) |
| Item Package Quantity | 1 |
| UPC | 733175435505, 756655352000 |
Warranty and Support
For information regarding warranty coverage or technical support for your Rockler Trim Router Table, please refer to the official Rockler Woodworking and Hardware website or contact their customer service department directly. Keep your purchase receipt for any warranty claims.


