
1. Introduction
This manual provides comprehensive instructions for the installation, maintenance, and troubleshooting of the Hypro D252 Diaphragm Pump Complete Repair Kit. This kit is designed to restore optimal performance to your Hypro D252, D252GRGI, and D252GRGI58 diaphragm pumps by replacing essential wearing components. Please read these instructions carefully before proceeding with any repair work to ensure safety and proper function.
2. Product Overview
The Hypro D252 Repair Kit (D252repairkit) is a comprehensive solution for maintaining the efficiency and longevity of your Hypro diaphragm pump. It combines the 9910-KIT1723 diaphragm repair kit and the 9910-KIT2408 valve repair kit into a single package. This kit addresses common wear issues by providing new diaphragms, o-rings, and valve assemblies, which are critical for maintaining pump pressure, flow, and preventing leaks.
Compatibility: This kit is compatible with the following Hypro diaphragm pump models:
- Hypro D252
- Hypro D252GRGI
- Hypro D252GRGI58
3. Kit Contents
The Hypro D252 Diaphragm Pump Complete Repair Kit includes the following components:
- 2 x O-rings (Part Number: 9910-480440)
- 2 x Black Buna Diaphragms (Part Number: 9910-800080)
- 1 x Accumulator Diaphragm (Part Number: 9910-800190)
- 2 x O-rings (Part Number: 9910-800210)
- 4 x D252 Valve Assemblies (Part Number: 9910-809060V)
- 4 x Valve O-rings (Part Number: 9910-880830)
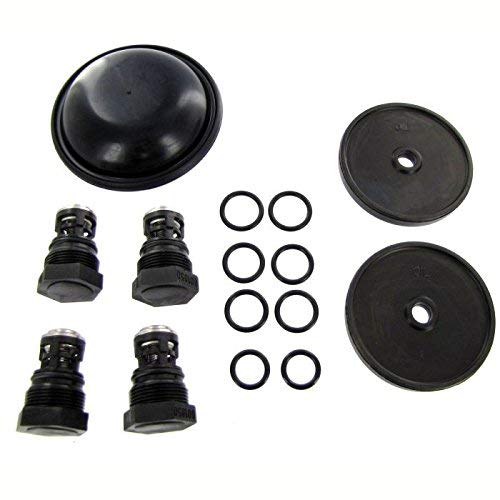
An image showing the various components included in the Hypro D252 Diaphragm Pump Complete Repair Kit, such as diaphragms, o-rings, and valve assemblies.
4. Setup and Installation (Repair Procedure)
Performing a complete repair on your Hypro D252 diaphragm pump requires careful attention to detail. If you are not comfortable with mechanical repairs, it is recommended to seek assistance from a qualified technician.
4.1 Safety Precautions
- Always disconnect power to the pump before beginning any repair work.
- Release any pressure in the system before disassembling the pump.
- Wear appropriate personal protective equipment, such as gloves and eye protection.
- Ensure the work area is clean and well-lit.
4.2 General Repair Steps
- Disassembly: Carefully disassemble the pump according to the manufacturer's service manual for your specific Hypro D252 model. Pay close attention to the order and orientation of all components.
- Remove Old Components: Remove the worn diaphragms (9910-800080, 9910-800190), o-rings (9910-480440, 9910-800210), and valve assemblies (9910-809060V) from the pump.
- Clean Components: Thoroughly clean all internal pump components and housing surfaces to remove any debris, residue, or corrosion. Ensure sealing surfaces are smooth and free of imperfections.
- Install New Diaphragms: Install the new black Buna diaphragms (9910-800080) and the accumulator diaphragm (9910-800190) in their respective positions. Ensure they are seated correctly and not pinched.
- Install New Valves and O-rings: Replace the old valve assemblies with the new D252 valve assemblies (9910-809060V) and their corresponding valve o-rings (9910-880830). Also, replace the other o-rings (9910-480440, 9910-800210) as needed. Lubricate o-rings lightly with a compatible lubricant if recommended by the pump manufacturer.
- Reassembly: Reassemble the pump by reversing the disassembly steps. Ensure all fasteners are tightened to the manufacturer's specified torque settings. Do not overtighten.
- Testing: After reassembly, reconnect the pump to power and the fluid system. Slowly introduce fluid and check for any leaks. Operate the pump to ensure proper pressure and flow are achieved.
5. Maintenance
Regular maintenance is crucial for extending the life of your diaphragm pump and the repair kit components.
- Regular Inspection: Periodically inspect the pump for any signs of leaks, unusual noises, or decreased performance.
- Cleanliness: Keep the exterior of the pump clean to prevent dirt and debris from entering critical components.
- Fluid Compatibility: Ensure that the fluids being pumped are compatible with the Buna diaphragms and o-rings to prevent premature wear.
- Winterization: If operating in freezing conditions, follow the pump manufacturer's guidelines for proper winterization to prevent damage.
6. Troubleshooting
This repair kit is designed to address common issues related to worn internal components. If you experience problems after installing the kit, consider the following:
- Loss of Pressure or Flow: This is often caused by worn diaphragms or faulty valve assemblies. Ensure all new components are installed correctly and seated properly. Check for any obstructions in the fluid lines.
- Leaks: Leaks can occur if o-rings or diaphragms are not seated correctly, are damaged during installation, or if fasteners are not tightened to specification. Recheck all sealing surfaces and torque settings.
- Pump Not Priming: This can be due to issues with the valve assemblies not sealing properly, allowing air into the system. Verify valve installation and ensure no air leaks are present in the suction line.
- Unusual Noise: Can indicate improper assembly or a foreign object in the pump. Disassemble and inspect carefully.
If problems persist, consult the original pump manufacturer's service manual or contact a qualified service technician.
7. Specifications
| Manufacturer | Hypro |
| Item Model Number | D252repairkit |
| Compatible Pump Models | Hypro D252, D252GRGI, D252GRGI58 |
| Diaphragm Material | Buna |
8. Warranty and Support
Specific warranty information for the Hypro D252 Diaphragm Pump Complete Repair Kit should be obtained from your original point of purchase or directly from the manufacturer, Hypro. Warranty terms typically cover defects in materials and workmanship.
For technical support or inquiries regarding this repair kit, please contact the seller or the manufacturer directly. When contacting support, please have your purchase details and the kit's model number (D252repairkit) available.