Introduction
This manual provides comprehensive instructions for the installation, operation, and maintenance of your Mount-It! Dual Monitor Mount, model MI-752. Please read these instructions carefully before assembly and use to ensure proper functionality and safety. This product is designed to securely hold two computer monitors, enhancing your workspace ergonomics.

Image: The Mount-It! Dual Monitor Mount MI-752, featuring its black finish, central pole, adjustable arms, and desk clamp mechanism.
Safety Information
- Ensure all components are present and undamaged before assembly. Do not use if any parts are missing or faulty.
- Verify that your desk surface is strong enough to support the combined weight of the mount and two monitors.
- Do not exceed the maximum weight capacity of 22 pounds (10 kg) per monitor arm.
- Ensure monitors are VESA compatible (75x75mm or 100x100mm) before attempting to attach them.
- Keep children and pets away during installation.
- Tighten all screws firmly, but do not overtighten to avoid stripping threads.
Package Contents
Please check that all the following components are included in your package:
- Central Pole with Desk Clamp/Grommet Base
- Two Monitor Arms
- VESA Mounting Plates (pre-attached to arms)
- Hardware Kit (screws, washers, spacers for monitor attachment)
- Tools (Allen wrenches)
- Cable Management Clips
Setup and Installation
Follow these steps to correctly install your dual monitor mount.
Step 1: Choose Mounting Method
The MI-752 supports two installation methods: C-Clamp or Grommet Base. Select the method suitable for your desk.
C-Clamp Installation
- Attach the C-clamp assembly to the bottom of the central pole.
- Position the mount on the edge of your desk. Ensure the desk thickness is between 0.4 inches (1 cm) and 4 inches (10 cm).
- Tighten the C-clamp screws until the mount is securely fastened to the desk. Do not overtighten.
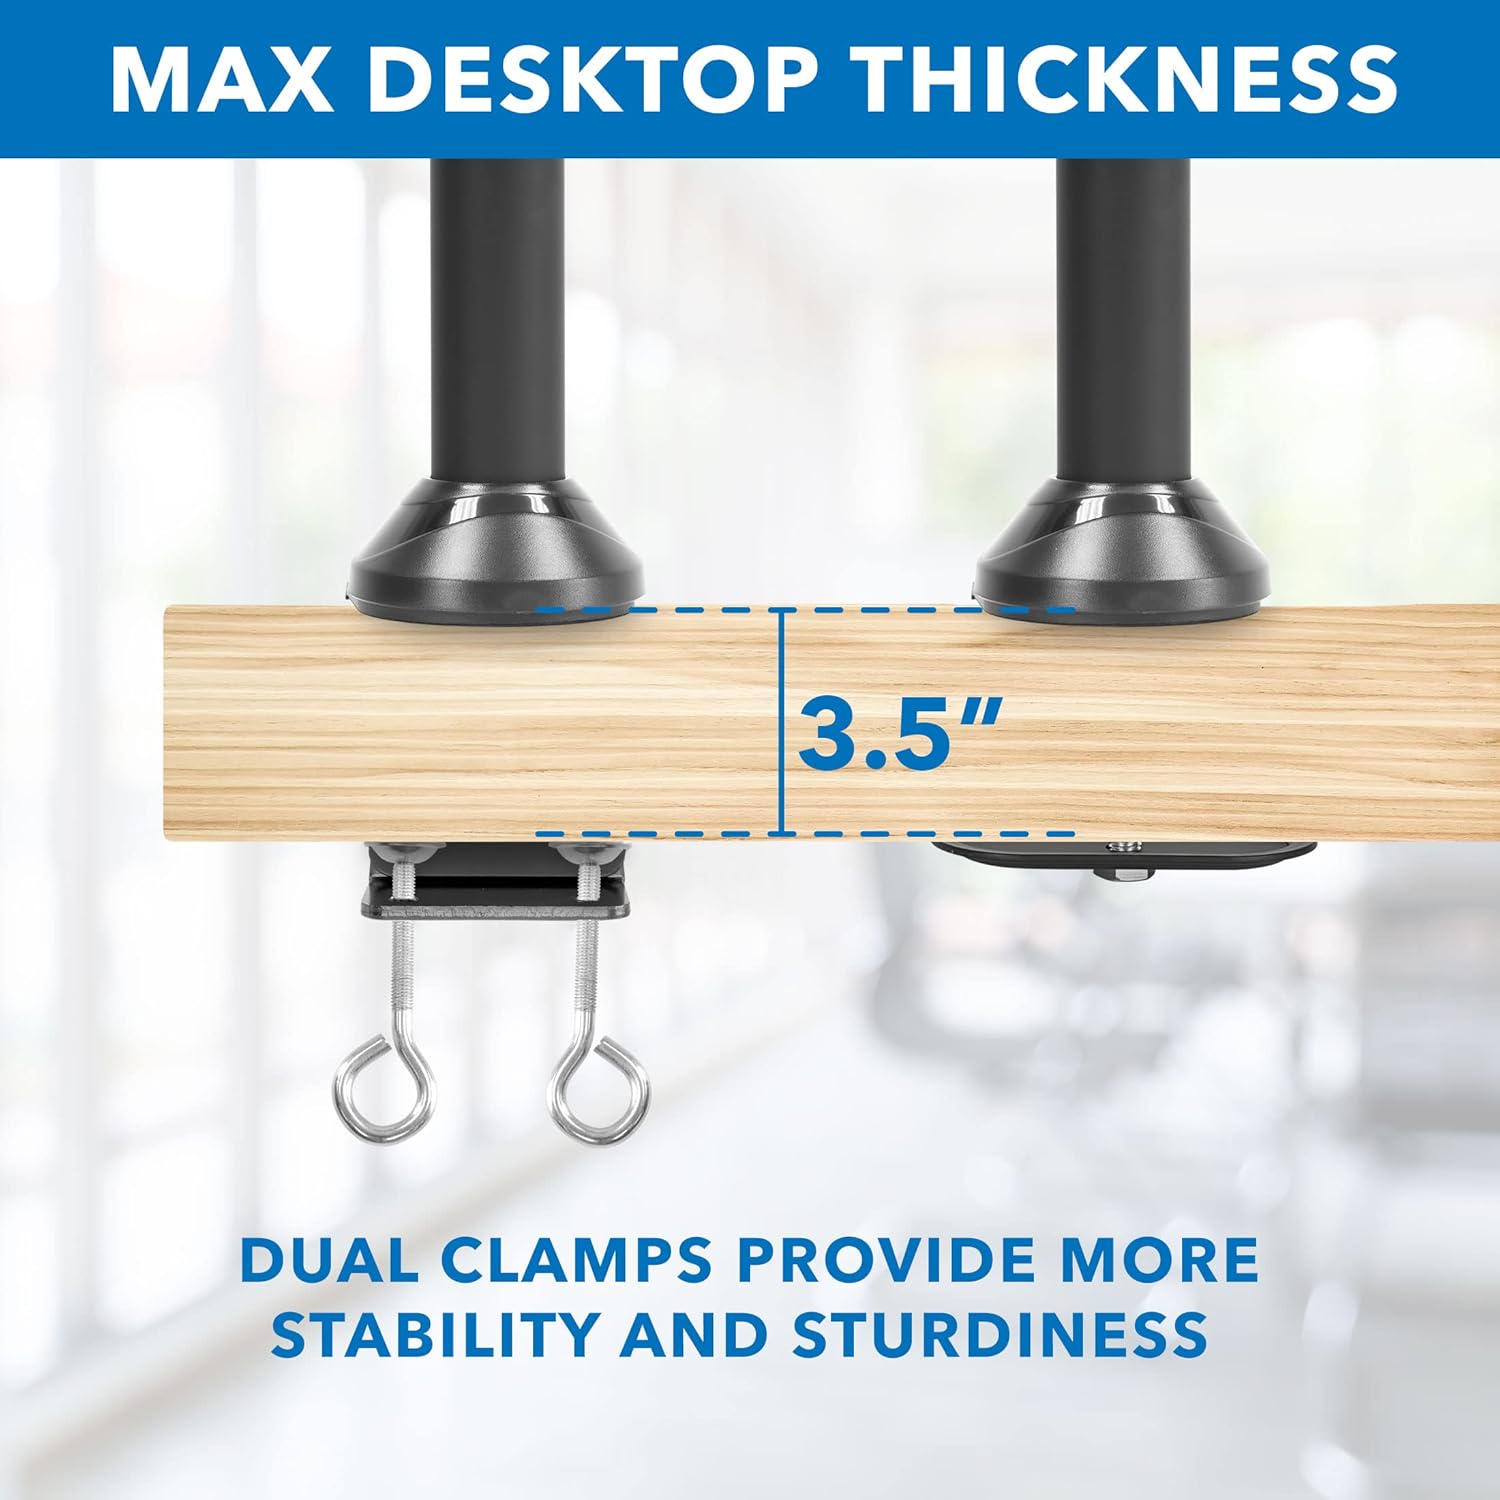
Image: Detail of the C-clamp mechanism securing the mount to a desktop, illustrating maximum compatible desk thickness.
Grommet Base Installation
- If your desk has a grommet hole, disassemble the C-clamp and attach the grommet base plate to the central pole.
- Insert the central pole through the grommet hole.
- Secure the grommet base from underneath the desk using the provided hardware.
Step 2: Attach Monitor Arms
Slide the monitor arms onto the central pole at your desired height. Use the included Allen wrench to tighten the set screw on each arm to secure its position.
Step 3: Attach Monitors
- Carefully attach the VESA mounting plates (pre-attached to the arms) to the back of your monitors using the appropriate screws from the hardware kit. Ensure the VESA pattern (75x75mm or 100x100mm) matches your monitor.
- Once the VESA plates are secured to the monitors, slide the monitors onto the arms.
- Tighten any remaining screws to ensure the monitors are firmly attached to the arms.

Image: Visual guide for VESA mounting patterns and weight capacity per arm.
Operating Instructions and Adjustments
The Mount-It! MI-752 offers various adjustment options for optimal viewing comfort.
Height Adjustment
To adjust the height of the monitors, loosen the set screw on the monitor arms where they attach to the central pole. Slide the arms up or down to the desired height, then re-tighten the set screw firmly.
Tilt, Swivel, and Rotation
The monitor arms allow for flexible positioning:
- Tilt: Monitors can tilt up or down by 15 degrees. Adjust the tilt mechanism on the VESA plate.
- Swivel: The arms can swivel 360 degrees left and right.
- Rotation: Monitors can rotate 180 degrees for landscape or portrait orientation without removal.

Image: Visual representation of the tilt, swivel, and rotation capabilities of the monitor arms.
Cable Management
Integrated cable management clips are located on each arm and along the central pole. Route your monitor and power cables through these clips to maintain a tidy and organized workspace.

Image: Example of cable routing using the integrated cable management system.
Maintenance
To ensure the longevity and safe operation of your monitor mount:
- Periodically check all screws and connections to ensure they remain tight. Re-tighten if necessary.
- Clean the mount with a soft, damp cloth. Avoid abrasive cleaners or solvents.
- Do not apply excessive force when adjusting the arms or monitors.
Troubleshooting
Monitors are not level or sag
- Ensure all VESA plate screws are securely tightened to the monitor and the arm.
- Check the tightness of the pivot points on the monitor arms. Adjust with the provided Allen wrench if needed.
- Verify that the desk surface itself is level. Minor desk imperfections can be amplified by the mount.
Mount feels unstable
- Re-check the C-clamp or grommet base installation. Ensure it is firmly secured to the desk and the desk thickness is within the specified range.
- Confirm that the combined weight of your monitors does not exceed the mount's capacity.
Difficulty adjusting monitor position
- Ensure no cables are snagged or obstructing movement.
- Check the tension of the joints. Some joints may have adjustable tension screws that can be loosened slightly with an Allen wrench if movement is too stiff.
Specifications
| Model Number | MI-752 |
| Material | Alloy Steel, Aluminum |
| Mounting Type | Tabletop Mount (C-Clamp or Grommet Base) |
| Compatible Monitor Sizes | 13 - 27 inches |
| Weight Capacity per Arm | 22 lbs (10 kg) |
| VESA Compatibility | 75x75mm, 100x100mm |
| Movement Type | Articulating, Rotate, Swivel, Tilt |
| Maximum Tilt Angle | 15 Degrees |
| Maximum Desktop Thickness | 4 inches (10 cm) |
| Product Dimensions | 24 x 5 x 11 inches (approximate, assembled) |
| Item Weight | 13.2 pounds |

Image: Detailed dimensions of the monitor mount components.
Warranty Information
The Mount-It! Dual Monitor Mount MI-752 comes with a 5-YEAR WARRANTY. This warranty covers defects in materials and workmanship under normal use. Please retain your proof of purchase for warranty claims.
Customer Support
For any questions, assistance with installation, or troubleshooting, please contact our US-based customer support team. Our friendly and responsive team is available during normal business hours to provide support.
Please refer to the Mount-It! website or your purchase documentation for specific contact details.