Introduction
Thank you for purchasing the Vivitar DVR480-LIC Digital Helmet Camcorder. This manual provides essential information for the safe and efficient operation of your device. Please read it thoroughly before use and retain it for future reference.
Safety Information
- Do not expose the camcorder to extreme temperatures, direct sunlight, or high humidity.
- Avoid dropping or subjecting the camcorder to strong impacts.
- Keep the lens clean using a soft, lint-free cloth.
- Do not attempt to disassemble or modify the camcorder. This will void the warranty.
- Use only recommended accessories and power sources.
Package Contents
- Vivitar DVR480-LIC Digital Helmet Camcorder
- Helmet Mount
- Side Helmet Mount
- Bike Mount
- USB Cable
- User Manual (this document)
- Note: 2 AA batteries and an SD/Multimedia Card are required but not included.
Product Overview
Familiarize yourself with the components of your Vivitar DVR480-LIC camcorder.
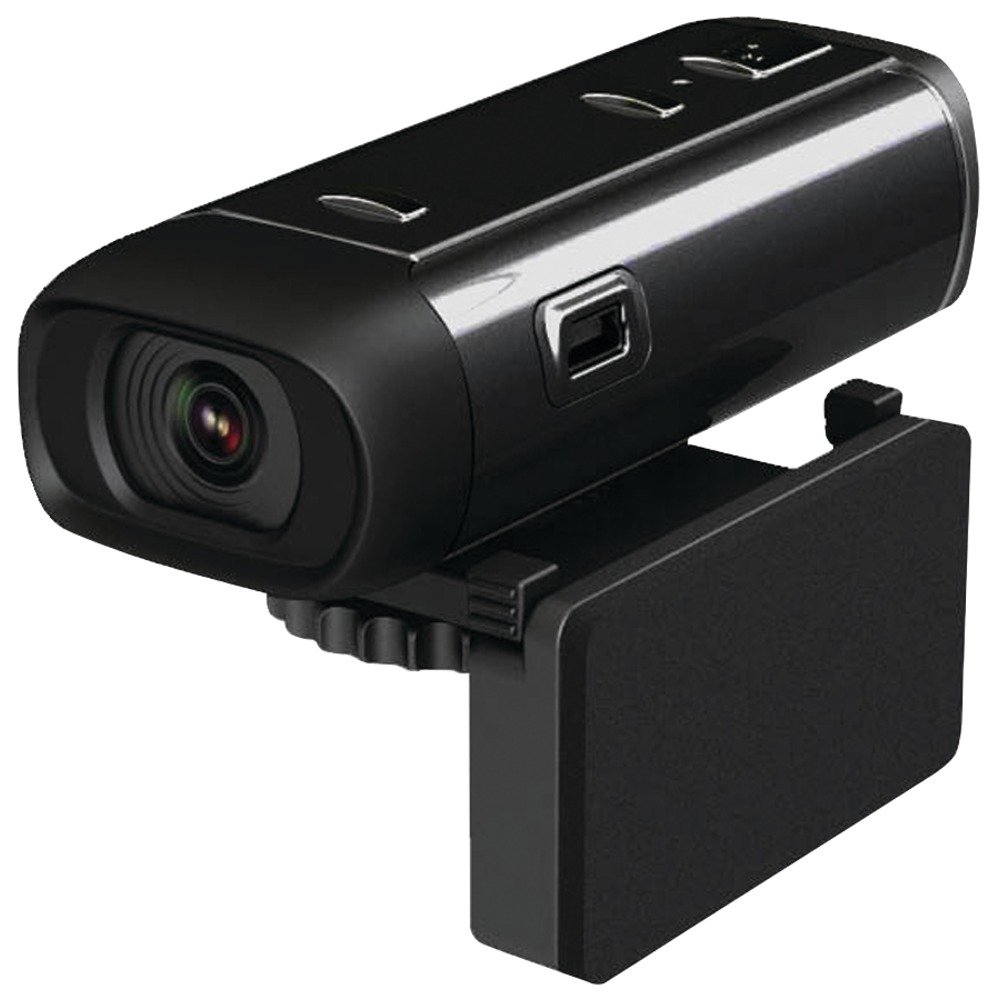
Figure 1: Front view of the Vivitar DVR480-LIC Digital Helmet Camcorder, showing the lens and integrated mounting bracket.
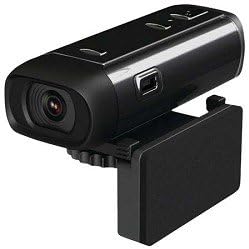
Figure 2: Side view of the Vivitar DVR480-LIC Digital Helmet Camcorder, highlighting the control buttons on the top surface.
Controls and Ports
- Lens: Captures video and still images.
- LCD Screen: 1-inch display for viewing recordings and menu navigation.
- Power Button: Turns the device on and off.
- Record Button: Starts and stops video recording.
- Mode Button: Switches between video, photo, and playback modes.
- Navigation Buttons: Used for menu selection and adjusting settings.
- USB Port: For connecting to a computer and charging (if applicable, though it uses AA batteries).
- SD Card Slot: For inserting a compatible SD or Multimedia Card.
- Battery Compartment: Holds 2 AA batteries.
Setup
1. Installing Batteries
- Locate the battery compartment cover on the camcorder.
- Slide or lift the cover to open the compartment.
- Insert two (2) AA batteries, ensuring correct polarity (+/-) as indicated inside the compartment.
- Close the battery compartment cover securely.
Important: Use only fresh, high-quality AA alkaline batteries. Do not mix old and new batteries or different types of batteries.
2. Inserting a Memory Card
The camcorder requires an SD or Multimedia Card (up to 16GB) to store recordings. The card is not included.
- Locate the SD card slot on the side of the camcorder.
- Insert the SD or Multimedia Card into the slot with the metal contacts facing down (or as indicated by a diagram on the device) until it clicks into place.
- To remove the card, gently push it in until it clicks, then release, and it will eject slightly.
Note: It is recommended to format a new memory card using the camcorder's menu before first use. Refer to the "Operating" section for formatting instructions.
3. Attaching Mounts
The DVR480-LIC comes with three types of mounts: helmet (top), side helmet, and bike mount.
- Select the appropriate mount for your activity.
- Align the camcorder's integrated bracket with the chosen mount.
- Securely attach the camcorder to the mount using the provided screws or locking mechanism. Ensure it is firmly in place to prevent detachment during use.
Operating the Camcorder
Powering On/Off
- To power on: Press and hold the Power Button until the LCD screen illuminates.
- To power off: Press and hold the Power Button again until the screen turns off.
Selecting Modes
Press the Mode Button repeatedly to cycle through the available modes:
- Video Recording Mode: Indicated by a video camera icon on the LCD.
- Photo Capture Mode: Indicated by a camera icon on the LCD.
- Playback Mode: Indicated by a play icon on the LCD.
Recording Video
- Switch to Video Recording Mode using the Mode Button.
- Press the Record Button once to start recording. A red indicator light or on-screen icon will typically flash.
- Press the Record Button again to stop recording. The indicator light will stop flashing.
Videos are recorded in 640 x 480 VGA resolution.
Taking Still Photos
- Switch to Photo Capture Mode using the Mode Button.
- Frame your shot using the LCD screen.
- Press the Record Button (often doubles as shutter button) once to take a photo.
Photos are captured at 1.3 megapixels.
Playback
- Switch to Playback Mode using the Mode Button.
- Use the Navigation Buttons to scroll through your recorded videos and photos.
- Press the Record Button (or a dedicated Play/OK button) to view a selected item.
Menu Settings (General)
While in any mode, pressing a specific button (often the Mode button held down, or a dedicated Menu button) will access the settings menu. Use the navigation buttons to:
- Set Date and Time
- Adjust Video/Photo Quality (if options are available)
- Format Memory Card: Caution: Formatting will erase all data on the memory card. Back up important files before proceeding.
- Reset to Factory Settings
- Other system settings.
Connecting to a Computer
To transfer your recorded videos and photos to a computer:
- Ensure the camcorder is powered off.
- Connect one end of the supplied USB cable to the camcorder's USB port.
- Connect the other end of the USB cable to an available USB port on your computer.
- The camcorder should be recognized as a removable storage device (like a USB drive).
- Open the camcorder's drive on your computer to access the stored video (VGA format) and photo (1.3 MP) files.
- Copy the desired files to your computer.
- Safely eject the camcorder from your computer before disconnecting the USB cable.
Maintenance
Cleaning the Camcorder
- Use a soft, dry, lint-free cloth to clean the exterior of the camcorder.
- For the lens, use a specialized lens cleaning cloth and lens cleaning solution. Do not use abrasive materials or harsh chemicals.
- Ensure no moisture enters the device through ports or openings.
Storage
- When not in use for extended periods, remove the AA batteries to prevent leakage.
- Store the camcorder in a cool, dry place, away from direct sunlight and extreme temperatures.
- Keep the camcorder in its original packaging or a protective case to prevent dust and scratches.
Troubleshooting
| Problem | Possible Cause | Solution |
|---|---|---|
| Camcorder does not power on. |
|
|
| Cannot record video or take photos. |
|
|
| Poor video/photo quality. |
|
|
| Computer does not recognize camcorder. |
|
|
Specifications
| Model Name | DVR480-LIC |
| Effective Still Resolution | 1.3 Megapixels |
| Video Resolution | 640 x 480 (VGA) |
| Video Capture Format | VGA |
| Supported Audio Format | WAV, MP4 |
| Photo Sensor Technology | CMOS |
| Screen Size | 1 Inch LCD |
| Storage Media | SD Cards & Multimedia Cards (up to 16GB) |
| Power Source | 2 x AA Batteries (not included) |
| Optical Zoom | 1x |
| Digital Zoom | 1x |
| Image Stabilization | Digital |
| Item Weight | 0.5 Pounds (approx. 227g) |
| Color | Black |
Warranty and Support
Limited Warranty
Vivitar products are manufactured with high-quality components and are warranted to be free from defects in materials and workmanship for a period of one (1) year from the original date of purchase. This warranty does not cover damage caused by misuse, neglect, accident, alteration, or unauthorized repair. Proof of purchase is required for all warranty claims.
For specific warranty terms and conditions, please refer to the warranty card included with your product or visit the official Vivitar website.
Customer Support
If you encounter any issues or have questions regarding your Vivitar DVR480-LIC Digital Helmet Camcorder that are not addressed in this manual, please contact Vivitar Customer Support.
- Online Support: Visit the official Vivitar website for FAQs, drivers, and contact information.
- Phone Support: Refer to your product packaging or the Vivitar website for current customer service phone numbers.