Introduction
The Technoline WT188 is a radio-controlled alarm clock designed for accurate timekeeping and convenience. It automatically synchronizes with the DCF-77 time signal, offering precise time, date, and day of the week display. Users can choose between 12-hour and 24-hour formats and adjust for different time zones. The clock also features an indoor temperature display, an alarm with a snooze function, and a backlight for easy viewing in low light conditions.
Safety Information
- Do not expose the unit to extreme temperatures, direct sunlight, or high humidity.
- Avoid dropping the unit or subjecting it to strong impacts.
- Use only the specified battery type (AA Mignon LR06).
- Do not mix old and new batteries or different types of batteries.
- Remove batteries if the unit will not be used for an extended period.
- Clean the unit with a soft, damp cloth. Do not use abrasive cleaners or solvents.
Package Contents
- Technoline WT188 Radio Controlled Alarm Clock
- Instruction Manual
Product Overview
Familiarize yourself with the main components and controls of your alarm clock.
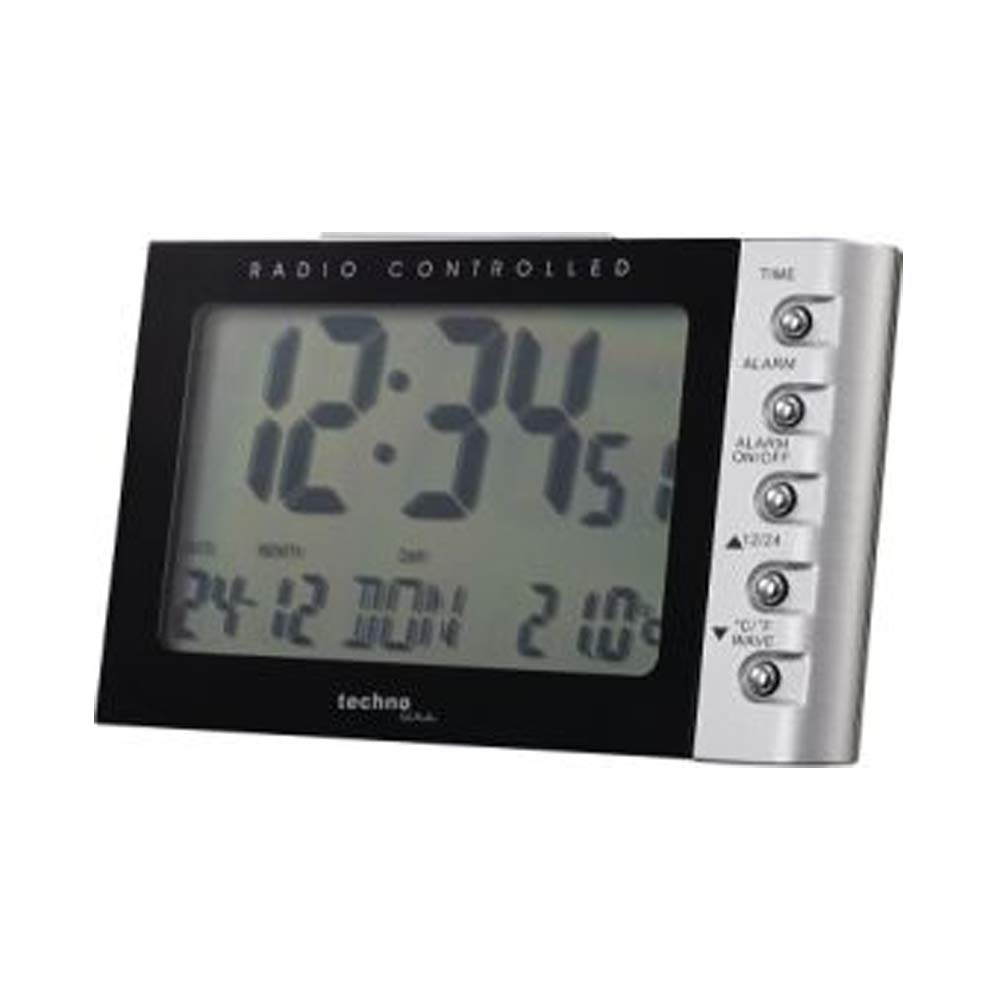
Image: Front view of the Technoline WT188 Radio Controlled Alarm Clock. The large LCD screen displays the time, date, day of the week, and indoor temperature. The right side features control buttons for various functions.
Control Buttons:
- TIME: Used to set the time manually and enter time setting mode.
- ALARM: Used to set the alarm time.
- ALARM ON/OFF: Activates or deactivates the alarm.
- 12/24: Toggles between 12-hour and 24-hour time display formats.
- °C/°F WAVE: Switches between Celsius and Fahrenheit temperature display. Also used to manually initiate DCF-77 signal reception.
Setup
1. Battery Installation
- Open the battery compartment cover on the back of the unit.
- Insert two AA Mignon LR06 batteries, observing the correct polarity (+ and -) as indicated inside the compartment.
- Close the battery compartment cover securely.
- The clock will power on and attempt to receive the DCF-77 radio signal.
2. Initial DCF-77 Signal Reception
Upon battery insertion, the clock will automatically begin searching for the DCF-77 radio signal. This process can take several minutes. During reception, a signal icon may flash on the display. Once the signal is successfully received, the correct time, date, and day of the week will be displayed, and the signal icon will become steady. For optimal reception, place the clock near a window and away from electronic devices that may cause interference. Note that the DCF-77 signal is primarily for Central European Time. Users in other regions, such as the UK, may experience issues or require manual time setting.
3. Manual Time Setting
If the radio signal cannot be received or if you need to set a different time zone, you can set the time manually:
- Press and hold the TIME button for approximately 3 seconds to enter manual time setting mode. The hour digits will flash.
- Use the 12/24 or °C/°F WAVE buttons to adjust the hour.
- Press the TIME button again to confirm the hour and move to minute setting. The minute digits will flash.
- Use the 12/24 or °C/°F WAVE buttons to adjust the minutes.
- Continue pressing the TIME button to cycle through and set the year, month, date, and day of the week. Use the 12/24 or °C/°F WAVE buttons to adjust each value.
- After setting all values, press the TIME button one last time to exit the setting mode.
Operating Instructions
1. Time Display (12/24 Hour Format)
To switch between 12-hour (with AM/PM indicator) and 24-hour time formats, briefly press the 12/24 button.
2. Date and Day of the Week Display
The clock automatically displays the current date (day-month) and the day of the week. The day of the week can be displayed in up to 5 languages, which can be cycled through during manual date setting.
3. Alarm Setting
To set the alarm time:
- Press and hold the ALARM button for approximately 3 seconds. The alarm hour digits will flash.
- Use the 12/24 or °C/°F WAVE buttons to adjust the alarm hour.
- Press the ALARM button again to confirm the hour and move to minute setting. The alarm minute digits will flash.
- Use the 12/24 or °C/°F WAVE buttons to adjust the alarm minutes.
- Press the ALARM button one last time to exit alarm setting mode.
4. Alarm Activation/Deactivation and Snooze
- To activate or deactivate the alarm, briefly press the ALARM ON/OFF button. An alarm icon will appear on the display when the alarm is active.
- When the alarm sounds, press any button (except ALARM ON/OFF) to activate the snooze function. The alarm will temporarily stop and sound again after a few minutes.
- To stop the alarm completely, press the ALARM ON/OFF button when it is sounding or during the snooze period.
5. Temperature Display (°C/°F)
The clock displays the indoor temperature. To switch between Celsius (°C) and Fahrenheit (°F) units, briefly press the °C/°F WAVE button.
6. Backlight
The clock features a backlight for improved visibility in low light conditions. The backlight can be activated by pressing a button (specific button not detailed, typically any button or a dedicated light button). It will illuminate for a few seconds and then turn off automatically to conserve battery power.
Maintenance
- Cleaning: Wipe the clock with a soft, dry cloth. For stubborn marks, use a slightly damp cloth. Do not use chemical cleaning agents.
- Battery Replacement: When the display becomes dim or the clock functions erratically, replace the batteries. Always replace all batteries at the same time with new ones of the same type.
Troubleshooting
- No display or dim display: Check battery polarity or replace batteries.
- Incorrect time: Ensure the clock is within range of the DCF-77 signal. Manually initiate signal reception by pressing the °C/°F WAVE button, or set the time manually.
- Alarm not sounding: Verify that the alarm is activated (alarm icon visible) and the alarm time is set correctly.
- Poor radio signal reception: Move the clock to a different location, preferably near a window and away from potential interference sources like TVs, computers, or other electronic devices.
Specifications
| Model Number | WT188 |
| Dimensions (L x W x H) | 11.5 x 7.2 x 7.1 cm |
| Weight | 127 grams |
| Power Source | Battery powered (2 x AA Mignon LR06, not included) |
| Display Type | LCD |
| Material | Plastic |
| Special Features | Radio Controlled (DCF-77), Alarm, Snooze, Indoor Temperature Display, Backlight, 12/24h Time, Date, Day of Week |
Warranty and Support
This product comes with a standard manufacturer's warranty. For detailed warranty information, please refer to the documentation provided with your purchase or contact Technoline customer support. For technical assistance or further inquiries, please visit the official Technoline website or contact their support channels.