
1. Introduction
The Powerwerks PW50 PA System is a highly portable and versatile audio solution designed for amplifying vocals, instruments, keyboards, drum machines, and various audio devices. Its compact design and robust construction make it suitable for a wide range of environments, from small venues to personal practice spaces. The PW50 delivers clear and balanced sound through its two 4.5-inch speakers and high-frequency driver, ensuring excellent vocal clarity and minimizing harsh frequencies.
This manual provides detailed instructions for setting up, operating, and maintaining your Powerwerks PW50 PA System. Please read it thoroughly before use to ensure optimal performance and longevity of your device.
2. Safety Information
- Power Source: Connect the unit only to the specified power supply (AC 120V~60Hz 80W). Ensure the power cable is not damaged or pinched.
- Ventilation: Do not block any ventilation openings. Ensure adequate airflow around the unit to prevent overheating.
- Water and Moisture: Do not expose the unit to rain, moisture, or excessive humidity. Do not place objects filled with liquids on the unit.
- Heat Sources: Keep the unit away from heat sources such as radiators, heat registers, stoves, or other apparatus that produce heat.
- Cleaning: Clean only with a dry cloth. Avoid using liquid cleaners or aerosols.
- Servicing: Do not attempt to service this product yourself. Refer all servicing to qualified service personnel. Servicing is required when the apparatus has been damaged in any way, such as power-supply cord or plug is damaged, liquid has been spilled or objects have fallen into the apparatus, the apparatus has been exposed to rain or moisture, does not operate normally, or has been dropped.
- Placement: For optimal stability, place the unit on a flat, stable surface. It can also be positioned on a standard speaker stand using the integrated 35mm mounting socket.
3. Package Contents
Verify that all items listed below are included in your package:
- Powered PA Tower (Powerwerks PW50)
- Power Cable
- Instruction Manual
4. Product Overview
The Powerwerks PW50 is a compact and powerful PA system. Below are images illustrating its design and the rear control panel, followed by a description of its key components and controls.

Figure 4.1: Powerwerks PW50 PA System (Angled Front View)
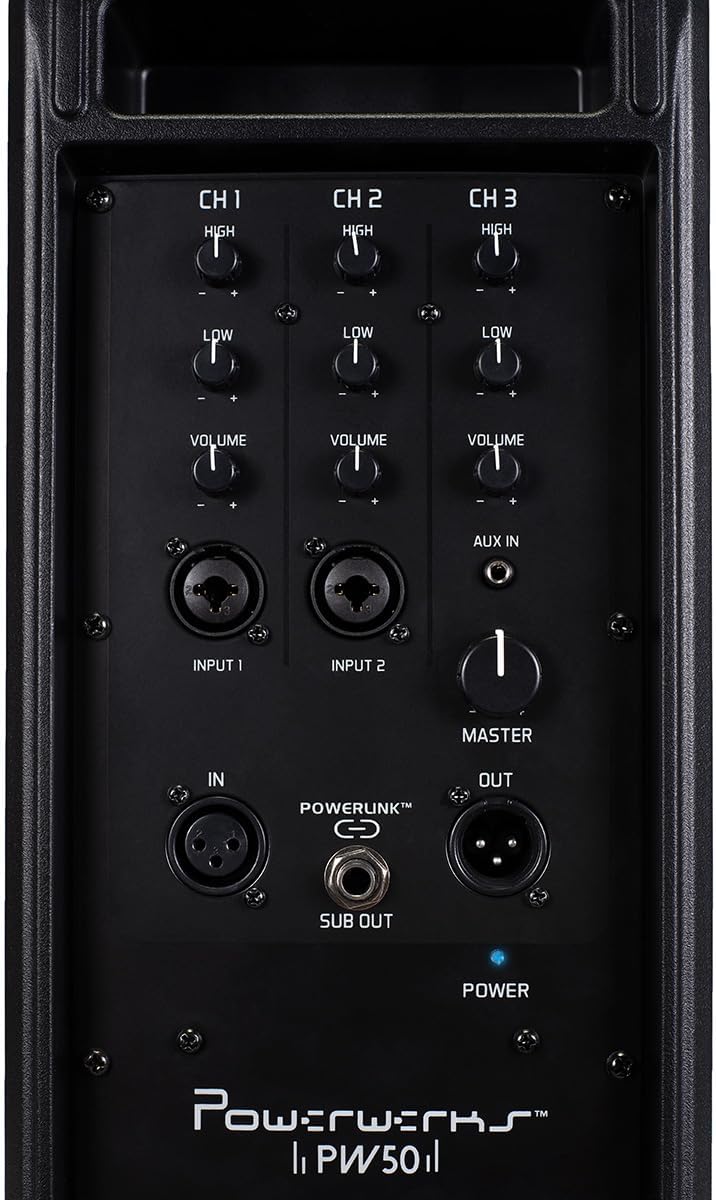
Figure 4.2: Powerwerks PW50 PA System (Rear Control Panel)
Control Panel Features:
- Channels 1 & 2 (MIC/Line Inputs): Each channel features XLR and 1/4" line inputs, allowing connection of microphones or line-level instruments. Each channel has independent High (treble) and Low (bass) EQ controls, and a Volume knob. Phantom power is available for XLR inputs.
- Channel 3 (AUX IN): An 1/8" (3.5mm) stereo jack summed to mono, ideal for connecting external audio devices like smartphones or MP3 players. This channel also has independent High (treble) and Low (bass) EQ controls, and a Volume knob.
- Master Volume: A global control for the overall output level of the PA system.
- POWERLINK™ (IN/OUT): XLR connections that allow two or more PW50 units to be linked together, functioning as a single, synchronized PA system.
- SUB OUT: An output for connecting an external subwoofer, which diverts low frequencies from the PW50's internal speakers to the subwoofer for enhanced bass response.
- POWER Switch and Indicator: Turns the unit on/off. A blue LED indicates power status.
5. Setup
- Placement: Position the PW50 on a stable, flat surface or mount it on a standard speaker stand using the 35mm socket. Ensure proper ventilation.
- Power Connection: Connect the supplied power cable to the AC input on the rear panel of the PW50 and then to a suitable power outlet. Do not power on the unit yet.
- Connect Inputs:
- For microphones, use an XLR cable and connect to Input 1 or 2.
- For instruments (e.g., guitar, keyboard), use a 1/4" TS cable and connect to Input 1 or 2.
- For external audio devices (e.g., smartphone, MP3 player), use an 1/8" (3.5mm) stereo cable and connect to the AUX IN on Channel 3.
- Initial Volume Settings: Before powering on, ensure all Channel Volume knobs and the Master Volume knob are set to their minimum (fully counter-clockwise) position.
- Power On: Flip the POWER switch to the 'ON' position. The blue power indicator LED will illuminate.
6. Operating Instructions
Once the PW50 is set up, follow these steps to begin operation:
- Adjust Channel Volume: Slowly increase the Volume knob for the channel you are using (Channel 1, 2, or 3) until you hear sound at a comfortable level.
- Adjust Master Volume: Use the Master Volume knob to control the overall output level of the entire system. This allows you to adjust the total loudness without affecting the individual channel mixes.
- Equalization (EQ): Use the High and Low EQ knobs on each channel to shape the tone of your input. Turn the High knob clockwise to increase treble, and counter-clockwise to decrease it. Do the same for the Low knob to adjust bass frequencies.
- Using POWERLINK™: To expand your sound system, connect the POWERLINK™ OUT of one PW50 unit to the POWERLINK™ IN of another PW50 unit using an XLR cable. This allows multiple units to function as a single, synchronized PA system.
- Connecting a Subwoofer: For enhanced bass, connect an active subwoofer to the SUB OUT port. This output sends a dedicated low-frequency signal to the subwoofer.
7. Maintenance
Proper care and maintenance will ensure the longevity and optimal performance of your Powerwerks PW50 PA System:
- Cleaning: Regularly wipe the exterior of the unit with a soft, dry, lint-free cloth. Do not use abrasive cleaners, solvents, or waxes.
- Storage: When not in use for extended periods, store the unit in a cool, dry place, away from direct sunlight and extreme temperatures.
- Ventilation: Ensure that the ventilation grilles are free from dust and debris. Use a soft brush or vacuum cleaner to gently remove any buildup.
- Cable Care: Inspect all cables regularly for signs of wear or damage. Replace any damaged cables immediately to prevent electrical hazards or signal loss.
8. Troubleshooting
If you encounter issues with your PW50, refer to the following common problems and solutions:
| Problem | Possible Cause | Solution |
|---|---|---|
| No sound output | Unit not powered on; Volume knobs too low; Incorrect input connection; Damaged cable. | Check power switch and indicator; Increase Master and Channel Volume; Verify cables are securely connected to correct inputs; Test with different cables. |
| Distorted sound | Volume levels too high (clipping); Incorrect EQ settings; Damaged speaker. | Reduce Master or Channel Volume; Adjust High/Low EQ knobs; If distortion persists, contact customer support. |
| Humming or buzzing noise | Ground loop issue; Interference from other electronics; Faulty cable. | Try plugging into a different outlet; Move unit away from other electronic devices; Test with different cables. |
If the issue persists after trying these solutions, please contact Powerwerks customer support.
9. Specifications
| Feature | Detail |
|---|---|
| Output Power | 50 Watts |
| Speaker Type | Portable PA System |
| Speaker Size | Two 4.5-inch Drivers |
| Tweeter Diameter | 4 Inches (High-Frequency Driver) |
| Inputs | 2 x MIC/Line (XLR/1/4" Combo), 1 x AUX IN (1/8" Stereo Jack) |
| Outputs | POWERLINK™ Out, Subwoofer Out |
| Controls | High EQ, Low EQ, Volume per channel; Master Volume |
| Material | Steel Grill and Rigid Corners |
| Color | Black |
| Item Weight | 12 Pounds |
| Product Dimensions | 18 x 6.5 x 7.5 inches |
| Model Number | PW50 |
| Power Source | Corded Electric |
10. Warranty and Support
The Powerwerks PW50 PA System comes with a limited warranty. For specific warranty terms and conditions, please refer to the warranty card included in your product packaging or visit the official Powerwerks website. For technical support, troubleshooting assistance beyond what is provided in this manual, or service inquiries, please contact Powerwerks customer support through their official channels.


