1. Introduction
The Hosa HMIC-010 Pro Microphone Cable is designed for reliable audio signal transmission. It features REAN connectors by Neutrik AG, ensuring durable and consistent performance for various audio applications. This cable is 10 feet in length and is suitable for connecting microphones to mixers, audio interfaces, and other sound equipment.

Image 1.1: Hosa HMIC-010 Pro Microphone Cable.
2. Setup
Setting up the Hosa HMIC-010 Pro Microphone Cable involves connecting its XLR connectors to compatible audio equipment. This cable features a male XLR connector on one end and a female XLR connector on the other.
- Identify Connectors: Locate the male XLR connector (with pins) and the female XLR connector (with holes) on the cable.
- Connect to Microphone: Insert the female XLR connector of the cable into the male XLR output port of your microphone. Ensure it clicks securely into place.
- Connect to Audio Equipment: Insert the male XLR connector of the cable into the female XLR input port of your mixer, audio interface, or other audio equipment. Ensure it clicks securely into place.

Image 2.1: Close-up view of the REAN XLR connectors.

Image 2.2: Cable connected to a microphone.
3. Operation
Once the Hosa HMIC-010 Pro Microphone Cable is securely connected between your microphone and audio equipment, it facilitates the transmission of balanced audio signals. No specific operational steps are required for the cable itself beyond proper connection.
- Balanced Signal: The XLR connectors provide a balanced audio signal, which helps reduce noise and interference over longer cable runs.
- Secure Connections: Ensure all connections are firm to prevent signal loss or intermittent audio. The locking mechanism on XLR connectors should engage properly.
- Cable Routing: Route cables away from power cords and other sources of electromagnetic interference to maintain signal integrity.

Image 3.1: Cable connected to audio equipment.
4. Maintenance
Proper maintenance extends the life and performance of your microphone cable.
- Storage: When not in use, coil the cable neatly. Avoid tight coiling or kinking, which can damage the internal wiring. Use an "over-under" coiling method to prevent twists.
- Cleaning: Keep connectors clean and free of dust and debris. A soft, dry cloth can be used to wipe the cable jacket. For connectors, a specialized contact cleaner can be used if necessary, ensuring the equipment is powered off.
- Inspection: Periodically inspect the cable for any signs of wear, such as frayed jackets, bent pins on connectors, or loose connections.
- Avoid Stress: Do not pull on the cable itself to disconnect it; always grasp the connector housing. Avoid placing heavy objects on the cable or running over it with equipment.

Image 4.1: Properly coiled cable for storage.
5. Troubleshooting
If you encounter issues with your microphone cable, consider the following troubleshooting steps:
- No Sound:
- Ensure both ends of the cable are fully and securely connected.
- Verify that the microphone is powered on (if it requires phantom power, ensure it is supplied by your audio equipment).
- Test with a different cable or microphone to isolate the problem.
- Hum or Buzz:
- Check for proper grounding of all audio equipment.
- Ensure the cable is not running parallel to power cables or other sources of electromagnetic interference.
- Verify that the cable is not damaged.
- Intermittent Signal:
- Inspect connectors for bent pins or loose connections.
- Gently wiggle the cable at both ends to see if the signal cuts in and out, indicating a faulty connection or internal break.
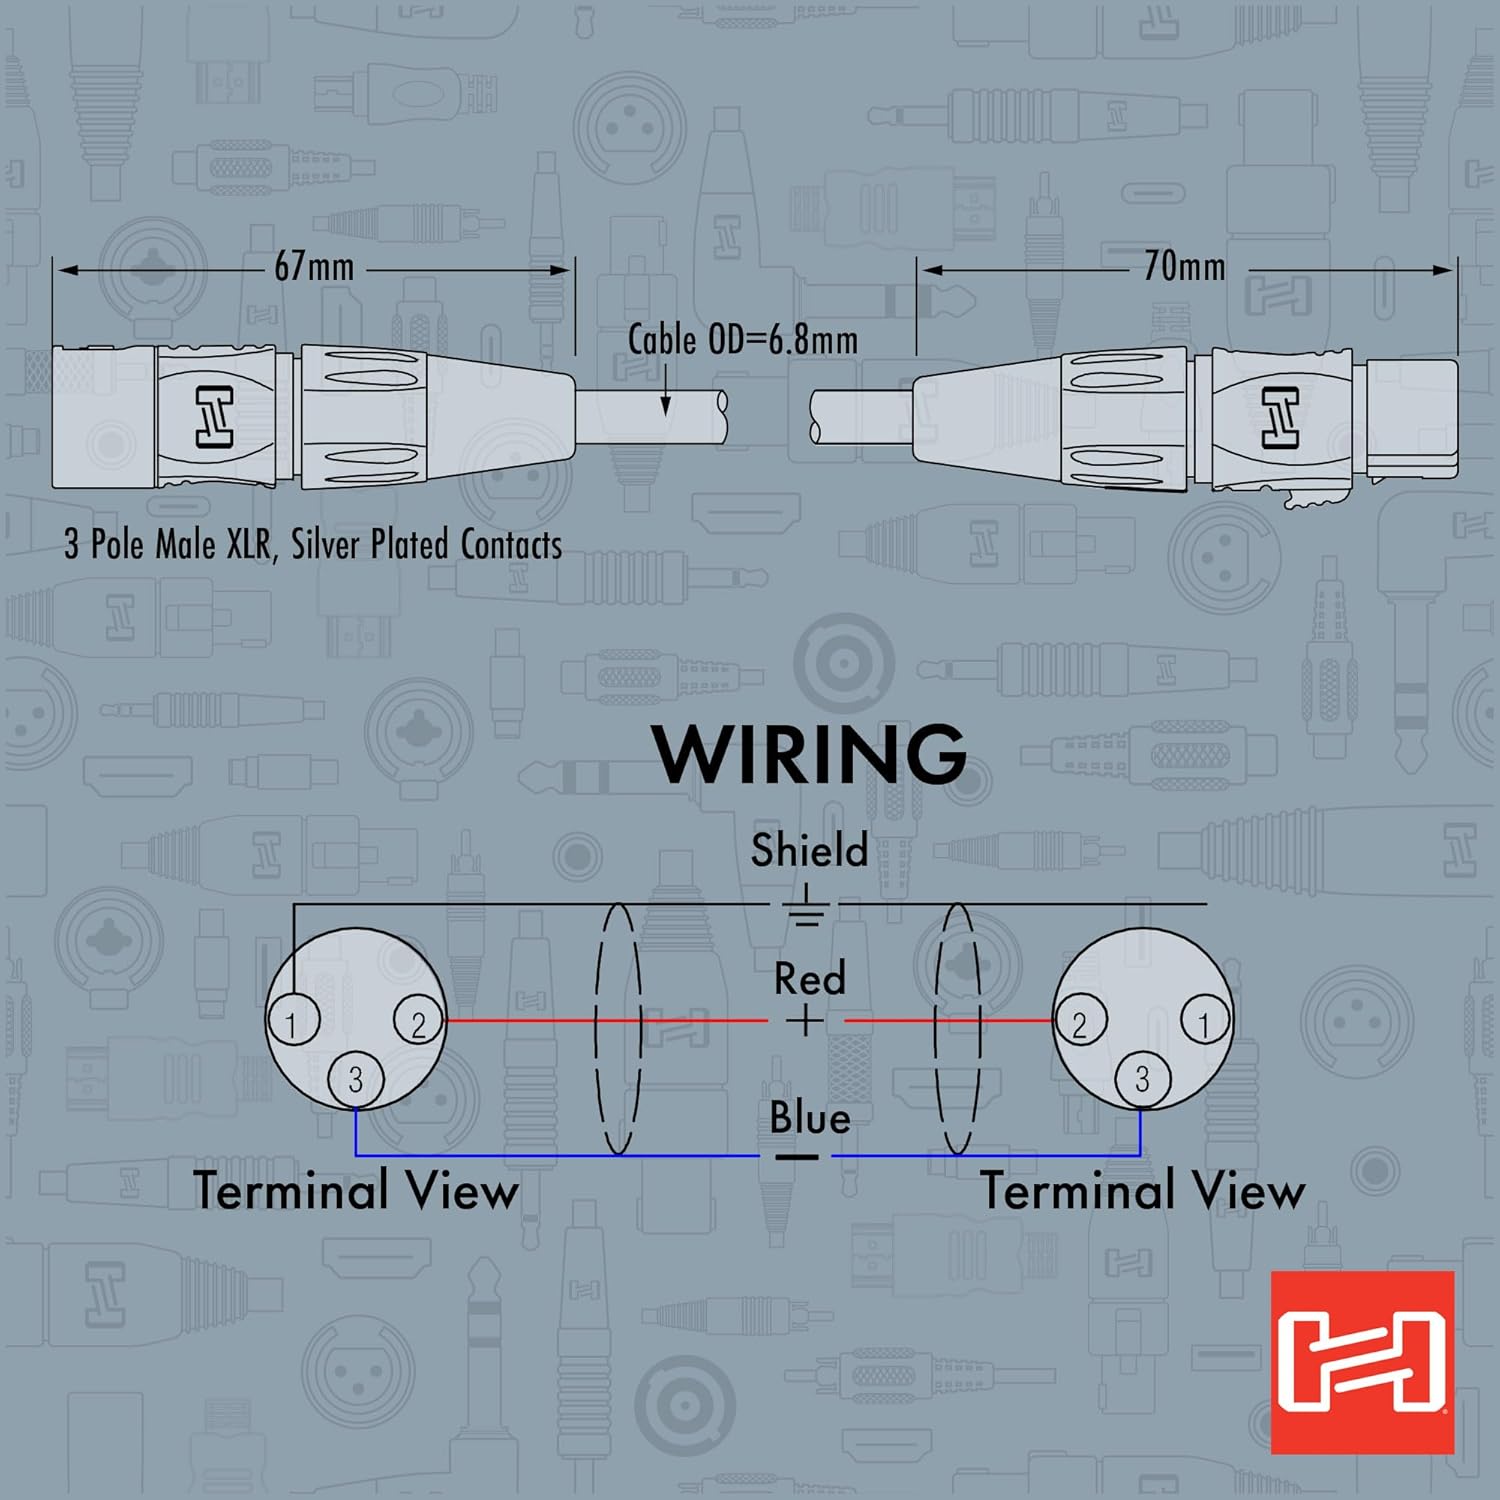
Image 5.1: XLR Wiring Diagram (Terminal View).
6. Specifications
| Feature | Detail |
|---|---|
| Model | HMIC-010 |
| Brand | Hosa |
| Cable Type | XLR Audio Cable |
| Connector Type | REAN XLR3F to XLR3M (Female to Male) |
| Length | 10 Feet (approximately 3 meters) |
| Gauge | 20 AWG |
| Special Feature | Braided (referring to internal shielding or cable construction) |
| Color | Black |
| Item Weight | 0.28 Kilograms |
| Compatible Devices | Microphones, Mixers, Audio Interfaces, and other XLR-equipped audio equipment |
| Indoor/Outdoor Usage | Indoor, Outdoor |
7. Warranty Information
Hosa Technology, Inc. provides a warranty for its products. For the Hosa HMIC-010 Pro Microphone Cable, the following warranty applies:
- Warranty Period: 90 days.
- Coverage: This warranty covers defects in material and workmanship.
- Eligibility: The warranty is typically valid for the original purchaser.
- Claim Process: For warranty claims or detailed terms and conditions, please refer to the official Hosa Technology website or contact their customer support.

Image 7.1: Hosa USA Warranty Information.
8. Support
For further assistance, technical support, or product information, please visit the official Hosa website or contact their customer service department.
- Hosa Website: www.hosa.com
- Customer Service: Refer to the Hosa website for contact details specific to your region.