1. Product Overview
1.1 Description
The ASUS P8H67-M EVO is a Micro ATX motherboard designed for Intel H67 platform, supporting LGA 1155 processors. It features advanced technologies such as GPU Boost for integrated graphics overclocking, an 8+2 Phase Power Design for enhanced stability and efficiency, and the user-friendly EFI BIOS (EZ Mode). Connectivity includes high-speed USB 3.0 and SATA 6Gbps ports. This motherboard also supports Quad-GPU CrossFireX for flexible multi-GPU solutions, making it a versatile choice for various computing needs.

Figure 1.1: ASUS P8H67-M EVO Motherboard and retail packaging. This image displays the ASUS P8H67-M EVO motherboard alongside its retail packaging, highlighting the product's branding and key features like 'Protect 3.0' and 'H67 B3 Revision'.
2. Key Features
- 8+2 Phase Power Design: Ensures longer component life and higher power efficiency.
- EFI BIOS (EZ Mode): Provides a flexible and easy-to-use graphical BIOS interface.
- USB 3.0/SATA 6G: Offers high-speed data transfer technology for peripherals and storage devices.
- CrossFireX Support: Enables flexible multi-GPU solutions for enhanced graphics performance.
- GPU Boost: Allows for iGPU (integrated graphics processing unit) level up and overclocking.
- Anti-Surge Protection: Protects the system from unexpected power surges.
3. Setup Guide
3.1 Unpacking and Inspection
Carefully remove the motherboard from its packaging. Inspect the board for any visible damage during shipping. Ensure all accessories listed in the packing list are present.
3.2 Component Identification
Familiarize yourself with the layout of the motherboard. Identify key components such as the CPU socket, memory slots, PCIe slots, SATA ports, and various headers.

Figure 3.1: Top-down view of ASUS P8H67-M EVO Motherboard. A top-down view of the ASUS P8H67-M EVO motherboard, showing the LGA 1155 CPU socket, DDR3 memory slots, PCIe slots, SATA ports, and various headers. This view is essential for identifying component placement during installation.
3.3 Installation Steps
3.3.1 CPU Installation
Open the CPU socket lever, align the CPU with the socket's notch, gently place the CPU into the socket, and close the lever to secure it. Apply thermal paste and install the CPU cooler.
3.3.2 Memory Installation
Open the clips on the DDR3 memory slots. Align the memory modules with the slot key and press firmly until the clips snap into place.
3.3.3 Graphics Card Installation
Insert your graphics card into the primary PCIe x16 slot. Ensure it is seated firmly and secure it with the case screw.
3.3.4 Storage Device Connection
Connect your SATA 6Gbps or SATA 3Gbps storage devices (HDDs/SSDs) to the appropriate SATA ports on the motherboard using SATA data cables. Connect power from the power supply.
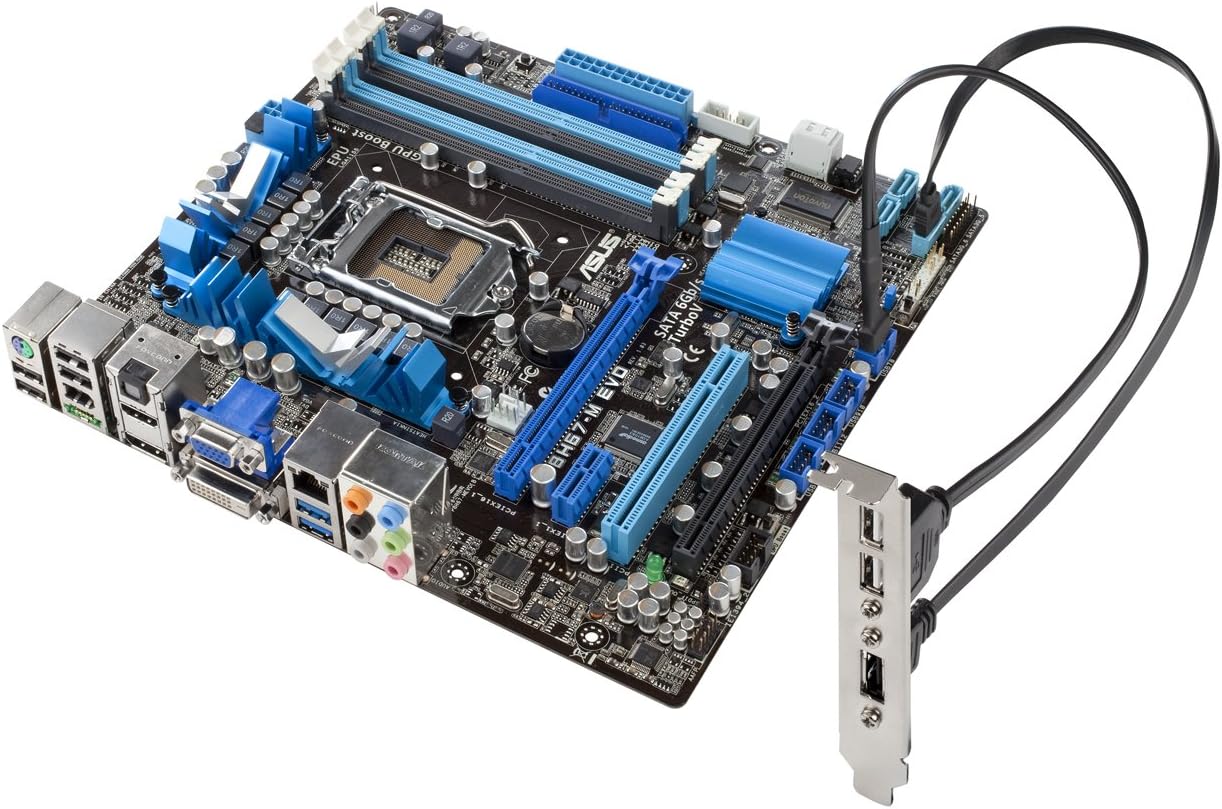
Figure 3.2: ASUS P8H67-M EVO Motherboard with USB 3.0 bracket connected. The ASUS P8H67-M EVO motherboard is shown with an external USB 3.0 expansion bracket connected, demonstrating the high-speed data transfer capabilities and available connectivity options.
3.3.5 Power Supply Connection
Connect the 24-pin ATX power connector and the 8-pin (or 4-pin) CPU power connector from your power supply to the corresponding ports on the motherboard.
3.3.6 Front Panel Connections
Connect the front panel cables (power button, reset button, HDD LED, power LED, USB, audio) from your PC case to the appropriate headers on the motherboard. Refer to the motherboard's silkscreen labels for correct pin alignment.

Figure 3.3: Rear I/O panel of ASUS P8H67-M EVO Motherboard and USB 3.0 bracket. A close-up view of the rear input/output (I/O) panel of the ASUS P8H67-M EVO motherboard, displaying various ports including USB, audio, LAN, and video outputs. The image also includes the separate USB 3.0 expansion bracket.
4. Operating Instructions
4.1 First Boot and BIOS Setup
After assembly, connect a monitor, keyboard, and mouse. Power on the system. Press the designated key (usually DEL or F2) during startup to enter the EFI BIOS. In EZ Mode, you can easily monitor system status, set boot priorities, and enable features like GPU Boost. For advanced settings, switch to Advanced Mode.
4.2 Driver Installation
Once the operating system is installed, install the necessary drivers for the motherboard chipset, integrated graphics, audio, LAN, and USB 3.0. These drivers are typically provided on a support DVD or can be downloaded from the ASUS official website.
4.3 Utilizing GPU Boost
The GPU Boost feature allows for real-time overclocking of the integrated graphics processor (iGPU). This can be enabled and configured through the ASUS AI Suite II utility in your operating system or directly within the EFI BIOS to enhance graphics performance.
5. Maintenance and Care
5.1 Dust Removal
Regularly clean dust from inside your PC case, especially from the motherboard's heatsinks and fan areas. Use compressed air or a soft brush. Ensure the system is powered off and unplugged before cleaning.
5.2 BIOS Updates
Periodically check the ASUS support website for BIOS updates. BIOS updates can improve system stability, compatibility, and performance. Follow the instructions provided by ASUS carefully when performing a BIOS update.
5.3 Proper Handling
Always handle the motherboard by its edges to avoid touching components or circuits. Use anti-static precautions (e.g., an anti-static wrist strap) when working with the motherboard to prevent electrostatic discharge (ESD) damage.
6. Troubleshooting
6.1 Common Issues and Solutions
- No Power/No Boot:
- Check all power connections (24-pin ATX, 8-pin CPU).
- Ensure the power supply is switched on.
- Verify front panel power button connection.
- No Display:
- Ensure monitor is connected and powered on.
- Reseat the graphics card and memory modules.
- Try using the integrated graphics output if a discrete GPU is installed.
- System Instability/Crashes:
- Check CPU and memory for proper seating.
- Ensure CPU cooler is properly installed and making good contact.
- Update drivers and BIOS to the latest versions.
- Run memory diagnostic tools.
- Peripheral Not Detected:
- Try a different USB or SATA port.
- Ensure drivers for the peripheral are installed.
- Check BIOS settings for port enablement.
For more detailed troubleshooting, refer to the comprehensive user manual available on the ASUS support website or contact ASUS technical support.
7. Technical Specifications
| Name | Value |
|---|---|
| Product Dimensions | 2.33 x 11.81 x 14.57 inches |
| Item Weight | 3 pounds |
| ASIN | B004QF0VFY |
| Date First Available | February 27, 2011 |
| Manufacturer | ASUS Computer International Direct |
| Brand | ASUS |
| CPU Socket | LGA 1155 |
| Compatible Devices | Personal Computer |
| RAM Memory Technology | DDR3 |
| Compatible Processors | Intel Core 2 DUO |
| Chipset Type | Intel H67 Express |
| Memory Clock Speed | 1333 MHz |
| Platform | Not Machine Specific |
| Memory Storage Capacity | 1748 MB |
| Main Power Connector Type | 24-Pin |
8. Warranty Information
This product is subject to the warranty terms and conditions provided by ASUS. For specific warranty details, including duration and coverage, please refer to the warranty card included with your product or visit the official ASUS support website. Please note that the product listing indicates "No returns," which may affect your return options with the retailer, but does not necessarily negate manufacturer warranty.
9. Support and Contact
For technical support, driver downloads, BIOS updates, and further information regarding your ASUS P8H67-M EVO motherboard, please visit the official ASUS support website:
You may also find helpful resources and community forums on the ASUS website.
10. Important Safety Information
Always observe the following safety precautions when handling or operating your motherboard:
- Disconnect the power cord from the wall outlet before installing or removing any components.
- Wear an anti-static wrist strap to prevent electrostatic discharge (ESD) damage to sensitive components.
- Do not expose the motherboard to moisture or extreme temperatures.
- Ensure proper ventilation within your PC case to prevent overheating.
- Keep the motherboard away from liquids and corrosive chemicals.
- Do not attempt to repair the motherboard yourself. Refer to qualified service personnel for repairs.


