
1. Introduction
This manual provides essential information for the safe and correct installation and operation of the BM CBB61 Ceiling Fan Capacitor. This component is designed to facilitate the starting and running of a ceiling fan motor, often controlling fan speeds. It is a common replacement part for ceiling fans experiencing issues such as slow rotation, failure to start, or inconsistent speed settings.
The BM CBB61 capacitor features a 3-wire configuration, providing dual capacitance values of 1.5µF and 2.5µF, suitable for various ceiling fan models requiring these specifications.
2. Safety Information
WARNING: Risk of Electric Shock. Always disconnect power before installation or maintenance.
- Ensure the main power supply to the ceiling fan is turned off at the circuit breaker before attempting any installation or repair.
- Capacitors can store an electrical charge even after power is disconnected. Exercise caution and discharge the capacitor if necessary before handling.
- If you are not confident in performing electrical work, consult a qualified electrician.
- Do not exceed the specified voltage or temperature ratings of the capacitor.
- Keep the capacitor dry and away from moisture.
3. Product Specifications
The following table details the technical specifications for the BM CBB61 Ceiling Fan Capacitor:
| Feature | Specification |
|---|---|
| Brand | BM |
| Model/Series | CBB61 (Item model number: 07) |
| Capacitance | 1.5 µF (Microfarad) and 2.5 µF (Microfarad) |
| Tolerance | ±5% |
| Rated Voltage | 250V AC |
| Frequency | 50/60 Hz |
| Operating Temperature | -25°C to +70°C |
| Material | Polypropylene |
| Shape | Rectangular |
| Approximate Dimensions | 1.6 x 0.8 x 0.6 inches (40.6 x 20.3 x 15.2 mm) |
| Approximate Weight | 0.81 ounces (23 grams) |
4. Installation Guide
Follow these steps carefully to replace your ceiling fan capacitor. Refer to your specific ceiling fan's manual for detailed disassembly and reassembly instructions.
- Disconnect Power: Turn off the power to the ceiling fan at the main circuit breaker. Verify power is off using a voltage tester.
- Access Capacitor: Carefully remove the fan's light kit or motor housing cover to access the existing capacitor. The location varies by fan model.
- Identify Wiring: Note the wire connections of the old capacitor. Typically, a 3-wire capacitor will have one common wire and two wires for different capacitance values, corresponding to different fan speeds. The BM CBB61 capacitor uses a RED wire as common, a YELLOW wire for 1.5µF, and a PURPLE wire for 2.5µF.
- Disconnect Old Capacitor: Carefully disconnect the wires from the old capacitor. It is recommended to take a photo before disconnecting for reference.
- Install New Capacitor: Connect the wires from the ceiling fan to the new BM CBB61 capacitor, matching the connections. Ensure secure connections, using wire nuts or appropriate connectors.
- Connect the fan's common wire to the RED wire of the new capacitor.
- Connect the fan's 1.5µF speed wire to the YELLOW wire of the new capacitor.
- Connect the fan's 2.5µF speed wire to the PURPLE wire of the new capacitor.
- Secure Capacitor: Place the new capacitor securely within the fan housing, ensuring it does not interfere with moving parts.
- Reassemble Fan: Reattach the motor housing cover and light kit (if applicable).
- Restore Power and Test: Turn the power back on at the circuit breaker. Test the fan's operation at all speed settings.
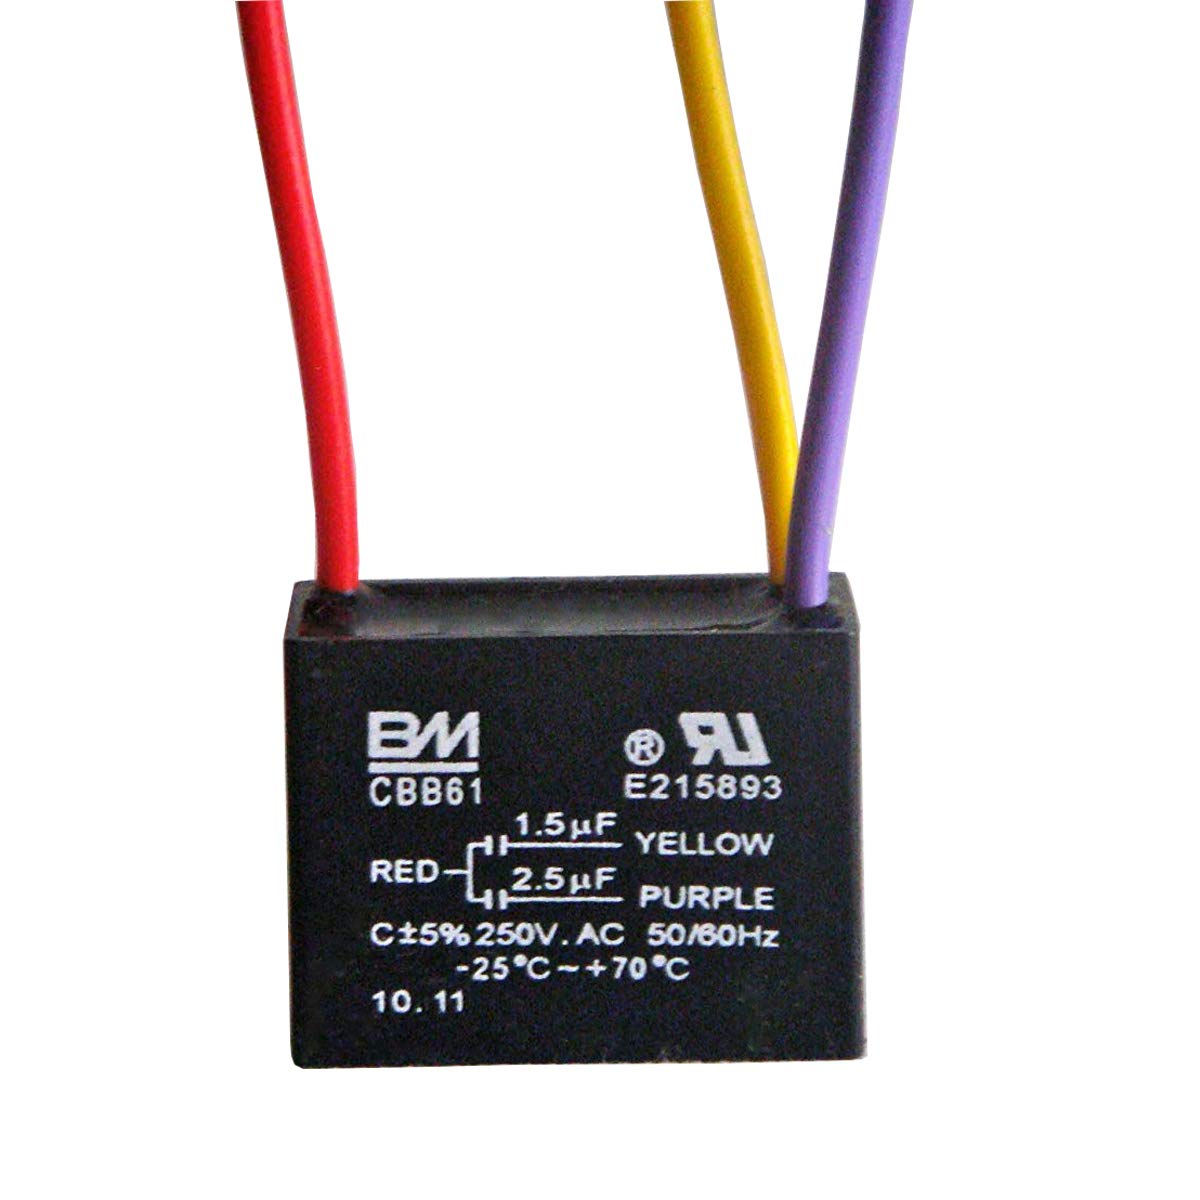
Image 1: BM CBB61 Ceiling Fan Capacitor. This image displays the capacitor unit with its three color-coded wires (Red, Yellow, Purple) and printed specifications including capacitance values (1.5µF, 2.5µF) and voltage (250V AC). The red wire is typically the common connection, while yellow and purple correspond to the specific capacitance values for fan speed control.
5. Operation
Once correctly installed, the BM CBB61 capacitor operates automatically as an integral part of your ceiling fan's motor circuit. It provides the necessary phase shift and current regulation to start the motor and maintain consistent speeds. The fan's speed control switch will then utilize the different capacitance values (1.5µF and 2.5µF) to achieve the desired fan speeds.
6. Troubleshooting
If your ceiling fan is not functioning correctly after capacitor replacement, consider the following:
- Fan Does Not Start or Runs Slowly:
- Verify all wire connections are secure and correctly matched according to the installation guide.
- Ensure the power supply to the fan is active.
- Confirm that the replacement capacitor's capacitance values (1.5µF, 2.5µF) and voltage (250V AC) match the original capacitor's specifications.
- Inspect for any loose wires or damaged components within the fan's wiring.
- Fan Hums but Does Not Turn: This often indicates a motor starting issue. Double-check capacitor connections. If the issue persists, the motor itself may be faulty.
- Incorrect Fan Speeds: Ensure the correct capacitance wires (Yellow for 1.5µF, Purple for 2.5µF) are connected to the corresponding speed control wires from the fan.
If troubleshooting steps do not resolve the issue, it is recommended to consult a qualified electrician or the fan manufacturer's support.
7. Maintenance
The BM CBB61 Ceiling Fan Capacitor is a sealed, maintenance-free component. No routine maintenance is required. However, it is advisable to:
- Keep the capacitor and its connections dry and free from dust or debris.
- Periodically inspect the capacitor and its wiring for any signs of physical damage, overheating, or corrosion, especially during other fan maintenance.
8. Warranty and Support
For specific warranty information regarding your BM CBB61 Ceiling Fan Capacitor, please refer to the purchase documentation or contact your retailer. As a general guideline, retain your proof of purchase for any warranty claims.
For technical support or further assistance, it is recommended to contact the seller or a qualified electrical professional.


