OMAX G619L
OMAX 40X-400X Kids Monocular Compound Microscope
Model: G619L
User Manual
1. Introduction
This manual provides essential information for the proper setup, operation, and maintenance of your OMAX 40X-400X Monocular Compound Microscope, Model G619L. Designed for educational use, this microscope offers clear magnification for observing microscopic specimens. Please read this manual thoroughly before using the instrument to ensure safe and effective operation.
2. Product Features
- Head: 45 degrees inclined and 360 degrees rotatable monocular head for comfortable viewing and shared observation.
- Eyepiece: Wide field WF10X eyepiece.
- Objectives: Achromatic objective lenses at 4X, 10X, and 40X magnification.
- Total Magnification: Provides total magnifications of 40X, 100X, and 400X.
- Illumination: Bright LED light source, suitable for various specimens.
- Diaphragm: Disc diaphragm with apertures of 2mm, 3mm, 4mm, 5mm, 7mm, and 8mm for controlling light intensity and contrast.
- Focusing: Focusing movement stroke of 8mm for precise adjustments.
- Power Options: Can be powered by a 110V/60Hz AC adapter (DC 5V output) or 3 AA batteries, allowing for portable use.
- Construction: Durable metal structure and frame with high-quality optical glass lenses.

Figure 2.1: The OMAX 40X-400X Monocular Compound Microscope, showing its complete assembly including the monocular head, objective turret, stage, and base with illumination.
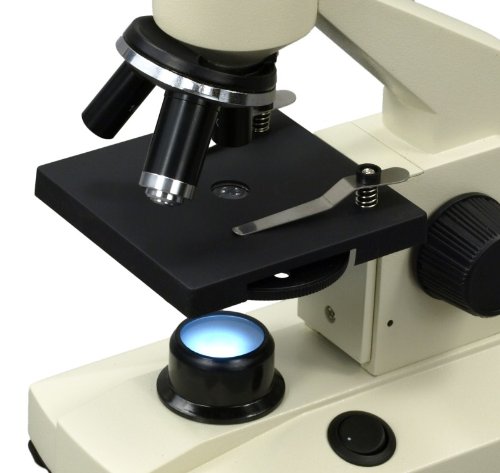
Figure 2.2: A close-up view of the microscope's stage and the integrated LED illumination system, highlighting the objective lenses and the disc diaphragm below the stage.
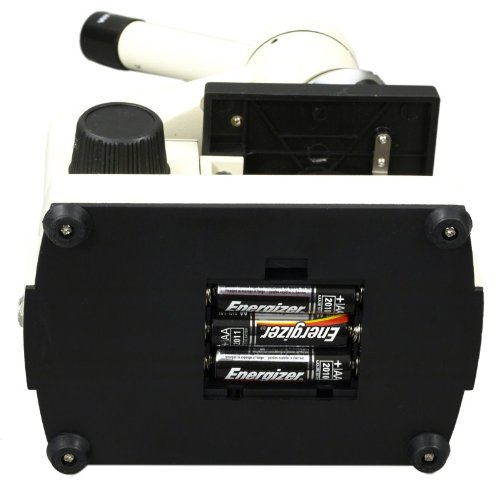
Figure 2.3: The underside of the microscope, illustrating the battery compartment designed to hold three AA batteries for portable operation.
3. Setup
3.1 Unpacking
- Carefully remove all components from the packaging.
- Inspect the microscope for any signs of damage during transit.
- Retain the original packaging for future storage or transport.
3.2 Powering the Microscope
The microscope can be powered by either the included AC adapter or 3 AA batteries.
- AC Adapter: Connect the DC 5V output plug of the adapter to the power input jack on the microscope. Plug the AC adapter into a standard 110V/60Hz electrical outlet.
- Batteries: For portable use, insert 3 AA batteries into the battery compartment located on the bottom of the microscope. Ensure correct polarity (+/-) as indicated inside the compartment. Refer to Figure 2.3 for the battery compartment location.
3.3 Placement
Place the microscope on a stable, flat surface away from direct sunlight, excessive heat, or vibrations. Ensure adequate space around the microscope for comfortable operation.
4. Operating Instructions
4.1 Preparing a Specimen
- Place a prepared microscope slide onto the stage, securing it with the stage clips.
- Center the specimen directly over the opening in the stage.
4.2 Adjusting Magnification
- Begin with the lowest power objective lens (4X) rotated into position over the specimen. This provides the widest field of view and makes it easier to locate the specimen.
- To change magnification, rotate the revolving nosepiece to select the desired objective lens (10X or 40X). Be careful not to hit the slide with the objective lens, especially with higher magnifications.
- The total magnification is calculated by multiplying the eyepiece magnification (WF10X) by the objective lens magnification (e.g., 10X eyepiece * 40X objective = 400X total magnification).
4.3 Focusing
- While looking through the eyepiece, slowly turn the coarse focus knob to bring the specimen into approximate focus.
- Once roughly focused, use the fine focus knob for precise adjustments to achieve a sharp image.
4.4 Adjusting Illumination
- Turn on the LED light using the power switch located on the base.
- Rotate the disc diaphragm located beneath the stage to select different aperture sizes (2mm, 3mm, 4mm, 5mm, 7mm, 8mm). Smaller apertures increase contrast, while larger apertures provide more light. Adjust the diaphragm to achieve optimal brightness and contrast for your specimen.
4.5 Head Rotation
The monocular head can be rotated 360 degrees. This feature is useful for sharing observations with others without moving the entire microscope.
5. Maintenance
- Cleaning Lenses: Use only specialized lens cleaning paper and lens cleaning solution to clean optical surfaces. Gently wipe in a circular motion. Avoid touching lenses with bare fingers.
- General Cleaning: Wipe the microscope body with a soft, dry cloth. For stubborn dirt, a slightly damp cloth can be used, but ensure no moisture enters the internal components.
- Storage: When not in use, cover the microscope with a dust cover to protect it from dust and debris. Store in a cool, dry place. If storing for extended periods, remove batteries to prevent leakage.
- Handling: Always carry the microscope by its arm and base. Avoid sudden impacts or vibrations.
6. Troubleshooting
| Problem | Possible Cause | Solution |
|---|---|---|
| No illumination | Power switch off, batteries dead/incorrectly inserted, AC adapter not connected, LED failure. | Ensure power switch is ON. Check battery polarity and charge/replace batteries. Verify AC adapter connection. If problem persists, contact support. |
| Image is blurry or out of focus | Incorrect focus adjustment, objective lens not fully engaged, dirty lens, slide upside down. | Adjust coarse and fine focus knobs. Rotate nosepiece until objective clicks into place. Clean objective and eyepiece lenses. Ensure specimen is facing up on the slide. |
| Image is too dark or too bright | Diaphragm setting incorrect. | Adjust the disc diaphragm to control the amount of light passing through the specimen. |
| Dust or spots visible in field of view | Dust on eyepiece or objective lens. | Clean the eyepiece and objective lenses using appropriate cleaning materials. |
7. Specifications
| Model Number | G619L |
| Brand | OMAX |
| Head Type | Monocular, 45° Inclined, 360° Rotatable |
| Eyepiece | WF10X Wide Field |
| Objective Lenses | 4X, 10X, 40X Achromatic |
| Total Magnification | 40X, 100X, 400X |
| Illumination | LED Light Source |
| Diaphragm | Disc Diaphragm (2, 3, 4, 5, 7, 8mm apertures) |
| Focusing Stroke | 8mm |
| Power Source | 110V/60Hz AC Adapter (DC 5V) or 3 AA Batteries |
| Material | Optical Glass (Lenses), Metal (Structure/Frame) |
| UPC | 729440211844 |
8. Warranty and Support
8.1 Warranty Information
This OMAX microscope comes with a 5-year warranty against manufacturing defects. Please retain your proof of purchase for warranty claims. The warranty covers defects in materials and workmanship under normal use.
8.2 Customer Support
For technical assistance, troubleshooting beyond this manual, or warranty inquiries, please contact OMAX customer support. Refer to the product packaging or the official OMAX website for the most current contact information.
Ask a question about this manual
Ask about setup, troubleshooting, compatibility, parts, safety, or missing instructions. Manuals+ will review the question and use this page’s manual context to help answer it.