1. Introduction
Thank you for choosing the Peavey PVi 2 XLR Dynamic Microphone. This manual provides essential information for the proper setup, operation, and maintenance of your microphone, ensuring optimal performance and longevity. The PVi 2 XLR is a high-quality, cost-effective vocal microphone designed for real-world use, featuring durable construction and a clean, natural sound.
1.1 Key Features
- High-quality sound reproduction
- Durable die-cast construction
- Convenient built-in On/Off switch
- Cardioid unidirectional polar response for feedback rejection
- Low handling noise and low 'pop' noise
1.2 What's in the Box
- Peavey PVi 2 XLR Dynamic Microphone
- XLR Cable
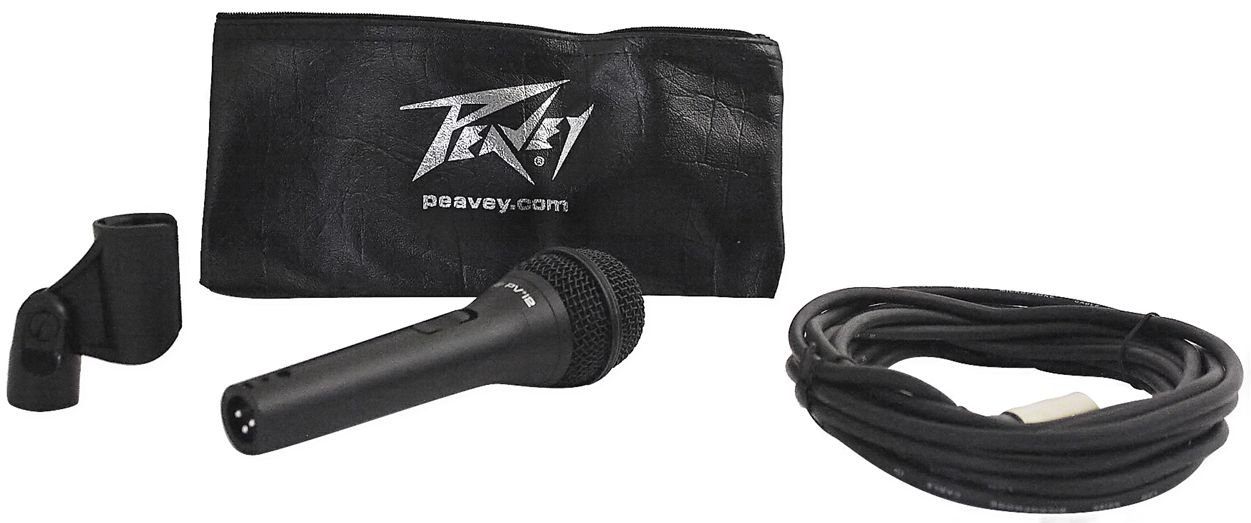
Image 1.1: The Peavey PVi 2 XLR Dynamic Microphone shown with its accompanying XLR cable.
2. Setup
Proper setup is crucial for optimal performance of your PVi 2 XLR microphone.
2.1 Connecting the Microphone
- Locate the XLR connector on the bottom of the microphone.
- Connect one end of the provided XLR cable to the microphone's XLR input. Ensure it clicks securely into place.
- Connect the other end of the XLR cable to an available XLR input on your amplifier, mixer, or audio interface.
- Ensure all connections are firm to prevent signal loss or intermittent sound.

Image 2.1: A close-up view of the XLR connector, which connects the microphone to audio equipment.
2.2 Microphone Placement
The PVi 2 XLR features a cardioid pickup pattern, which means it is most sensitive to sound coming from the front and rejects sound from the sides and rear. This characteristic is beneficial for:
- Feedback Reduction: When using stage monitors, position the microphone behind the monitor speakers. This helps prevent sound from the speakers from entering the microphone and causing feedback.
- Isolation: It helps to isolate the desired sound source (e.g., a vocalist) from other instruments or ambient noise on stage or in a recording environment.
3. Operation
Operating your Peavey PVi 2 XLR microphone is straightforward.
3.1 On/Off Switch
The microphone is equipped with a convenient On/Off switch located on the handle. To activate the microphone, slide the switch to the 'ON' position. To mute or turn off the microphone, slide the switch to the 'OFF' position. Always ensure the microphone is in the 'OFF' position before connecting or disconnecting it from audio equipment to prevent loud pops or potential damage.
3.2 Microphone Technique
For optimal vocal performance and sound quality:
- Distance: Hold the microphone approximately 2-6 inches (5-15 cm) from your mouth. Closer distances will result in a fuller sound (proximity effect), while further distances will capture more room ambiance.
- Angle: Speak or sing directly into the top of the microphone for the clearest sound. Avoid cupping the microphone head, as this can negatively affect its polar pattern and sound quality, potentially leading to feedback.
- Gain Staging: Adjust the input gain on your mixer or amplifier so that the signal is strong but does not clip or distort.

Image 3.1: The microphone head, indicating its cardioid pickup pattern for focused sound capture.
4. Maintenance
Proper care and maintenance will extend the life and performance of your microphone.
4.1 Cleaning
- Use a soft, dry cloth to wipe down the microphone body.
- For the grille, a soft brush can be used to gently remove dust or debris.
- Do not use liquid cleaners, solvents, or abrasive materials, as these can damage the microphone's finish or internal components.
4.2 Storage and Handling
- Store the microphone in a dry, cool place, away from extreme temperatures and humidity.
- Avoid dropping the microphone or subjecting it to harsh impacts, as this can damage the capsule or internal wiring.
- When not in use, disconnect the XLR cable and store it neatly to prevent kinks or damage.
5. Troubleshooting
If you encounter issues with your PVi 2 XLR microphone, refer to the following common problems and solutions:
5.1 No Sound Output
- Check Connections: Ensure the XLR cable is securely connected to both the microphone and the audio equipment.
- On/Off Switch: Verify that the microphone's On/Off switch is in the 'ON' position.
- Audio Equipment: Confirm that your amplifier, mixer, or audio interface is powered on and its input gain and volume levels are appropriately set. Test with another microphone or audio source if possible.
- Cable Integrity: Try using a different XLR cable to rule out a faulty cable.
5.2 Feedback (High-Pitched Squeal)
- Microphone Position: Ensure the microphone is positioned behind any loudspeakers or stage monitors.
- Reduce Gain: Lower the input gain on your mixer or amplifier.
- Speaker Placement: Adjust the angle or position of your speakers.
5.3 Distorted Sound
- Input Gain: Reduce the input gain on your mixer or amplifier. The signal may be too strong, causing clipping.
- Microphone Distance: If speaking or singing too loudly directly into the microphone, try increasing the distance slightly.
6. Specifications
| Feature | Specification |
|---|---|
| Model Number | PVI 2 XLR |
| Brand | Peavey |
| Microphone Form Factor | Microphone only |
| Polar Pattern | Unidirectional (Cardioid) |
| Frequency Response | 15 KHz |
| Connectivity Technology | XLR |
| Connector Type | XLR |
| Material | Alloy Steel |
| Color | Black |
| Recommended Uses | Singing, Voice Recording |
| Item Weight | 10.3 pounds |
| UPC | 613815566809 |
7. Warranty and Support
For warranty information, please refer to the documentation provided at the time of purchase or contact your retailer. Peavey stands behind its products, and specific warranty terms may vary by region and retailer.
If you require further assistance, technical support, or have questions not covered in this manual, please visit the official Peavey website or contact their customer service department.


