Introduction
This manual provides essential information for the proper installation, operation, and maintenance of your RCA RTD396 DVD Home Theater System. Please read these instructions thoroughly before using the system to ensure optimal performance and safety. The RTD396 system delivers 100 watts of total power with Dolby Digital 5.1 surround sound, offering an immersive audio experience for your home entertainment.
Safety Information
- Power Source: Connect the system only to the type of power source indicated on the marking label.
- Ventilation: Ensure adequate ventilation. Do not block any ventilation openings. Maintain a minimum distance around the apparatus for sufficient ventilation.
- Water and Moisture: Do not expose the apparatus to dripping or splashing. Do not place objects filled with liquids, such as vases, on the apparatus.
- Cleaning: Unplug the system from the wall outlet before cleaning. Use a soft, dry cloth. Do not use liquid cleaners or aerosol cleaners.
- Servicing: Do not attempt to service this product yourself. Refer all servicing to qualified service personnel.
Package Contents
Verify that all items listed below are included in your package:
- RCA RTD396 DVD Receiver Unit
- 5 Satellite Speakers (Front Left, Front Right, Center, Surround Left, Surround Right)
- 1 Subwoofer
- Remote Control with Batteries
- Speaker Cables (color-coded)
- Audio/Video Cables
Setup
1. Speaker Placement
Position the speakers in your room for optimal surround sound. The front left and right speakers should be placed on either side of your television. The center speaker should be placed directly above or below the television. The surround left and right speakers should be placed to the sides or slightly behind your listening position.
2. Speaker Connections
Connect the speaker cables to the corresponding color-coded terminals on the back of the DVD receiver and each speaker. Ensure that the positive (+) and negative (-) terminals are matched correctly for each speaker.
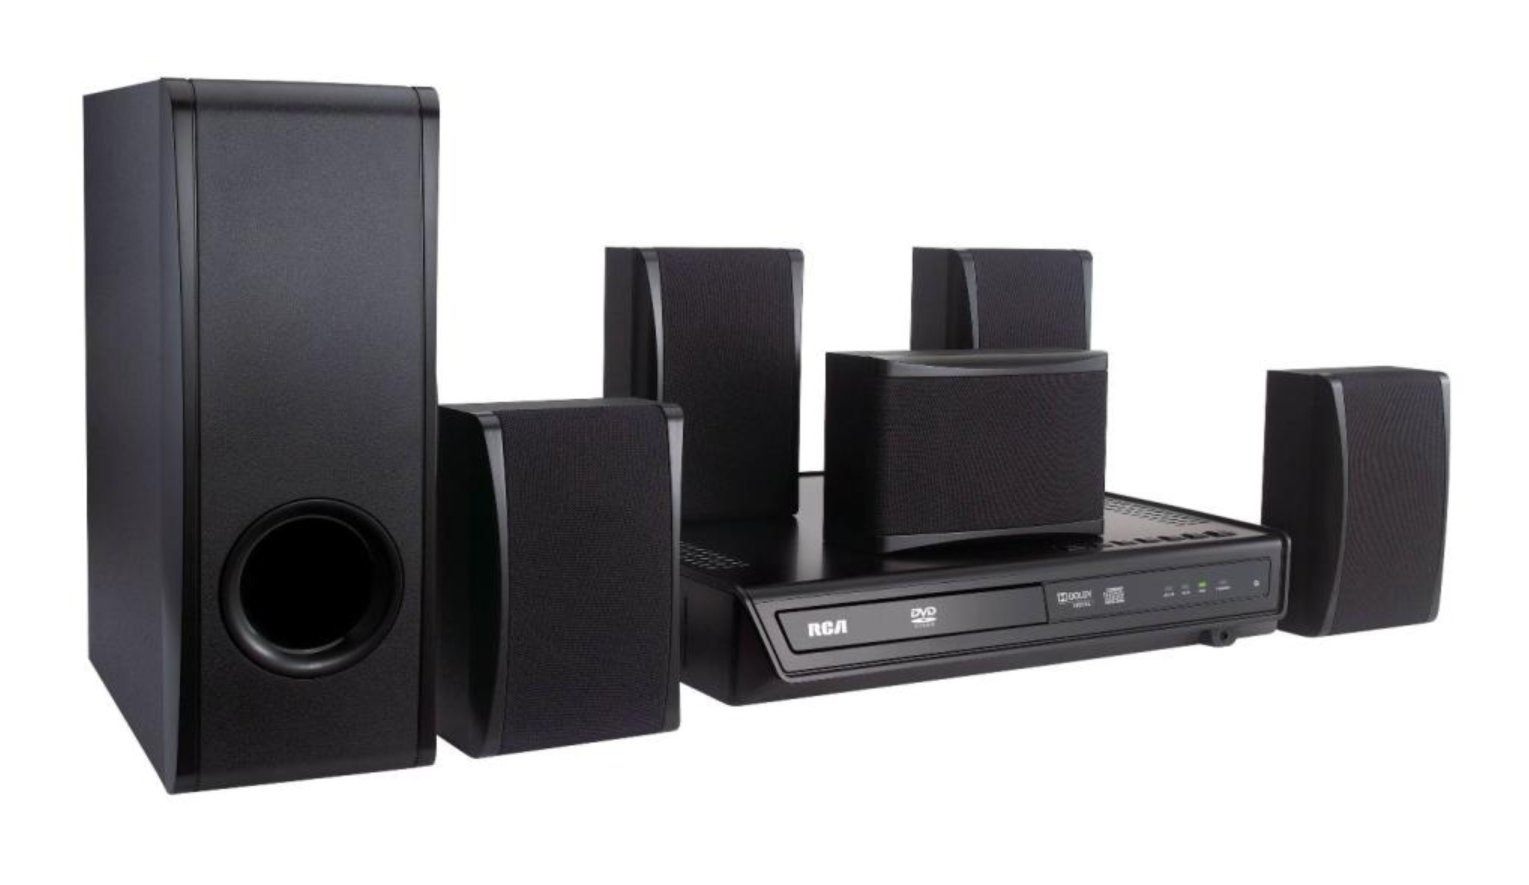
Image: RCA RTD396 DVD Home Theater System showing the main unit, speakers, and remote control. This illustrates the components involved in the setup.
3. Video Connections
Connect the DVD receiver to your television using one of the following methods:
- Progressive Scan Video Output (Y, Pb, Pr): For high-quality video, connect a component video cable (red, green, blue) from the Y, Pb, Pr jacks on the receiver to the corresponding input jacks on your television.
- Analog Video Output: For standard video quality, connect a composite video cable (yellow) from the VIDEO OUT jack on the receiver to the VIDEO IN jack on your television.
4. Audio Input Connections
To connect external audio sources:
- AUX Audio Input: Connect an audio cable (red and white RCA connectors) from the audio output of your external device (e.g., TV, cable box) to the AUX IN jacks on the back of the receiver.
- Front Panel Line-in Jack: For portable audio devices like iPods, iPhones, iPads, or other MP3 players, connect a 3.5mm audio cable from your device's headphone jack to the LINE-IN jack on the front panel of the receiver.
5. Power Connection
Once all audio and video connections are made, plug the power cord of the DVD receiver into a wall outlet.
Operating Instructions
1. Power On/Off
Press the POWER button on the front panel or the remote control to turn the system on or off.
2. Selecting Input Source
Press the SOURCE or FUNCTION button on the remote control or front panel to cycle through available input sources (e.g., DVD, AUX).
3. DVD Playback
- Select the DVD input source.
- Press the OPEN/CLOSE button to open the disc tray.
- Place a compatible DVD, DVD-R/RW, DVD+R/RW, CD, or CD-R/RW disc onto the tray with the label side facing up.
- Press OPEN/CLOSE again to close the tray. The system will begin playing automatically or display a menu.
- Use the PLAY, PAUSE, STOP, FAST FORWARD, and REWIND buttons on the remote control for playback functions.
4. Using Front Panel Line-in
After connecting your portable audio device to the front panel LINE-IN jack, select the appropriate input source (usually labeled AUX or LINE-IN) using the SOURCE button. Control playback from your portable device.
5. Volume Control
Adjust the volume using the VOLUME +/- buttons on the remote control or the main unit.
Maintenance
- Cleaning the Unit: Wipe the exterior surfaces of the unit with a soft, dry cloth. Do not use abrasive cleaners, waxes, or solvents.
- Disc Care: Handle discs by their edges. Keep discs clean and free of scratches. Store discs in their cases when not in use.
- Ventilation: Ensure that the ventilation openings on the unit are not blocked by dust or debris.
- Remote Control Batteries: Replace the remote control batteries when the remote's range decreases or it stops responding. Use AAA batteries.
Troubleshooting
| Problem | Possible Cause / Solution |
|---|---|
| No power | Ensure the power cord is securely plugged into a working wall outlet. Check if the power button is pressed. |
| No sound | Check speaker connections. Ensure the correct input source is selected. Increase the volume. Check if the system is muted. |
| No video | Verify video cables are securely connected to both the receiver and the TV. Ensure the TV is set to the correct input channel. |
| DVD disc not playing or reading | Ensure the disc is clean and free of scratches. Check if the disc is inserted correctly (label side up). Try a different disc. The disc tray mechanism may require manual assistance to open/close if it's sticking. |
| Remote control not working | Replace the batteries. Ensure there are no obstructions between the remote and the receiver's sensor. |
Specifications
- Model Number: RTD396
- Total Power Output: 100 Watts
- Audio Decoding: Dolby Digital 5.1 Surround Sound
- Video Output: Progressive Scan (Y, Pb, Pr jacks), Analog Video Output
- Audio Inputs: AUX Audio Input, Front Panel Line-in Jack
- Compatible Media: DVD, DVD-R/RW, DVD+R/RW, CD, CDDA (audio CD), JPG
- Product Dimensions: 17.4 x 15 x 11.1 inches
- Item Weight: 0.01 ounces (Note: This weight may be a data entry error and not reflect the actual product weight.)
- Date First Available: January 26, 2011
Warranty and Support
For warranty information or technical support, please refer to the warranty card included with your product or visit the official RCA support website. Keep your purchase receipt as proof of purchase for any warranty claims.