1. Introduction
Thank you for choosing the GLOBO 3151S E27 Miami IP44 Stainless Steel Sensor Outdoor Wall Lamp. This manual provides essential information for the safe installation, operation, and maintenance of your new outdoor lighting fixture. Please read these instructions carefully before installation and retain them for future reference.
This outdoor wall lamp is designed for exterior use, featuring a durable stainless steel construction and an IP44 rating, ensuring protection against splashing water and solid objects larger than 1mm. It includes an integrated motion sensor for enhanced security and convenience. The fixture requires one E27 bulb, with a maximum wattage of 60W (bulb not included).

Figure 1: GLOBO 3151S Outdoor Wall Lamp - Front View. This image shows the overall design of the stainless steel outdoor wall lamp with its glass cylinder and E27 bulb socket visible.
2. Safety Information
- Electrical Safety: Installation must be performed by a qualified electrician in accordance with local wiring regulations. Always switch off the main power supply at the fuse box or circuit breaker before commencing any electrical work.
- Voltage: This fixture operates on 230V mains power. Ensure your electrical supply matches this requirement.
- Bulb Type: Use only E27 bulbs with a maximum wattage of 60W. LED bulbs are recommended for energy efficiency. Do not exceed the maximum wattage.
- Outdoor Use: This product is rated IP44 for outdoor use, providing protection against splashing water. However, avoid direct high-pressure water jets.
- Mounting: Ensure the mounting surface is structurally sound and can support the weight of the fixture.
- Heat: Bulbs can become hot. Allow the bulb to cool before touching or replacing it.
- Disposal: Dispose of packaging materials and old bulbs responsibly according to local regulations.
3. Package Contents
Please check that all components are present and undamaged before installation. If any parts are missing or damaged, contact your retailer.
- GLOBO 3151S Outdoor Wall Lamp fixture (1 unit)
- Mounting bracket
- Screws and wall plugs for mounting
- Instruction Manual (this document)
- Note: E27 bulb is not included and must be purchased separately.
4. Specifications
| Feature | Detail |
|---|---|
| Model Number | 3151S |
| Brand | GLOBO |
| Material | Stainless Steel |
| Color | Silver |
| Protection Rating | IP44 (Splash-proof) |
| Power Source | Mains Powered (230V) |
| Bulb Base | E27 |
| Max Wattage | 60W (Bulb not included) |
| Special Features | Integrated Motion Sensor, Waterproof |
| Installation Type | Wall Mount |
| Dimensions (approx.) | Diameter: 20 cm, Height: 36 cm, Depth (from wall): 24.5 cm |
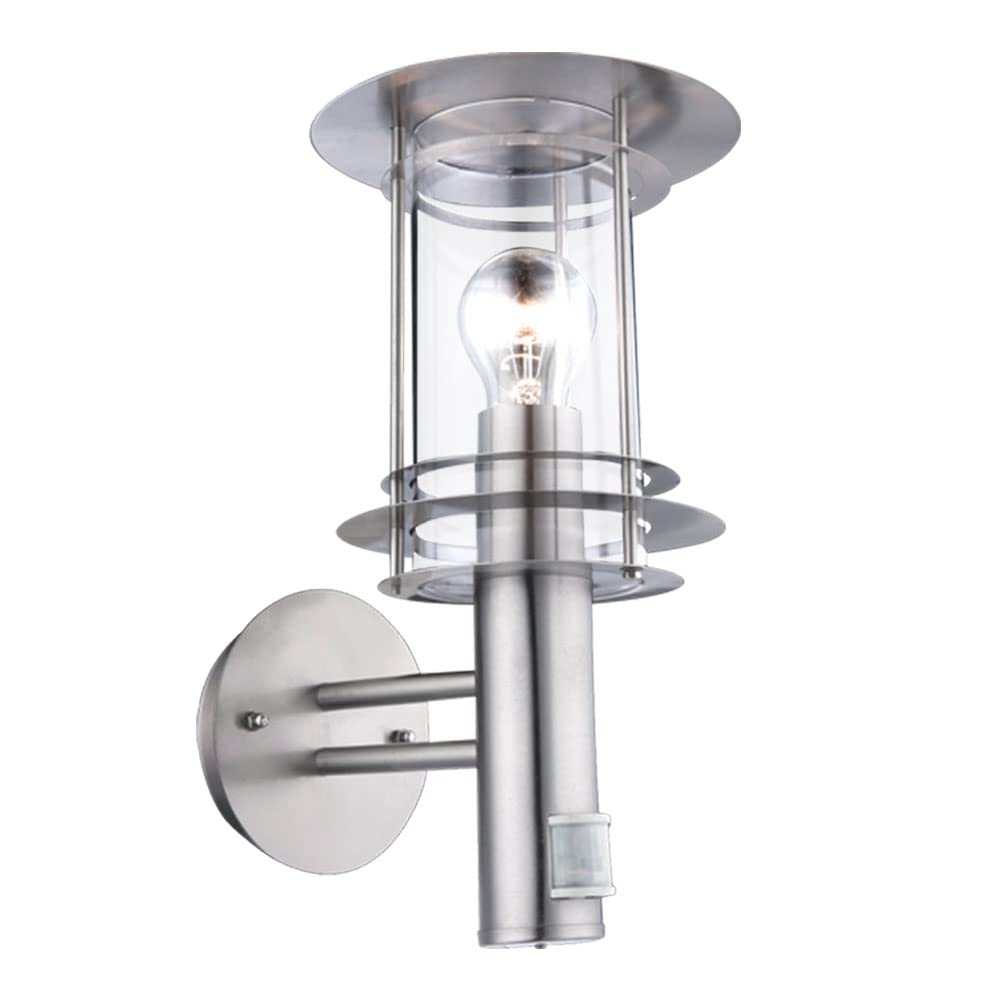
Figure 2: Technical drawing showing the dimensions of the GLOBO 3151S outdoor wall lamp. The lamp has a diameter of 20 cm, a height of 36 cm, and extends 24.5 cm from the wall.
5. Installation
Tools Required: Drill, screwdriver, wire strippers, electrical tape, pencil, measuring tape.
Important: Ensure the main power supply is switched off before beginning installation.
- Prepare the Mounting Location: Choose a suitable outdoor wall location, ensuring it is structurally sound and has access to the electrical wiring. Mark the drilling points for the mounting bracket using a pencil.
- Mount the Bracket: Drill holes at the marked points. Insert the wall plugs (if necessary) and secure the mounting bracket to the wall using the provided screws.
- Electrical Connection: Carefully connect the electrical wires from your mains supply to the terminal block inside the lamp fixture. Ensure correct polarity (Live, Neutral, Earth) according to local wiring codes. Use appropriate connectors and ensure all connections are secure.
- Secure the Fixture: Attach the lamp fixture to the mounting bracket. Some models may require securing with small nuts or screws. Ensure the fixture is firmly attached to prevent movement.
- Insert the Bulb: Unscrew the protective cover or glass cylinder (if applicable) and carefully screw an E27 bulb (max 60W) into the socket. Replace the cover securely.
- Restore Power: Once installation is complete and all connections are secure, switch the main power supply back on.

Figure 3: The GLOBO 3151S lamp installed on an outdoor wall, highlighting its IP44 weather protection and the integrated motion sensor at the base of the fixture.
6. Operation
The GLOBO 3151S lamp features an integrated motion sensor that automatically turns the light on when movement is detected and off after a set period of inactivity. It also includes a daylight sensor to ensure the light only activates when it is dark enough.
6.1. Sensor Settings
The motion sensor typically has adjustable settings for sensitivity (detection range), time duration (how long the light stays on after detection), and lux level (ambient light threshold for activation). These adjustments are usually made via small dials or screws located on the sensor unit itself, often requiring a small screwdriver.
- TIME: Adjusts the duration the light remains on after motion detection. Turn clockwise to increase the time, counter-clockwise to decrease.
- LUX: Sets the ambient light level at which the sensor becomes active. Turn towards the "sun" icon for daylight operation (testing), or towards the "moon" icon for night-only operation.
- SENS (Sensitivity): Controls the detection range of the motion sensor. Adjust as needed to prevent unwanted activations or to ensure adequate coverage.
Testing the Sensor: To test the sensor during daylight, set the LUX control to the "sun" position. The light should turn on when motion is detected. Once testing is complete, adjust the LUX control to the desired night-time setting (towards the "moon" icon).

Figure 4: A close-up view of the motion sensor located on the GLOBO 3151S outdoor wall lamp, showing the typical location for adjustment dials.
7. Maintenance
7.1. Cleaning
To maintain the appearance and functionality of your lamp, clean it regularly. Ensure the power is off before cleaning.
- Wipe the stainless steel surfaces with a soft, damp cloth. For stubborn dirt, use a mild, non-abrasive cleaner specifically designed for stainless steel.
- Clean the glass cylinder with a glass cleaner and a soft cloth.
- Do not use abrasive cleaners, solvents, or harsh chemicals, as these can damage the finish or electrical components.
7.2. Bulb Replacement
Always switch off the power supply before replacing the bulb. Allow the old bulb to cool down completely before touching it.
- Switch off the main power supply to the fixture.
- Carefully remove the glass cylinder or protective cover to access the bulb.
- Unscrew the old E27 bulb counter-clockwise.
- Screw in a new E27 bulb (max 60W) clockwise until secure.
- Replace the glass cylinder or protective cover, ensuring it is securely fastened to maintain the IP44 rating.
- Restore power to the fixture.
8. Troubleshooting
| Problem | Possible Cause | Solution |
|---|---|---|
| Light does not turn on. | No power supply. Faulty bulb. Incorrect sensor settings. Loose wiring. |
Check circuit breaker/fuse. Replace bulb. Adjust LUX setting (see Section 6.1). Check wiring connections (power off first). |
| Light stays on continuously. | Sensor constantly detecting motion. Sensor set to override mode (if applicable). Faulty sensor. |
Adjust SENS setting or reposition fixture. Check manual for override function; reset if needed. Contact a qualified electrician for inspection. |
| Light turns on too frequently/randomly. | Sensor sensitivity too high. Sensor detecting moving objects (e.g., trees, animals). |
Reduce SENS setting. Adjust sensor angle or reposition fixture to avoid false triggers. |
| Light does not turn off. | TIME setting too long. Continuous motion detection. Faulty sensor. |
Reduce TIME setting. Ensure no continuous motion in detection zone. Contact a qualified electrician for inspection. |
9. Warranty and Support
GLOBO products are manufactured to high-quality standards. In the unlikely event of a defect, please refer to your purchase receipt for warranty terms and conditions provided by your retailer. Keep your proof of purchase for any warranty claims.
For technical support or further assistance, please contact your point of purchase or visit the official GLOBO website for contact information.