Introduction
The Dr.meter LX1010B Digital Illuminance/Light Meter is a precision instrument designed to measure light intensity across a wide range. It provides accurate readings for various applications, from checking light levels in homes and offices to specialized uses in photography or plant cultivation. This manual provides detailed instructions for the proper setup, operation, and maintenance of your device.

Image: The Dr.meter LX1010B Digital Illuminance/Light Meter actively measuring light from a lamp, displaying a reading of 986 Lux. The separate photo detector is held near the light source, connected by a coiled cable to the main unit with the LCD display.

Image: A collage illustrating various applications for the Dr.meter LX1010B Light Meter, including use in warehouses, offices, hospitals, libraries, bedrooms, and for studying, highlighting its versatility.
Product Features
- Easy-Read LCD: Features a large 18mm LCD display with 3-1/2 digits for clear visibility of readings.
- Wide Measurement Range: Capable of measuring light intensity from 0 to 100,000 Lux.
- High Accuracy: Provides readings within a +/-5% accuracy range.
- Quick Response: Offers a fast sampling rate of 0.4 seconds for rapid measurements.
- Long Battery Life: Operates on a 9V battery with low energy consumption for extended use.
Components Overview

Image: A detailed view of the Dr.meter LX1010B Light Meter, highlighting its key components. The main unit shows the LCD display, Data Hold/On/Off switch, and Range Select buttons. The separate photo detector unit is also shown, connected by a coiled cable.
- LCD Display: Shows the measured light intensity.
- Photo Detector: Sensor unit that measures light. It is connected to the main unit via a coiled cable.
- Data Hold Button: Freezes the current reading on the display.
- On/Off Switch: Powers the device on or off.
- Range Select Buttons: Allows selection between 0-2000 Lux, 0-20000 Lux, and 0-100000 Lux measurement ranges.
Setup
1. Battery Installation
The Dr.meter LX1010B requires one 9V battery for operation. To install or replace the battery:
- Locate the battery compartment cover on the back of the main unit.
- Slide the cover open.
- Connect a new 9V battery to the battery clip, observing correct polarity.
- Place the battery into the compartment and close the cover securely.
2. Initial Inspection
Before first use, ensure the photo detector's protective red cap is removed. This cap protects the sensor during storage and transport.
Operating Instructions
1. Power On/Off
Slide the ON/OFF switch to the "ON" position to power on the device. Slide it to "OFF" to power off.
2. Selecting Measurement Range
The meter offers three measurement ranges: 0-2000 Lux, 0-20000 Lux, and 0-100000 Lux. Use the range select buttons to choose the appropriate range for your measurement. For optimal accuracy, select the lowest possible range that still accommodates the expected light intensity.

Image: A user holding the Dr.meter LX1010B Light Meter, demonstrating its three measurement ranges (0-2000 Lux, 0-20000 Lux, 0-100000 Lux) in a home setting. The display shows a reading of 687 Lux.
3. Taking a Measurement
- Ensure the photo detector's protective cap is removed.
- Point the photo detector towards the light source or area where you wish to measure light intensity.
- Read the Lux value displayed on the LCD screen. The meter updates readings approximately every 0.4 seconds.
4. Data Hold Function
Press the "HOLD" button to freeze the current reading on the display. Press it again to release the hold and resume live measurements.
Maintenance
1. Cleaning
Wipe the device with a soft, dry cloth. Do not use abrasive cleaners or solvents. Keep the photo detector clean and free from dust or smudges, as this can affect measurement accuracy.
2. Storage
When not in use for extended periods, remove the 9V battery to prevent leakage and damage to the device. Store the meter in its protective case in a cool, dry place, away from direct sunlight and extreme temperatures. Ensure the protective cap is placed back on the photo detector.
Troubleshooting
- No Display or Faint Display: Check the 9V battery. Replace if necessary. Ensure the battery is installed with correct polarity.
- Inaccurate Readings:
- Ensure the protective red cap is removed from the photo detector.
- Clean the photo detector surface.
- Verify the correct measurement range is selected for the ambient light conditions.
- Ensure the photo detector is stable and not obstructed during measurement.
- "OL" or Overload Indication: This indicates that the measured light intensity exceeds the currently selected range. Switch to a higher measurement range.
Specifications
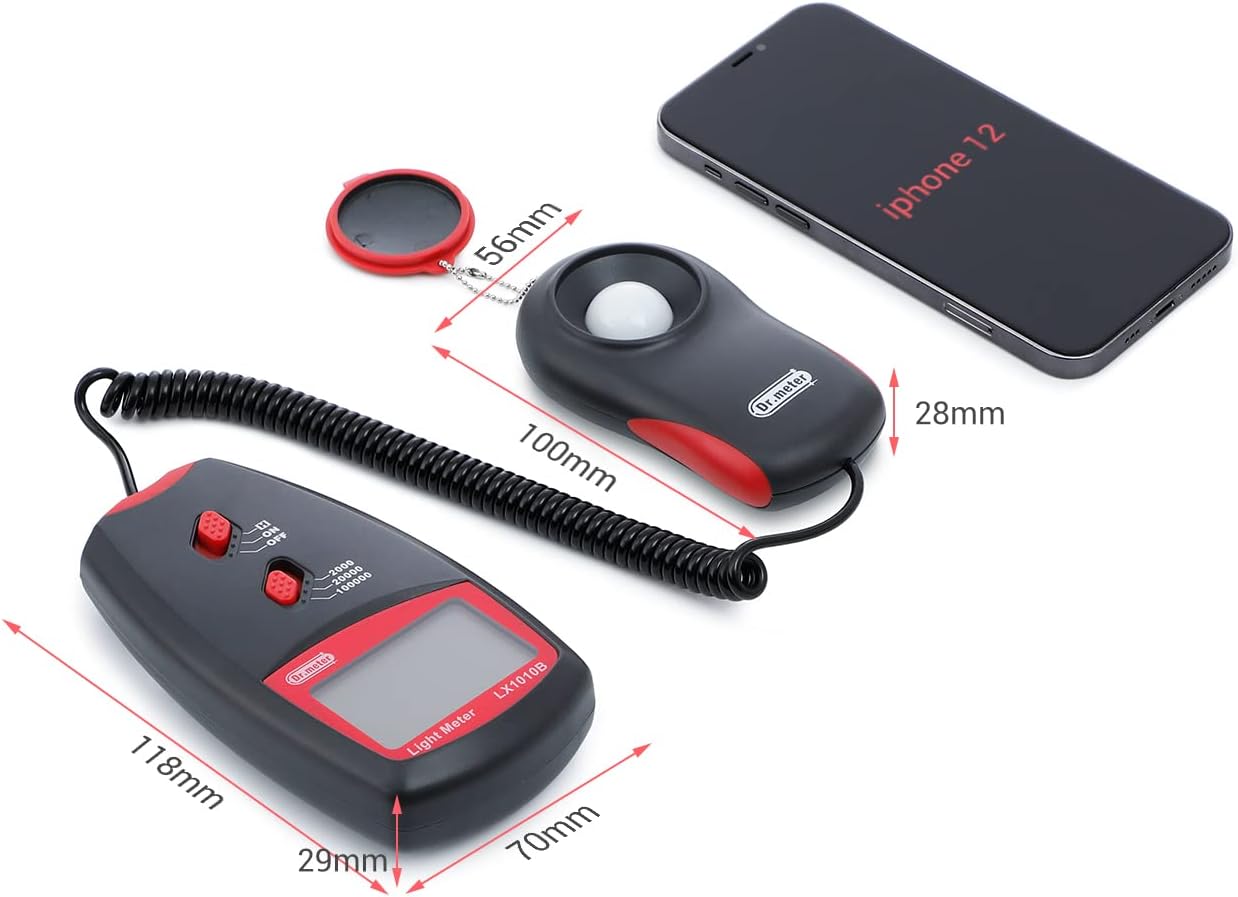
Image: A top-down view of the Dr.meter LX1010B Light Meter and its photo detector, with key dimensions labeled in millimeters, providing a clear understanding of the product's size.
| Feature | Specification |
|---|---|
| Model Number | LX1010B |
| Measurement Range | 0 - 100,000 Lux |
| Accuracy | ±5% |
| Sampling Rate | 0.4 seconds |
| Display | 18mm LCD, 3-1/2 digits |
| Power Source | 1 x 9V battery |
| Product Dimensions | 4.6 x 2.7 x 1.1 inches |
| Item Weight | 12.2 ounces |
Warranty and Support
For warranty information or technical support, please refer to the documentation included with your purchase or visit the official Dr.meter website. If you encounter any issues not covered in this manual, please contact Dr.meter customer service for assistance.
You can find more information and contact details on the Dr.meter Store Page.