KODAK Z990
Kodak EasyShare Z990 Digital Camera Instruction Manual
Model: Z990 | Brand: KODAK
1. Introduction
The KODAK EASYSHARE MAX Camera, model Z990, is a high-performance digital camera designed to capture crisp, beautiful pictures and HD videos. Featuring a 12 MP BSI CMOS sensor and a powerful 30x optical zoom lens, it offers advanced capabilities for both novice and experienced photographers. This manual provides detailed instructions on setting up, operating, and maintaining your camera to ensure optimal performance.

Figure 1.1: Kodak EasyShare Z990 Digital Camera
This camera is equipped with Kodak's Smart Capture feature, which automatically identifies the scene and adjusts camera settings for optimal results. It also includes a dedicated Share button for easy uploading of photos and videos to social networks and email.
2. What's in the Box
Before you begin, please ensure all the following items are included in your KODAK EASYSHARE MAX Camera package:
- KODAK EASYSHARE MAX Camera (Z990)
- KODAK Ni-MH Pre-charged Rechargeable Digital Camera Batteries (AA)
- KODAK USB AC adapter for in-camera charging
- Charging solution
- Wrist strap
- USB cable
- Lens cap with strap
- Neck strap
- User Guide (this document)
3. Initial Setup
3.1. Installing Batteries
Your camera uses AA Ni-MH rechargeable batteries. To install them:
- Locate the battery compartment door on the bottom of the camera.
- Open the door carefully.
- Insert the four KODAK Ni-MH AA batteries according to the polarity indicators inside the compartment.
- Close the battery compartment door securely.
3.2. Charging Batteries
For optimal performance, fully charge the included Ni-MH batteries before first use. The included charger indicates charging status with green lights. Batteries are fully charged when they feel warm to the touch.
3.3. Inserting a Memory Card
The camera supports SD/SDHC memory cards up to 128 MB (internal memory is also 128 MB). A memory card is recommended for storing a large number of photos and videos.
- Locate the memory card slot, typically on the side or bottom of the camera.
- Insert the SD/SDHC card with the metal contacts facing the correct direction (refer to the diagram near the slot).
- Push the card in until it clicks into place.
3.4. System Requirements for Computer Connection
To transfer photos and videos to your computer, ensure your system meets the following requirements:
- WINDOWS: WINDOWS XP SP2, VISTA, WINDOWS 7 or later; INTERNET EXPLORER 6.0 or higher.
- MACINTOSH: MACINTOSH 10.4, 10.5, 10.6 or higher; SAFARI 1.1 or higher.
- Hardware: PENTIUM 4, 2.8 GHz processor or higher; 1 GB RAM and 64 MB video RAM; 300 MB hard drive space available; CD-ROM drive; Available USB port (1.1 or higher); 1024 x 768 display resolution.
4. Camera Overview
Familiarize yourself with the main components and controls of your Kodak EasyShare Z990 camera.
4.1. Front and Side Views
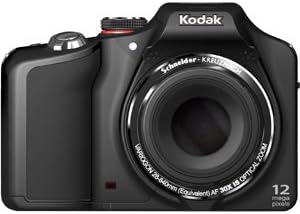
Figure 4.1: Front View
The front of the camera features the prominent 30x optical zoom lens, the built-in flash, and the autofocus assist lamp.
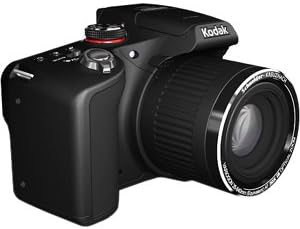
Figure 4.2: Side View
The side of the camera typically houses ports for USB and HDMI connectivity, as well as the memory card slot.
4.2. Top Controls

Figure 4.3: Top Controls
- On/Off Switch: A momentary slide switch to power the camera on or off. The camera will automatically power off after about 20 seconds of inactivity if the lens cover is on.
- Mode Dial: A rotary wheel with icons to select various shooting modes (e.g., Smart Capture, HDR, PASM, SCN).
- Shutter Button: Press halfway to focus, fully to capture a photo.
- Zoom Lever: Surrounds the shutter button, used to zoom in (W) and out (T).
- Burst Mode Button: (Marked by 'pages' or 'frames') Activates continuous shooting.
- Macro/Focus Button: (Marked by a flower) Controls focusing bias (macro, super macro, infinity, manual focus).
- Self-Timer Button: Sets a delay before taking a photo.
4.3. Rear Controls and LCD

Figure 4.4: Rear Controls
- 3.0-inch HVGA High-Resolution LCD: Displays live view, menus, and playback.
- EVF/LCD Button: Toggles between the electronic viewfinder and the LCD screen.
- Record Button: (Silver/Red button) Initiates video recording.
- Navigation Pad (Square/Silver): Used to navigate menus and select options (Up, Down, Left, Right, OK/Center button).
- DISP Button: Displays additional functionality or information on the screen.
- Flash Button: (Lightning bolt icon) Controls flash modes (Auto, Off, Fill, Red-eye reduction).
- Magic Wand Button: Displays creative effects available in the current mode.
- Trash Can Button: Deletes selected photos or videos in review mode.
- Play Button: Switches between shooting mode and playback/review mode.
- Share Button: Pre-assigns pictures for sharing to social networks or email when connected to a computer.
5. Operating the Camera
5.1. Basic Photography (Smart Capture Mode)
For quick and easy photo taking, use the Smart Capture mode. This mode automatically analyzes the scene and adjusts camera settings for optimal results.
- Turn the mode dial to the RED Camera ICON.
- Frame your shot using the LCD screen.
- Press the shutter button halfway down to allow the camera to focus. You will hear a beep once focus is achieved.
- Press the shutter button all the way down to capture the photo.
5.2. Advanced Shooting Modes (PASM)
The Z990 offers Program, Aperture Priority, Shutter Priority, and Manual modes for greater creative control.
- Program Auto Mode (P): The camera sets optimal shutter speed and aperture combination. You can adjust other settings like ISO, white balance, and color mode.
- Aperture Priority Mode (A): You choose the aperture (f/stop), and the camera sets the shutter speed for correct exposure. This mode is useful for controlling depth of field.
- Shutter Priority Mode (S): You choose the shutter speed, and the camera sets the aperture. This mode is ideal for controlling motion blur (fast shutter for freezing action, slow shutter for blurring motion).
- Manual Mode (M): You have full control over both aperture and shutter speed. Press the DISP button to view and adjust all manual settings on the LCD.
5.3. Scene Modes (SCN)
The SCN mode provides optimized settings for specific shooting situations. Turn the mode dial to SCN, then use the navigation pad to select from options like:
- Auto
- Sport
- Portrait (including Night Portrait, Self)
- Landscape (including Night Landscape, Sunset)
- Bright
- Fireworks
- Backlight
- Children
- Stage
- Flower (Macro)
5.4. Creative Modes and Effects
Explore various creative options by turning the mode dial to the Paint Brush ICON or using the Magic Wand button.
- HDR (High Dynamic Range): Captures multiple exposures and combines them for a single image with extended dynamic range. Hold the camera very steady for best results.
- Dramatic: Enhances color and contrast for a more impactful image.
- Night Scene Long Exposure: Optimizes settings for capturing details in low-light scenes with longer shutter times.
- Intelligent Portrait: Applies intelligent processing for improved portrait shots.
- Photobooth Capture: Takes a series of four consecutive photos, styled as if taken in a traditional photobooth.
- Automatic Panorama: Guides you to capture a series of images that the camera automatically stitches together into a wide panoramic shot (180-degree horizontal or 120-degree vertical).
- Film Effects: Apply classic film looks such as KODACHROME, KODACOLOR, EKTACHROME, TRI-X, T-MAX, and Sepia.
5.5. Continuous Shooting (Burst Mode)
The camera can capture multiple frames per second for fast-moving subjects. Press the Burst Mode button on the top of the camera to activate. The camera can shoot up to 5 frames per second (fps) without flash, or up to 9 fps at 2 MP resolution (max 20 shots). Note that processing RAW files in burst mode may temporarily slow down camera responsiveness.
5.6. Recording Videos
The Kodak EasyShare Z990 can record full 1080 HD video with stereo sound.
- Press the silver Record Button (with the red bullseye) on the rear of the camera.
- The camera will immediately begin recording.
- Press the Record Button again to stop recording.
Features include audio capture, on-camera editing, and the ability to create action prints (9-up) from video frames.
5.7. Playback and Sharing
To review your photos and videos:
- Press the Play Button (arrow icon) on the rear of the camera.
- Use the navigation pad to scroll through your images and videos.
- For videos, press the OK button to play. Sound will come from the camera's speaker.
To share your content:
- Press the Share Button after taking a picture or during playback.
- Select your preferred sharing destinations (e.g., FACEBOOK, email, KODAK Gallery).
- Connect your camera to a computer via USB, and your content will automatically upload to the selected destinations.
6. Maintenance
6.1. Battery Care
- Always use the included KODAK Ni-MH rechargeable batteries and charger.
- Ensure the battery compartment door is handled with care to prevent damage.
- Remove batteries if the camera will not be used for an extended period.
6.2. Cleaning the Camera
- Use a soft, lint-free cloth to clean the camera body.
- For the lens, use a specialized lens cleaning cloth and solution. Avoid touching the lens surface with your fingers.
- Do not use harsh chemicals or abrasive materials.
7. Troubleshooting
This section addresses common issues you might encounter with your Kodak EasyShare Z990.
- Camera does not power on: Ensure batteries are correctly installed and fully charged. Check that the lens cap is removed.
- HDR mode not working as expected: HDR requires the camera to be held very steady during capture. Any movement can cause the merging process to fail. Ensure you are zoomed out for optimal results.
- Continuous shooting (burst mode) slows down: When shooting in high-resolution JPEG or RAW formats, the camera may temporarily pause to transfer data to the memory card. This is normal behavior. Using smaller JPEG resolutions will allow for faster continuous shooting.
- Battery charger indicator: The green light on the Kodak charger stays on even when batteries are fully charged. Batteries are typically charged when they feel warm to the touch.
- Difficulty navigating menus: To exit a menu, often you need to navigate back to the first item in the menu, then press the UP arrow or a dedicated 'Back' button if available.
- Memory card issues: If a memory card is not recognized, try formatting it using the camera's 'Format' option in the setup menu (Wrench icon). Note that formatting will erase all data on the card.
8. Specifications
| Feature | Specification |
|---|---|
| Megapixels | 12 MP BSI CMOS |
| Optical Zoom | 30x SCHNEIDER-KREUZNACH VARIOGON Lens |
| Digital Zoom | 5x |
| Display Size | 3.0 in. HVGA high-resolution LCD |
| Image Stabilization | Optical |
| Maximum Aperture | f/2.8 (wide) |
| Minimum Focal Length | 28 mm |
| Maximum Focal Length | 840 mm |
| ISO Equivalents | 125, 200, 400, 800, 1600, 3200, 6400 |
| Shutter Speed | 1/2000 sec. to 16 sec. (manual) |
| Video Resolution | FHD 1080p (30 FPS) |
| Supported File Formats | JPEG, KDC (RAW), AVC (Video) |
| Internal Memory | 128 MB |
| Compatible Memory Cards | SD/SDHC |
| Battery Type | AA (NiMH Rechargeable) |
| Connectivity | HDMI, USB |
| Weight | 0.98 Pounds |
9. Warranty and Support
For information regarding product warranty, technical support, and service, please refer to the official KODAK website or contact KODAK customer service directly. Specific warranty terms and support options may vary by region and purchase date.
Ask a question about this manual
Ask about setup, troubleshooting, compatibility, parts, safety, or missing instructions. Manuals+ will review the question and use this page’s manual context to help answer it.