1. Introduction
The Honeywell Home ECONOswitch RPLS740B is a 7-day solar programmable switch designed to automate the control of lighting and motors. This device allows for customized scheduling to enhance convenience and energy efficiency in your home. It is compatible with various lighting types and motor-operated appliances for both indoor and outdoor applications.
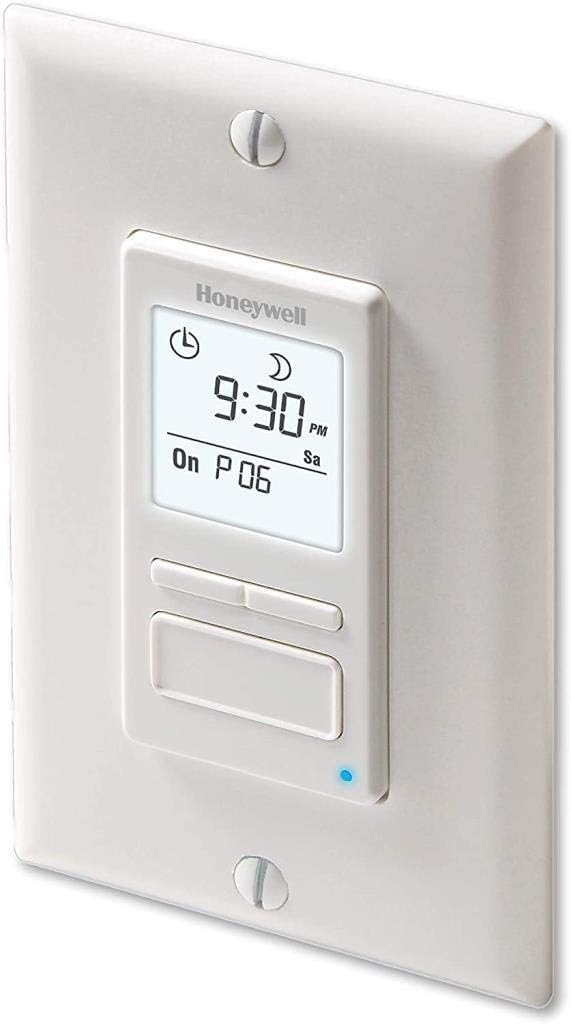
Figure 1: Honeywell Home RPLS740B ECONOswitch installed in a wall plate.
2. Key Features
- 7-Day Programmability: Allows up to 7 on-and-off schedules per week, configurable daily or weekly.
- Solar Timetable Function: Automatically adjusts on/off times based on local sunrise and sunset, calculated from latitude and longitude input.
- Versatile Compatibility: Works with LED, CFL, incandescent, halogen, and fluorescent lighting. Also controls motor-operated appliances such as ceiling fans, bathroom fans, pond pumps, and pool pumps (up to 1800W, 3/4 HP on 120V).
- Multiple Operating Modes: Includes automatic, manual (conventional on/off switch), and random modes for flexible control.
- Automatic Daylight Saving Adjustment: Automatically updates for daylight saving time.
- Power Outage Protection: Program settings are retained during power outages.
- Backlit Display: Large, backlit screen for clear viewing, even at night, with an option to stay lit at low intensity as a nightlight.
- Security Feature: Random mode turns lights on and off at irregular intervals to simulate occupancy when away from home.
3. Safety Information
WARNING: Risk of Electric Shock.
- Always cut power at the circuit breaker or fuse box before installing or servicing the switch to avoid electric shock.
- This switch requires a neutral wire (typically white wires joined together) inside the electrical box for proper operation. It cannot be used in installations without a neutral wire.
- If you are unsure about any part of the installation process, consult a qualified electrician.
- Ensure all wire connections are secure and properly insulated.
4. Installation
4.1. Pre-Installation Checklist
- Verify that your electrical box contains a neutral wire.
- Ensure the circuit breaker for the switch location is turned OFF.
- Gather necessary tools: screwdriver, wire strippers, electrical tape, wire connectors (provided).
4.2. Wiring Instructions
- Turn off power at the circuit breaker.
- Remove the existing wall plate and switch.
- Identify the wires: Line (hot), Load, and Neutral. The RPLS740B has three wires: black (Line), blue (Load), and white (Neutral).
- Connect the white wire from the RPLS740B to the neutral wires in the electrical box using a wire connector.
- Connect the black wire from the RPLS740B to the incoming line (hot) wire from the circuit breaker.
- Connect the blue wire from the RPLS740B to the load wire (going to the light or motor).
- Secure all connections with wire connectors and electrical tape.
- Carefully push the wires back into the electrical box.
4.3. Mounting the Switch
- Mount the RPLS740B switch into the electrical box using the provided screws.
- Attach a standard decorative wall plate (not included) over the switch.
- Restore power at the circuit breaker.
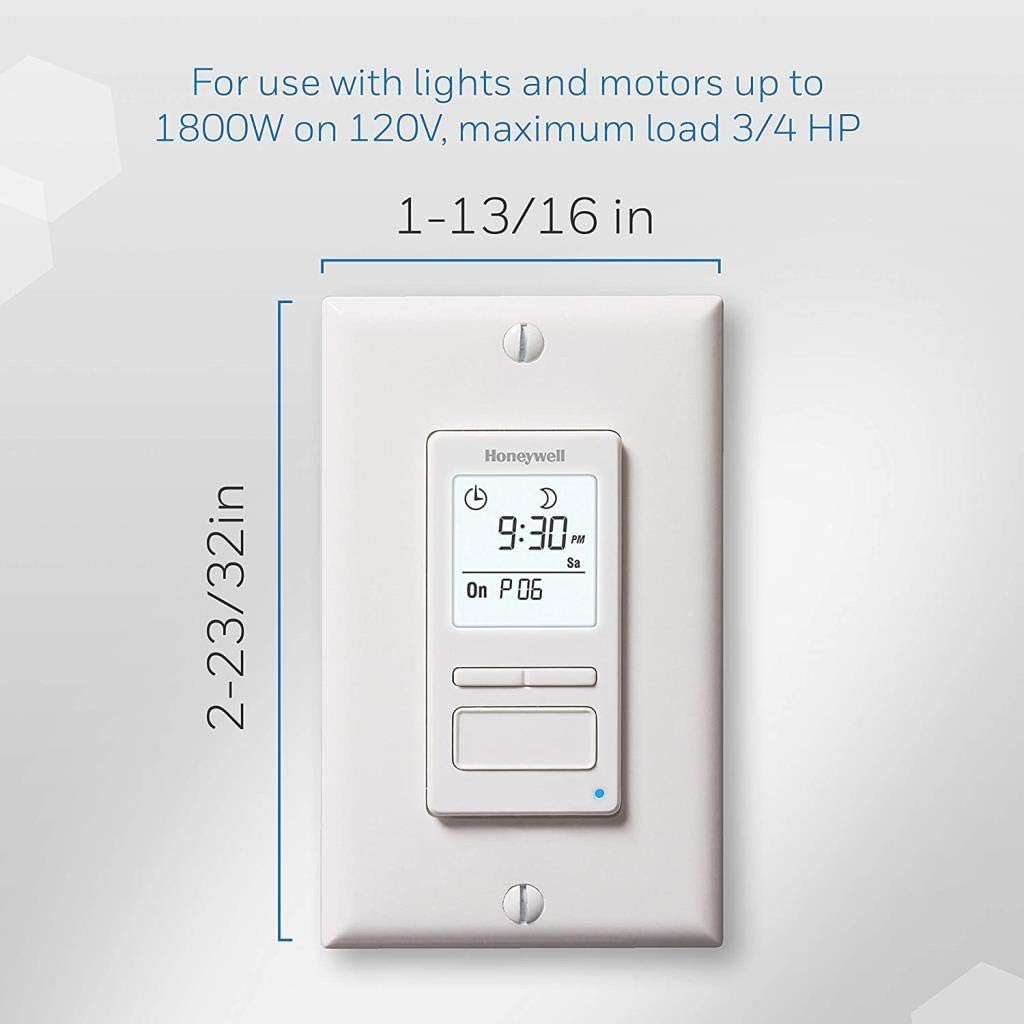
Figure 2: Dimensions of the Honeywell Home RPLS740B ECONOswitch.
5. Initial Setup
Upon first power-up or after a prolonged power outage, the switch will require initial setup.
- Set Time and Date: Use the navigation buttons to set the current time, AM/PM, day of the week, and date.
- Set Latitude and Longitude: Enter your home's latitude and longitude. This allows the solar timetable function to accurately calculate local sunrise and sunset times. Refer to the instruction manual for detailed steps on entering these values.
- Daylight Saving Time (DST): Enable or disable the automatic DST adjustment feature.

Figure 3: Close-up view of the switch's backlit display and control buttons.
6. Operating Modes
The RPLS740B offers three primary operating modes:
- Automatic Mode: The switch operates according to the programmed schedules, including solar timetable adjustments.
- Manual Mode: The switch functions as a conventional on/off switch. Press the main button to toggle the connected load on or off. This temporarily overrides any active program without deleting it.
- Random Mode: Activates lights at random times to create an illusion of occupancy, enhancing home security when you are away.

Figure 4: The switch offers various modes for flexible control.
7. Programming Schedules
The switch allows for up to 7 programmable periods (P1 to P7) per week. Each period can be set for a specific day, weekdays, weekends, or all 7 days.
7.1. Setting On/Off Times
- Press the 'Program' button to enter programming mode.
- Select the desired program number (P1-P7) using the navigation buttons.
- Set the 'ON' time for the selected program. You can choose a specific time or select 'Sunrise' for automatic adjustment.
- Set the 'OFF' time for the selected program. You can choose a specific time or select 'Sunset' for automatic adjustment.
- Select the days of the week for which this program will be active.
- Repeat for all desired programs.
- Exit programming mode to save settings.

Figure 5: The simple 3-button interface facilitates programming.
7.2. Solar Timetable Adjustment
The solar timetable can be adjusted by up to an hour before or after actual sunrise/sunset times to suit specific needs or environmental conditions.
8. Maintenance
- The RPLS740B is designed for maintenance-free operation.
- Clean the display and buttons with a soft, dry cloth. Avoid abrasive cleaners or solvents.
- No user-serviceable parts inside.
9. Troubleshooting
| Problem | Possible Cause | Solution |
|---|---|---|
| Switch does not power on. | No power to the switch; missing neutral wire. | Check circuit breaker. Verify neutral wire connection. |
| Lights/motors do not turn on/off as programmed. | Incorrect programming; incorrect time/date/latitude. | Review and adjust programmed schedules, time, date, and latitude/longitude settings. |
| Lights/motors flicker or remain dimly lit (for CFL/LED). | Incompatible load type (for older SCR-based timers). | The RPLS740B is designed to be compatible with LED/CFL. If flickering occurs, ensure proper wiring and bulb compatibility. |
| Display is blank after power outage. | Prolonged power outage exceeding 4 hours. | Reset time and date. Programmed schedules should be retained. |
10. Specifications
| Feature | Detail |
|---|---|
| Model Number | RPLS740B |
| Brand | Honeywell Home |
| Color | White |
| Material | Plastic |
| Item Weight | 4 ounces (0.25 Pounds) |
| Product Dimensions | 1.69 x 1.5 x 4.06 inches |
| Number of Settings | 7 (programs per week) |
| Wattage | 1800 watts (Max) |
| Horsepower | 3/4 HP (at 120V) |
| Voltage | 120V |
| Switch Type | 1-way |
| Mounting Type | Embedded |
| Compatibility | LED, CFL, Incandescent, Halogen, Fluorescent |
| Certification | cULus |
11. Warranty and Support
The Honeywell Home RPLS740B ECONOswitch is backed by a 1-year limited warranty.
For technical support, troubleshooting assistance, or warranty claims, please refer to the contact information provided in the product packaging or visit the official Honeywell Home website.


