
Introduction
This manual provides comprehensive instructions for the installation, operation, and maintenance of your Velvac 714565 Exterior Mirror. This mirror is designed for GMC/Chevy vehicles manufactured from 1997 onwards, featuring a 14.5-inch arm. Please read this manual thoroughly before installation and use to ensure proper function and safety.
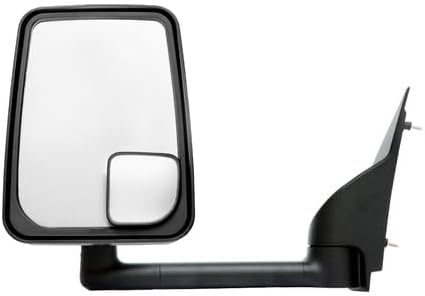
Image: Velvac 714565 Exterior Mirror. This image displays the complete mirror assembly, featuring a rectangular main mirror and a smaller convex spot mirror, attached to a black arm and mounting base.
Safety Information
- Always disconnect the vehicle's battery before performing any electrical work.
- Ensure all wiring connections are secure and properly insulated to prevent short circuits.
- Use appropriate tools for installation to avoid damage to the mirror or vehicle.
- Verify mirror stability and proper adjustment before driving.
- Convex mirrors make objects appear smaller and farther away. Use caution when judging distances.
Package Contents
Upon opening the package, verify that all components are present and undamaged:
- Velvac 714565 Exterior Mirror Assembly (Left or Right, depending on purchase)
- Mounting Hardware (if included by manufacturer)
- Instruction Manual (this document)
Note: The product description mentions "Cargo, Management, Mirrors" as included components. This manual assumes the primary component is the mirror assembly itself.
Specifications
| Brand | Velvac |
| Model Number | 714565 |
| Compatible Vehicles | GMC/Chevy (1997-Newer) |
| Arm Length | 14.5 inches |
| Auto Part Position | Left, Right (depending on unit) |
| Mounting Type | Door Mount |
| Mirror Shape | Rectangular (main), Convex (spot) |
| Item Dimensions (L x W x H) | 29.87 x 20.68 x 8.37 inches |
| Item Weight | 14.34 pounds |
| Lift Type | Automatically, Electric (for folding function) |
Setup and Installation
Professional installation is recommended for this product. If you choose to install it yourself, follow these general steps. Specific vehicle models may require additional steps or tools. Refer to your vehicle's service manual for detailed door panel removal and wiring diagrams.
Tools Required:
- Socket wrench set
- Screwdriver set (Phillips and flathead)
- Trim panel removal tool
- Wire strippers/crimpers (if electrical connections are needed)
- Electrical tape or heat shrink tubing
Installation Steps:
- Prepare the Vehicle: Park the vehicle on a level surface, engage the parking brake, and turn off the ignition. Disconnect the negative terminal of the vehicle's battery to prevent electrical hazards.
- Remove Old Mirror (if applicable): Carefully remove the interior door panel to access the mirror mounting bolts and electrical connector. Disconnect the electrical connector and unbolt the old mirror from the door frame.
- Mount New Mirror: Position the Velvac 714565 mirror assembly onto the door frame, aligning the mounting studs with the holes. Secure the mirror with the appropriate nuts or bolts, ensuring a snug fit without overtightening.
- Connect Wiring: Connect the new mirror's electrical harness to the vehicle's existing wiring. Ensure all connections are secure and match the vehicle's wiring diagram. If the mirror includes an automatic folding feature, ensure these wires are correctly connected to the vehicle's electric system (e.g., door lock/unlock signals, ACC power).
- Test Functionality: Before reassembling the door panel, reconnect the vehicle's battery. Test the mirror's functions, including power adjustment (if equipped) and the automatic folding mechanism.
- Reassemble: Once all functions are verified, carefully reattach the interior door panel, ensuring all clips and screws are properly secured.
Operating Instructions
Mirror Adjustment:
Adjust the main mirror glass using the vehicle's interior mirror control switch to achieve optimal rearward visibility. The smaller convex mirror provides a wider field of view to minimize blind spots; it is typically fixed and does not require adjustment.
Automatic Folding Feature:
This mirror system is designed to integrate with your vehicle's existing electrical and security systems for automatic folding functionality:
- Folding: The side mirrors will automatically fold when the car doors are locked or the alarm system is armed. This protects the mirrors from damage in tight spaces or parking.
- Unfolding: The side mirrors will automatically unfold when the car doors are unlocked, or when the ACC (Accessory) power is turned on before igniting the vehicle.
Ensure your vehicle's electrical system is properly configured to support these automatic functions. Consult a professional if the automatic folding feature does not operate as expected after installation.
Maintenance
- Cleaning: Clean the mirror glass and housing regularly with a mild automotive glass cleaner and a soft cloth. Avoid abrasive cleaners or harsh chemicals that could damage the mirror surface or plastic housing.
- Inspection: Periodically inspect the mirror for any signs of damage, loose mounting, or frayed wiring. Address any issues promptly to maintain safety and functionality.
- Moving Parts: If the mirror has manual folding capabilities in addition to automatic, ensure the pivot points are free of debris and operate smoothly. Do not force the mirror if it resists movement.
Troubleshooting
- Mirror Does Not Adjust Electrically:
- Check the vehicle's fuse box for a blown fuse related to mirror power.
- Verify all electrical connections to the mirror are secure and properly seated.
- Ensure the vehicle's ignition is on or in accessory mode.
- Automatic Folding Feature Not Working:
- Confirm that the mirror's folding wires are correctly connected to the vehicle's door lock/unlock or ACC signals.
- Check for any obstructions preventing the mirror from folding or unfolding.
- Consult a professional installer to verify compatibility and correct wiring with your vehicle's specific system.
- Mirror Vibrates Excessively:
- Ensure the mirror is securely mounted to the door frame and all bolts are tightened.
- Inspect the mirror housing and arm for any cracks or damage.
Warranty and Support
For specific warranty information, please refer to the documentation provided with your purchase or contact Velvac customer support directly. Keep your proof of purchase for warranty claims.
For technical assistance or further inquiries, please visit the official Velvac website or contact their customer service department.