
Sunstech XD TH-35 Home Cinema 5.1 Subwoofer System User Manual
Model: TH-XD 35
1. Introduction
This manual provides essential information for the safe and efficient operation of your Sunstech XD TH-35 Home Cinema 5.1 Subwoofer System. Please read this manual thoroughly before using the product and retain it for future reference.
The Sunstech XD TH-35 is a 5.1 channel home cinema system designed to deliver an immersive audio experience for movies, music, and games. It includes a main unit (DVD/CD/DivX player), a subwoofer, and five satellite speakers.
2. Safety Information
WARNING: To reduce the risk of electric shock, do not remove the cover (or back). No user-serviceable parts inside. Refer servicing to qualified service personnel.
- Power Source: Ensure the power supply voltage matches the rating label on the unit.
- Ventilation: Do not block any ventilation openings. Install in accordance with the manufacturer's instructions.
- Water and Moisture: Do not expose this apparatus to rain or moisture. Do not place objects filled with liquids, such as vases, on the apparatus.
- Heat: Do not install near any heat sources such as radiators, heat registers, stoves, or other apparatus (including amplifiers) that produce heat.
- Cleaning: Unplug this apparatus during lightning storms or when unused for long periods of time. Clean only with a dry cloth.
- Servicing: Refer all servicing to qualified service personnel. Servicing is required when the apparatus has been damaged in any way, such as power-supply cord or plug is damaged, liquid has been spilled or objects have fallen into the apparatus, the apparatus has been exposed to rain or moisture, does not operate normally, or has been dropped.
3. Package Contents
Please check that all items listed below are included in your package:
- Main Unit (DVD/CD/DivX Player)
- Subwoofer
- Front Left Satellite Speaker
- Front Right Satellite Speaker
- Center Satellite Speaker
- Rear Left Satellite Speaker
- Rear Right Satellite Speaker
- Remote Control
- Audio/Video Cables
- User Manual (this document)
4. Product Overview
The Sunstech XD TH-35 system comprises a central player unit, a powerful subwoofer, and five compact satellite speakers, along with a remote control for convenient operation.
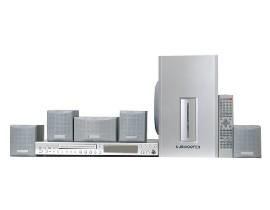
Figure 4.1: Overview of the Sunstech XD TH-35 Home Cinema 5.1 Subwoofer System, showing the main unit, subwoofer, five satellite speakers, and remote control.
4.1 Main Unit (DVD/CD/DivX Player)
This unit serves as the central control hub, featuring disc playback capabilities for CD, DVD, and DivX formats. It includes various input/output ports for connecting to your television and other audio sources.
4.2 Subwoofer
The subwoofer is responsible for reproducing low-frequency sounds, adding depth and impact to your audio experience. It connects directly to the main unit.
4.3 Satellite Speakers
Five satellite speakers (Front Left, Front Right, Center, Rear Left, Rear Right) provide the surround sound experience, distributing audio across your listening area for immersive soundscapes.
4.4 Remote Control
The included remote control allows for convenient adjustment of volume, input selection, playback controls, and other system settings from a distance.
5. Setup
5.1 Speaker Placement
Optimal speaker placement is crucial for achieving the best 5.1 surround sound experience.
- Center Speaker: Place directly above or below your television, centered.
- Front Left/Right Speakers: Position these speakers equidistant from the television, forming an equilateral triangle with your primary listening position.
- Rear Left/Right Speakers: Place these speakers to the sides or slightly behind your primary listening position, at ear level or slightly above.
- Subwoofer: The subwoofer can be placed anywhere in the room, but typically performs well in a corner or near a wall to enhance bass response. Experiment with placement for best results.
5.2 Connecting the Speakers
- Identify the speaker output terminals on the main unit and the corresponding input terminals on each speaker.
- Connect the Front Left speaker to the "FL" terminal, Front Right to "FR", Center to "CEN", Rear Left to "RL", and Rear Right to "RR".
- Connect the subwoofer to the dedicated "SUBWOOFER OUT" port on the main unit.
- Ensure all connections are secure and the correct polarity (+ to + and - to -) is observed for each speaker wire.
5.3 Connecting to a Television/Display
Use the provided audio/video cables to connect the main unit to your television. Common connection types include:
- Composite Video: Connect the yellow video output from the main unit to the yellow video input on your TV.
- Stereo Audio: Connect the red and white audio outputs from the main unit to the corresponding red and white audio inputs on your TV.
- (Note: Depending on your TV and the system's capabilities, other connections like S-Video or Component Video might be available for better picture quality. Refer to your TV's manual for input options.)
5.4 Power Connection
- Once all audio/video and speaker connections are made, plug the main unit's power cord into a wall outlet.
- Turn on the main unit using the power button on the front panel or the remote control.
6. Operating Instructions
6.1 Basic Playback
- Power On: Press the POWER button on the main unit or remote control.
- Insert Disc: Gently insert a CD, DVD, or DivX disc into the disc tray. The tray will automatically close, and playback should begin.
- Select Input: If the system does not automatically switch to disc playback, press the INPUT or SOURCE button on the remote to select the correct input.
- Volume Control: Use the VOL + and VOL - buttons on the remote to adjust the master volume.
- Playback Controls: Use PLAY, PAUSE, STOP, SKIP, and FAST FORWARD/REWIND buttons for disc navigation.
6.2 Audio Settings
Access the system's on-screen menu (usually by pressing SETUP or MENU on the remote) to adjust audio settings such as:
- Speaker Levels: Adjust the individual volume levels for each speaker (Front, Center, Rear, Subwoofer) to balance the sound.
- Delay Settings: Compensate for different distances of speakers from the listening position.
- Sound Modes: Select from various preset sound modes (e.g., Movie, Music, Game) or customize equalizer settings.
6.3 Remote Control Functions
The remote control provides full functionality for the system. Familiarize yourself with the button layout for easy operation.
(Note: A detailed diagram of the remote control with button descriptions would typically be included here in a physical manual.)
7. Maintenance
7.1 Cleaning the Unit
To maintain the appearance and performance of your system:
- Exterior: Wipe the exterior surfaces with a soft, dry cloth. Do not use abrasive cleaners, waxes, or solvents.
- Disc Tray: Keep the disc tray clean and free of dust. Avoid touching the lens inside the disc tray.
- Ventilation: Ensure ventilation openings are clear of dust and debris to prevent overheating.
7.2 Disc Care
Handle discs by their edges. Store discs in their cases when not in use to prevent scratches and dust accumulation. Clean discs with a soft, lint-free cloth, wiping from the center outwards.
7.3 Remote Control Batteries
If the remote control's range decreases or it becomes unresponsive, replace the batteries with new ones of the specified type (e.g., AAA). Ensure correct polarity when inserting new batteries.
8. Troubleshooting
If you encounter problems with your system, refer to the following table for common issues and solutions.
| Problem | Possible Cause | Solution |
|---|---|---|
| No power | Power cord not connected; Power outlet faulty | Check power cord connection; Try a different outlet |
| No sound | Volume too low; Incorrect input selected; Speaker wires loose/incorrectly connected | Increase volume; Select correct input; Check all speaker connections and polarity |
| No picture | Video cable loose/incorrectly connected; Incorrect TV input selected | Check video cable connections; Select correct input on TV |
| Disc not playing | Disc inserted incorrectly; Disc is dirty or scratched; Disc format not supported | Re-insert disc correctly; Clean or replace disc; Check disc compatibility (CD, DVD, DivX) |
| Remote control not working | Batteries depleted or inserted incorrectly; Obstruction between remote and unit | Replace batteries, check polarity; Remove obstructions; Ensure remote is pointed at the unit's sensor |
If the problem persists after trying these solutions, please contact Sunstech customer support or a qualified service technician.
9. Specifications
| Feature | Detail |
|---|---|
| Model Name | TH-XD 35 |
| Brand | Sunstech |
| Surround Sound Configuration | 5.1 (5 Speakers + 1 Subwoofer) |
| Wattage | 170 watts |
| Supported Media Types | CD, DVD, DivX |
| ASIN | B0044ALAEM |
| First Available Date | February 21, 2020 |
10. Warranty and Support
For warranty information and customer support, please refer to the warranty card included with your product or visit the official Sunstech website. Keep your proof of purchase for warranty claims.
Online Support: www.sunstech.com/support (This is a placeholder link, please replace with the actual support URL if available)
Contact: Refer to your regional Sunstech contact information for service inquiries.