1. Important Safety Instructions
Please read these safety instructions carefully before using your Neewer Studio Strobe Flash Light. Failure to follow these instructions may result in electric shock, fire, or serious injury.
- Electrical Safety: Always ensure the power supply voltage matches the specifications of the strobe (AC100-120V 60HZ). Do not operate with wet hands or in damp environments. Disconnect power before cleaning or servicing.
- Heat Warning: The flash tube and modeling lamp generate significant heat during operation. Allow the unit to cool down before handling or storing. Do not cover the ventilation openings.
- Eye Protection: Avoid looking directly into the flash when it fires, as it can cause temporary vision impairment.
- Ventilation: Ensure adequate ventilation around the strobe to prevent overheating.
- Handling: Handle the flash tube and modeling lamp with care. Do not touch the glass parts directly with bare hands, as oils can reduce their lifespan.
- Children and Pets: Keep the unit out of reach of children and pets.
2. Product Overview
The Neewer C-250 / 250DI is a 250 Watt studio strobe flash light designed for professional photography. It features adjustable flash output, a modeling lamp, and multiple triggering options.
2.1 Package Contents
- Neewer C-250 / 250DI Studio Strobe Unit
- Power Cord
- Sync Cord
- Modeling Lamp (pre-installed or separate)
- Flash Tube (pre-installed)

Figure 2.1: The Neewer C-250 studio strobe flash unit accompanied by its power cable and sync cable.
2.2 Component Identification (Back Panel)
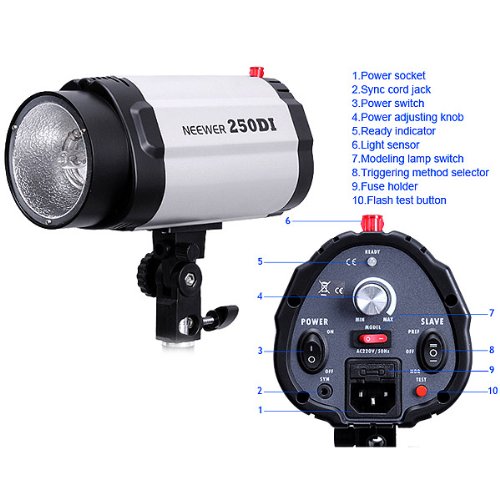
Figure 2.2: Detailed diagram illustrating the back panel controls and ports of the Neewer 250DI studio strobe.
- Power Socket: Connects to the main power supply.
- Sync Cord Jack: For connecting a PC sync cable from your camera or trigger.
- Power Switch: Turns the unit ON or OFF.
- Power Adjusting Knob: Controls the flash output power (stepless adjustment).
- Ready Indicator: Illuminates when the flash is fully charged and ready to fire.
- Light Sensor: Detects other flashes for optical slave triggering.
- Modeling Lamp Switch: Controls the modeling lamp (ON/OFF/Proportional).
- Triggering Method Selector: Selects between normal (sync cord) and slave (optical) modes.
- Fuse Holder: Contains the protective fuse.
- Flash Test Button: Manually fires the flash for testing.
3. Setup
3.1 Mounting the Strobe
The strobe unit is designed to be mounted on a standard light stand. The integrated mounting bracket allows for tilt adjustment.
- Attach the strobe's mounting bracket to the top stud of your light stand.
- Tighten the locking knob on the bracket to secure the strobe in place.
- Adjust the tilt angle of the strobe as needed and tighten the tilt locking knob.

Figure 3.1: The Neewer C-250 studio strobe flash unit securely mounted on a light stand.
3.2 Connecting Power
- Ensure the strobe's power switch (3) is in the "OFF" position.
- Connect the power cord to the power socket (1) on the back of the strobe.
- Plug the other end of the power cord into a suitable AC power outlet (AC100-120V 60HZ).
3.3 Connecting Sync Cord (Optional)
If you are using a wired trigger or camera with a PC sync port:
- Connect one end of the sync cord to the Sync Cord Jack (2) on the strobe.
- Connect the other end of the sync cord to your camera's PC sync port or a compatible trigger.
4. Operating Instructions
4.1 Powering On and Initializing
- After connecting power, switch the Power Switch (3) to the "ON" position.
- The strobe will begin charging. The Ready Indicator (5) will illuminate when the unit is fully charged and ready to fire.
4.2 Adjusting Flash Output
Rotate the Power Adjusting Knob (4) to increase or decrease the flash output power. The adjustment is stepless, allowing for fine control over light intensity.
4.3 Using the Modeling Lamp
The modeling lamp provides continuous light to help visualize the lighting setup before firing the flash.
- Use the Modeling Lamp Switch (7) to control its operation.
- Options typically include:
- ON: Modeling lamp is continuously on at full brightness.
- OFF: Modeling lamp is off.
- PROP (Proportional): Modeling lamp brightness adjusts proportionally to the flash output setting.
4.4 Triggering Methods
The strobe offers multiple ways to trigger the flash:
- Sync Cord: Connect a PC sync cord from your camera or trigger to the Sync Cord Jack (2). Ensure the Triggering Method Selector (8) is set to "NOR" (Normal).
- Optical Slave: The built-in Light Sensor (6) detects another flash (e.g., from your camera's pop-up flash or another strobe) and triggers the unit simultaneously. Set the Triggering Method Selector (8) to "SLAVE".
- Flash Test Button: Press the Flash Test Button (10) to manually fire the flash for testing purposes.
5. Maintenance
5.1 Cleaning
- Always disconnect the power cord before cleaning.
- Use a soft, dry cloth to wipe the exterior of the unit.
- For the flash tube and modeling lamp, use a clean, lint-free cloth, preferably with a small amount of isopropyl alcohol, to remove any fingerprints or dust. Avoid touching the glass directly with bare hands.
- Do not use abrasive cleaners or solvents.
5.2 Storage
Store the strobe in a cool, dry place, away from direct sunlight and excessive humidity. Protect it from dust and physical impact.
6. Troubleshooting
| Problem | Possible Cause | Solution |
|---|---|---|
| Strobe does not power on. | No power supply; Power cord loose; Blown fuse. | Check power outlet; Ensure power cord is securely connected; Check and replace fuse (refer to Fuse Holder (9) in Figure 2.2). |
| Strobe does not fire. | Not fully charged; Incorrect triggering method; Sync cord not connected or faulty; Light sensor obstructed (in slave mode). | Wait for Ready Indicator (5) to illuminate; Verify Triggering Method Selector (8) setting; Check sync cord connection; Ensure Light Sensor (6) is clear and facing the trigger flash. |
| Inconsistent flash output. | Power fluctuations; Unit overheating; Faulty flash tube. | Ensure stable power supply; Allow unit to cool down; Contact support for flash tube replacement. |
| Modeling lamp not working. | Modeling Lamp Switch (7) is OFF; Burnt out modeling lamp. | Set Modeling Lamp Switch (7) to ON or PROP; Replace modeling lamp if burnt out. |
7. Specifications
| Feature | Detail |
|---|---|
| Model | C-250 / 250DI (Internal Model: 10000114@@4) |
| Flash Output | 250WS |
| Guide Number (ISO100) | 48 |
| Color Temperature | 5400±200K |
| Power Voltage | AC100-120V 60HZ |
| Flash Power Control | Stepless adjustment |
| Wattage | 250 Watts |
| Special Features | Energy Efficient |
| Item Weight | 1.7 kg (1 kg 700 g) |
| Mounting Type | Freestanding |
| Wireless Communication Technology | Optical Pulse |
8. Warranty and Support
For warranty information, technical support, or service inquiries, please contact your retailer or the manufacturer directly. Keep your purchase receipt as proof of purchase.
Manufacturer: NEEWER®


